| Advertisement |
|
|
|
|
|
|
|
If this is your first visit, be sure to check out the FAQ by clicking the link above.
You may have to register before you can post: click the register link above to proceed.
To start viewing messages, select the forum that you want to visit from the selection below.
|
 02-06-2016, 10:08 PM
|
#1
|
Name: Tate
Title: What?
Status: Not Here
Join Date: Nov 2007
Location: Airdrie, Alberta
Member`s Gallery
Posts: 3,419
|
4-Link and Air Ride
I've got about 250 pictures of my build, but I'll try to post the relevant ones. Feel free to cruise through the album.
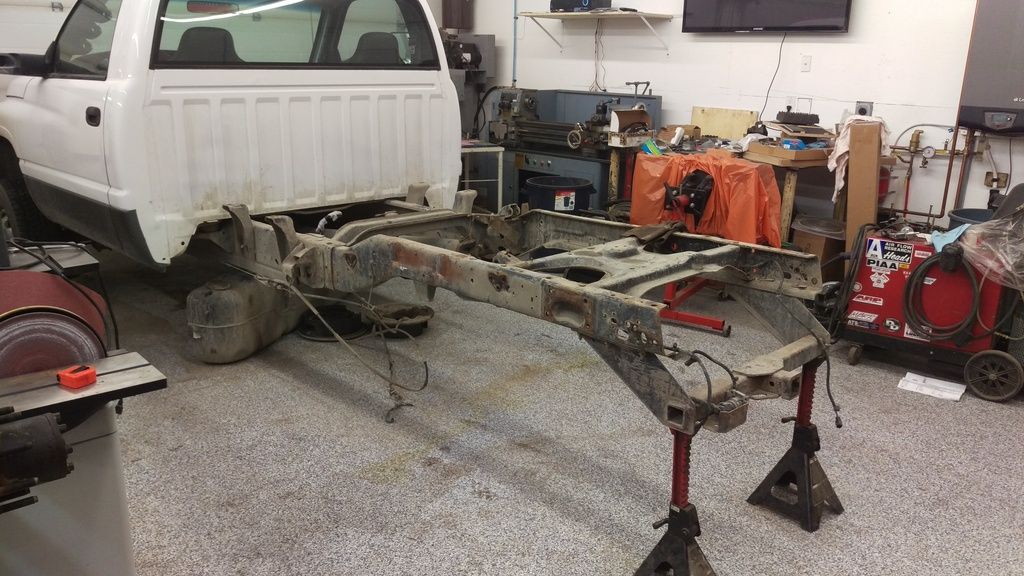
I had a Carli Performance 2.0 suspension setup on my '98 12v. It really wasn't much better than stock, and I lost a lot of payload capacity because it removes the overload. Couple that with the lifted front end, any time I had a load in it, I was looking to the sky and it became old quick. So I started coming up with plans for air ride and a rear four link.
The bags I went with in front were W013585426.pdf and rear W013585439.pdf
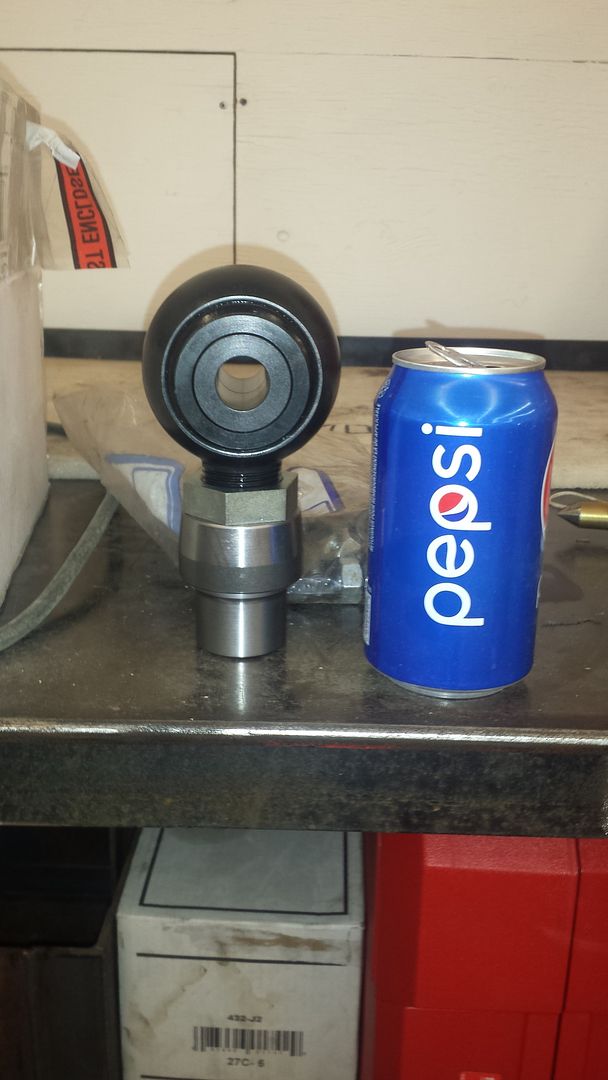
I went with EMF bushing ends. Totally overkill, but they are second to none, and are about 20 minutes away from me.
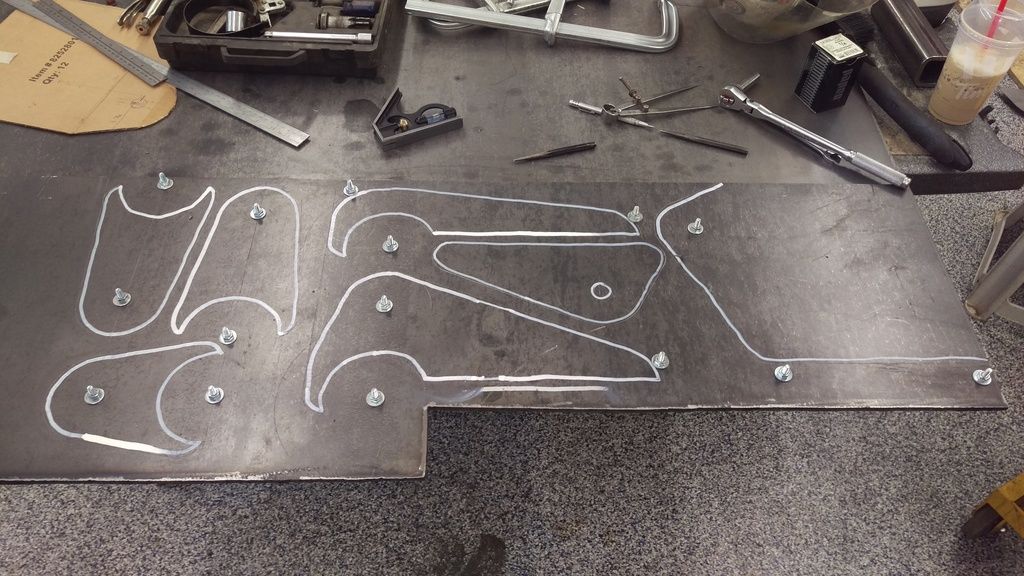
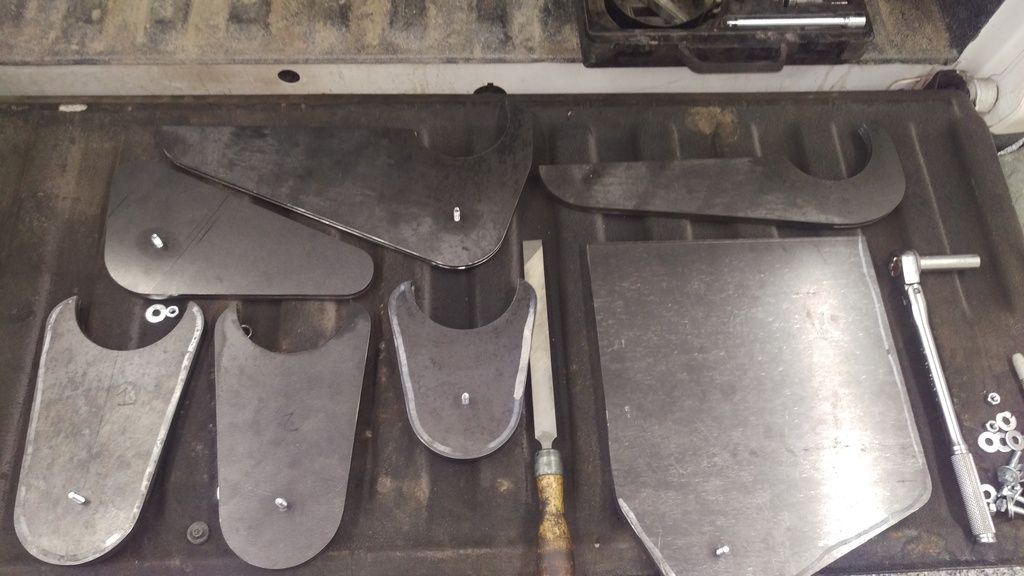
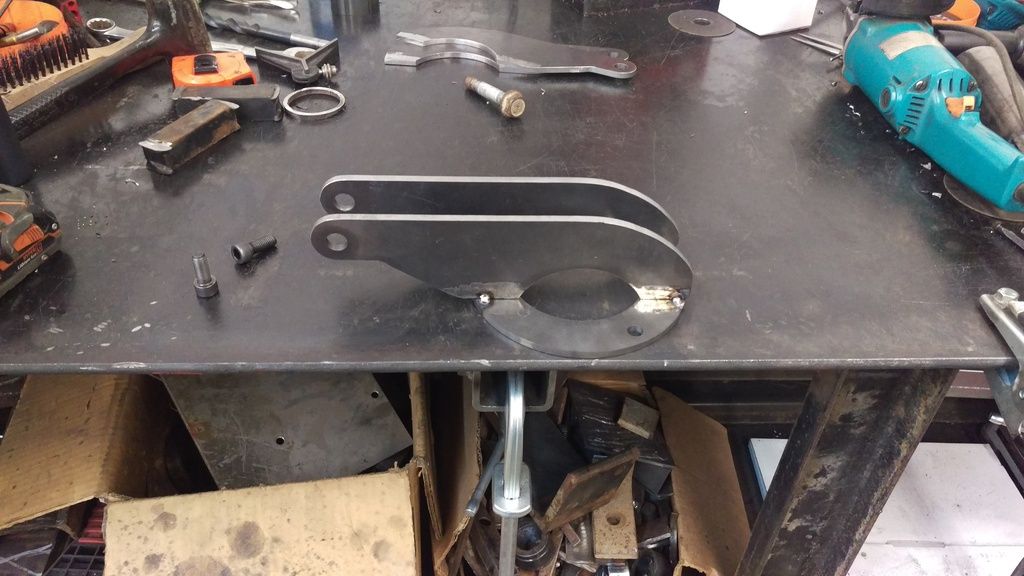
I drew up the the link brackets and played with the numbers in the 3-link and 4 link calculator. Once I was happy with that, I picked up a 4x8 sheet of 1/4" mild steel. I had to make two of everything, so I cut the plate into an appropriate shape and doubled it up. Laid out the shapes, and drilled all the holes for the link ends or axle centers to 1/4" and bolted it together.
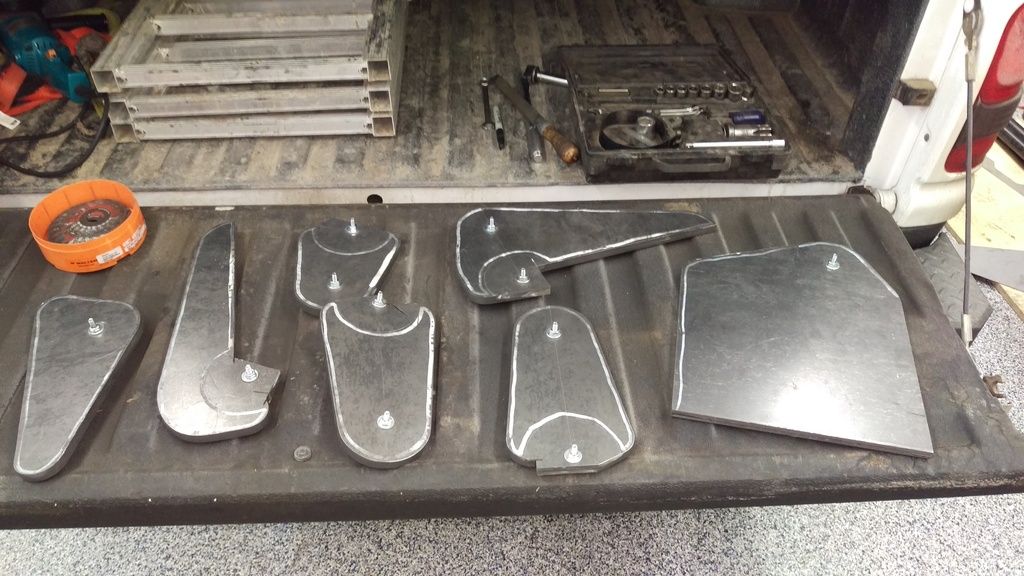
Everything I cut out was with zipcut and smoothed out with a belt sander. This is after the brackets are cut and sanded, just need to cut out the centers for the axle tube.
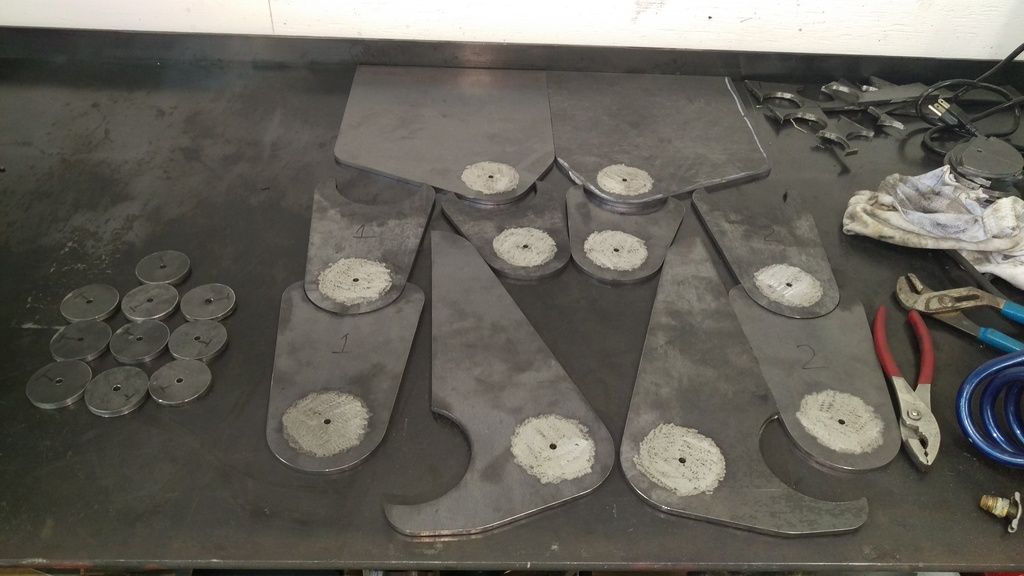
Four inch hole saw. 1/4" pilot bit lines up in the holes I used to bolt the plates together.
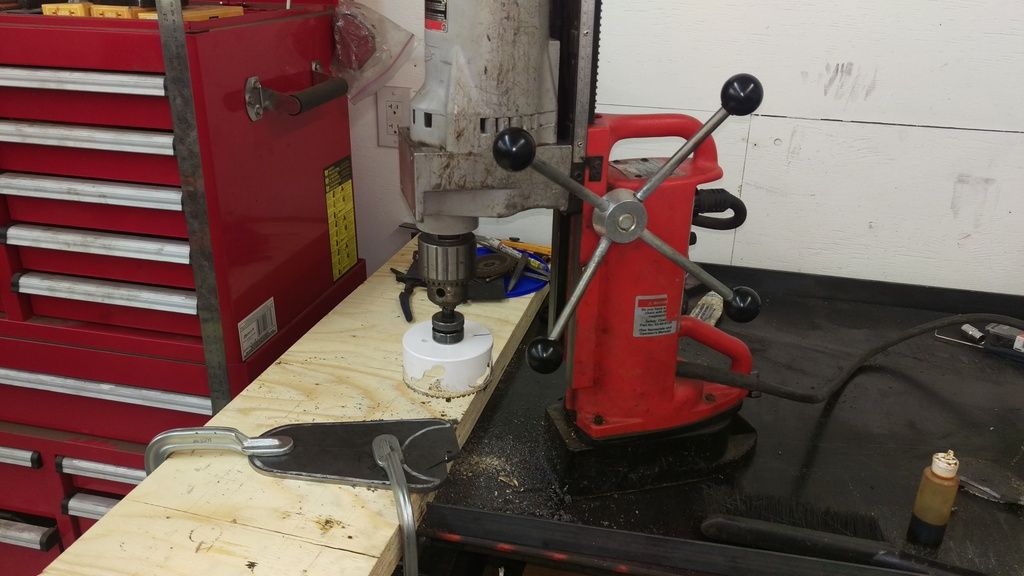
Cut out.
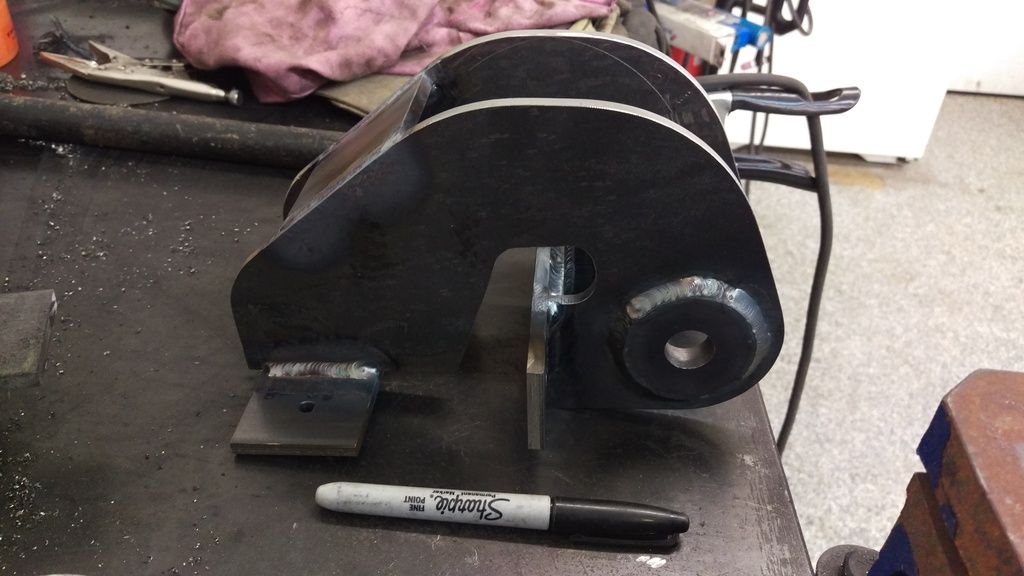
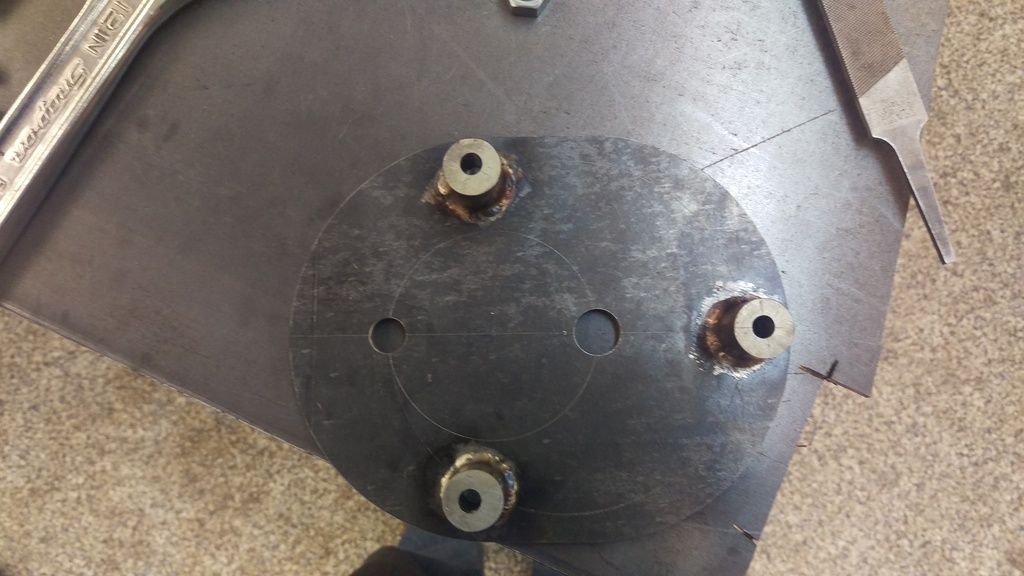
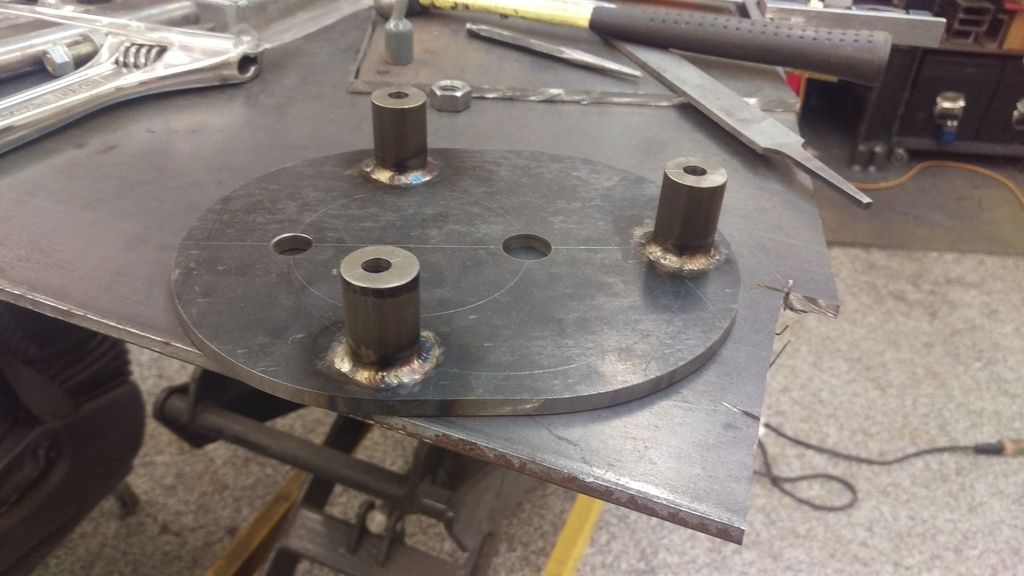
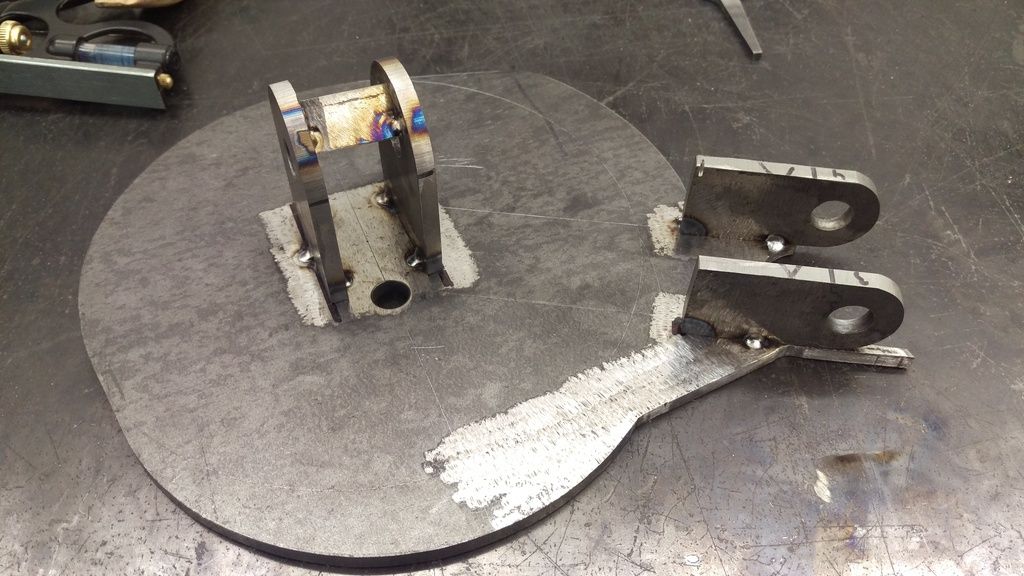
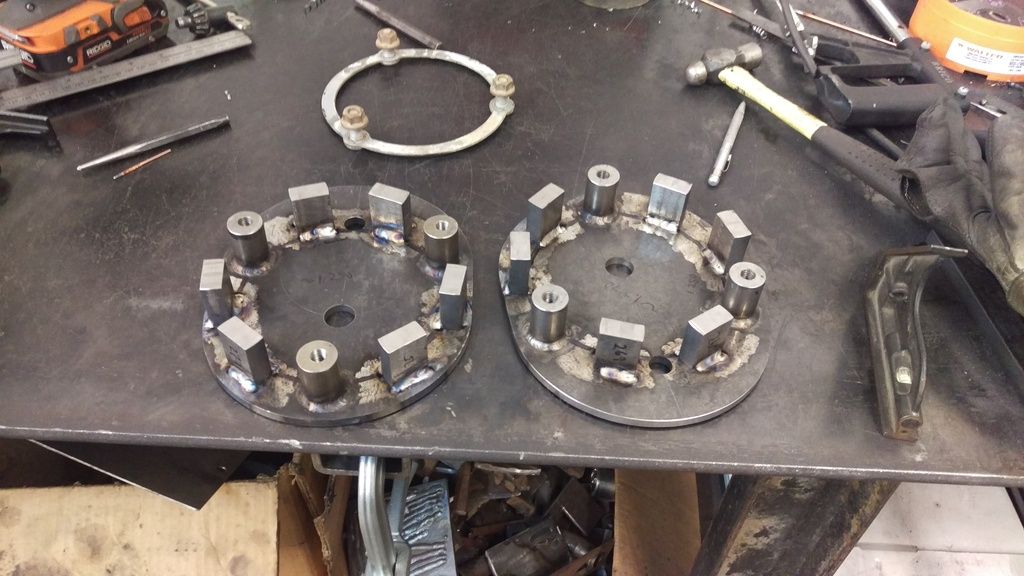
I cut out 2" OD bushings to add a bit more bearing surface on the link bolts. This is prepped for welding. Everything with 1/4" center holes, so just bolt them together and burn them in.
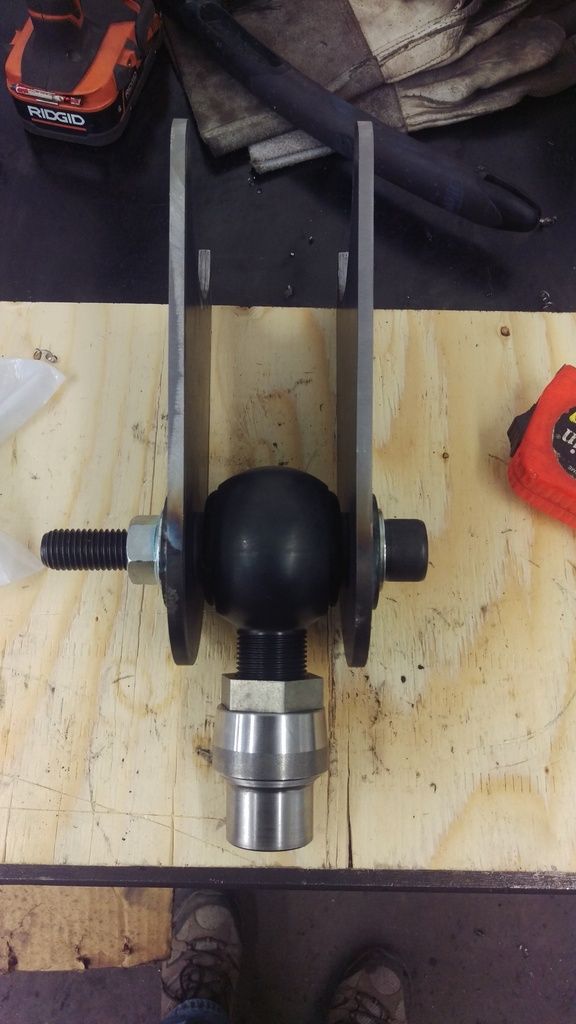
Test fitting the link ends. 1-1/4" shank, 3/4" socket head cap screws. The bolts I picked have a shank that is just a hair longer than the total distance through the brackets and the link end. So I'll have to add a couple washers to ensure the bolt tightens against the brackets and not the shank. I wanted to make sure there was enough surface on the brackets, and not wearing on the threads.
__________________
'98 3500 2wd, 24v, 5 spd, p-pumped
'98 2500 4wd, 12v, 6 spd, VP'd 
'02 VW Jetta, 5 spd.
My p-pump conversion pics
|
|
|
|
|
02-06-2016, 10:18 PM
|
#2
|
Name: jimbo486
Title: Too Much Time
Status: Not Here
Join Date: Jan 2010
Location: Orange County, CA
Member`s Gallery
Posts: 1,617
|
Looks good so far.
Watching.
__________________
1990 Dodge D350
Giles' 12mm VE - Airdog II 165 - 370s @ 75lpm - BW S362fmw/68/12 - Hamilton 182/214 - '01 NV5600
|
|
|
|
|
02-06-2016, 10:24 PM
|
#3
|
Name: Tate
Title: What?
Status: Not Here
Join Date: Nov 2007
Location: Airdrie, Alberta
Member`s Gallery
Posts: 3,419
|
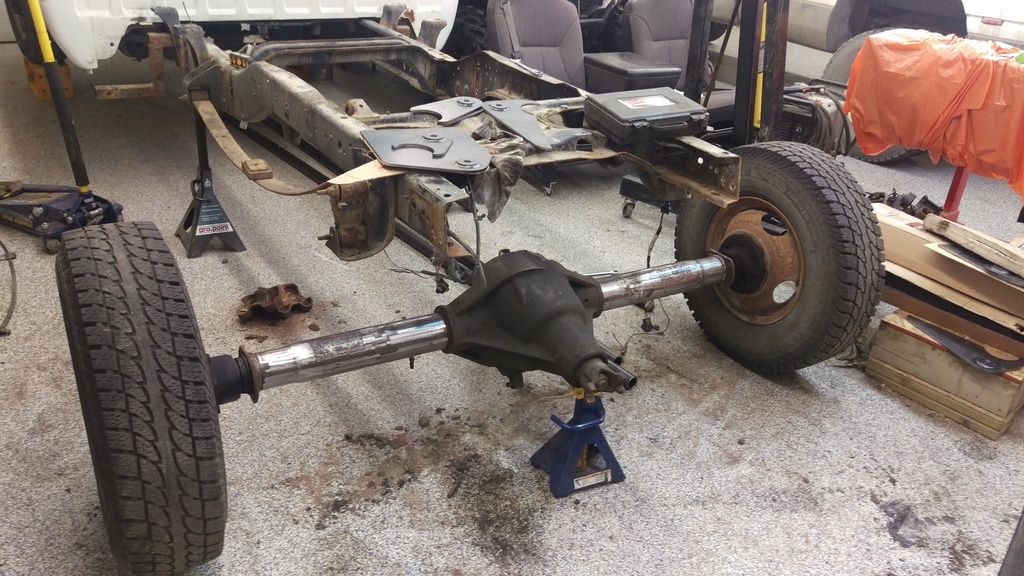
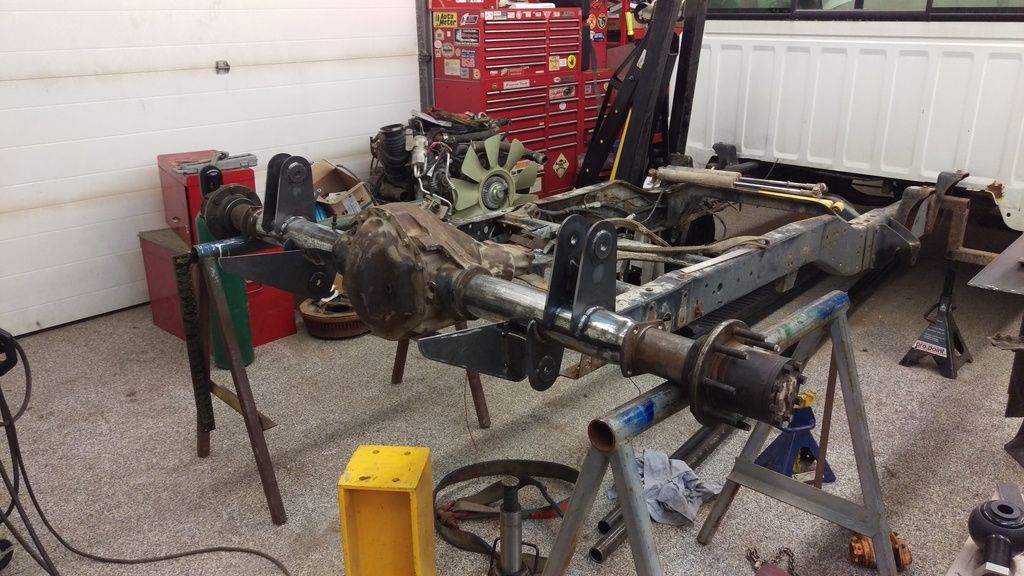
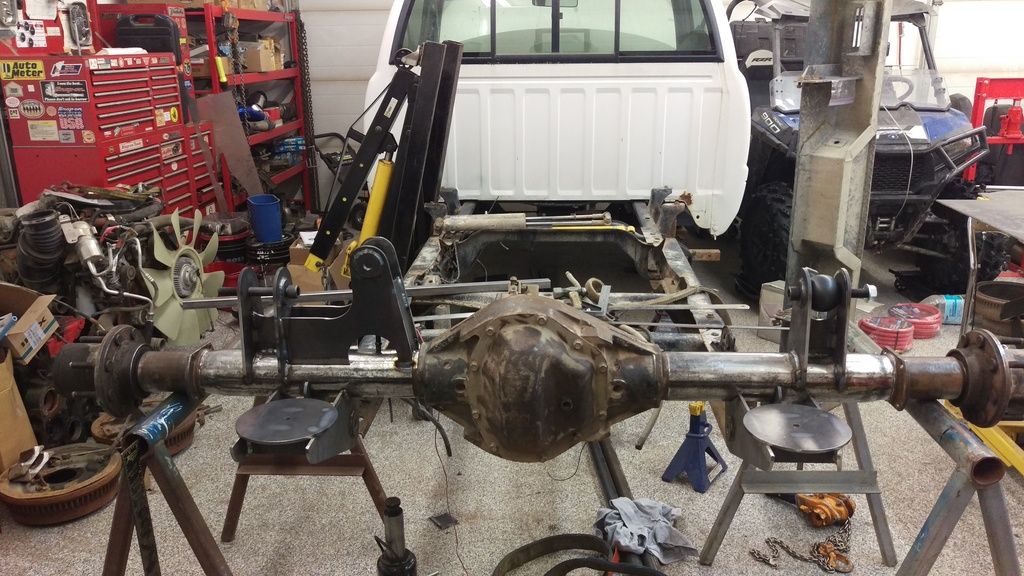
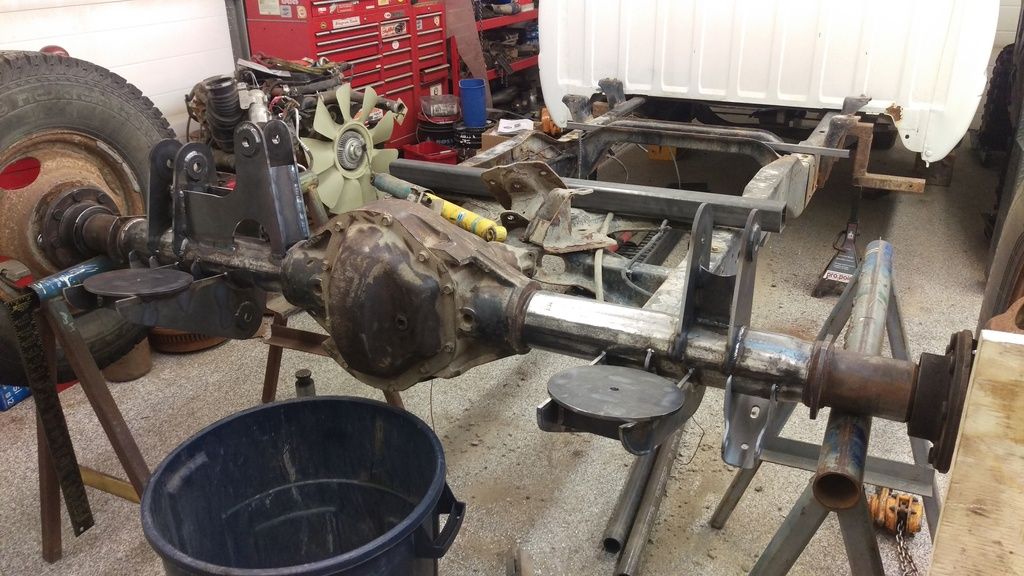
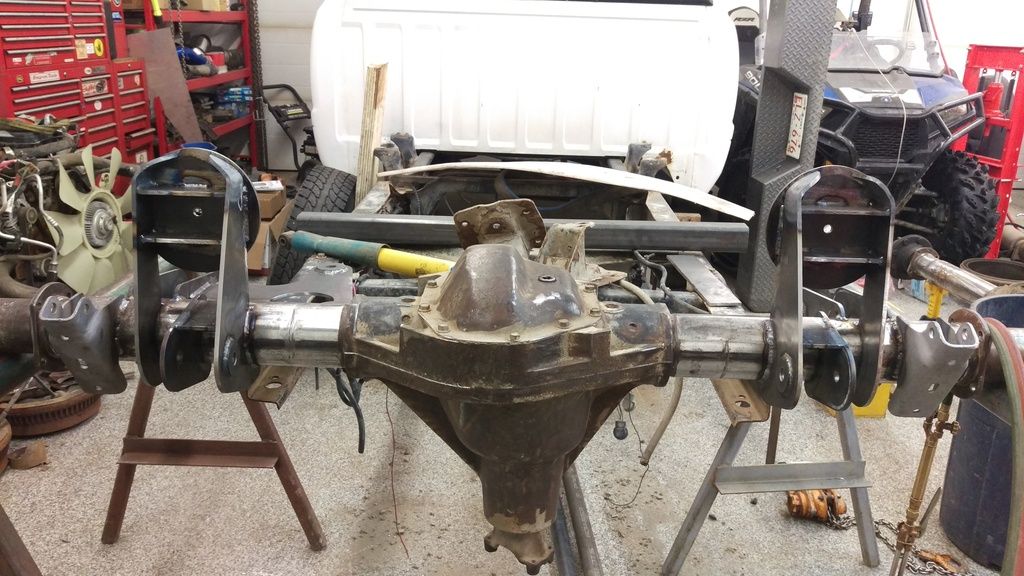
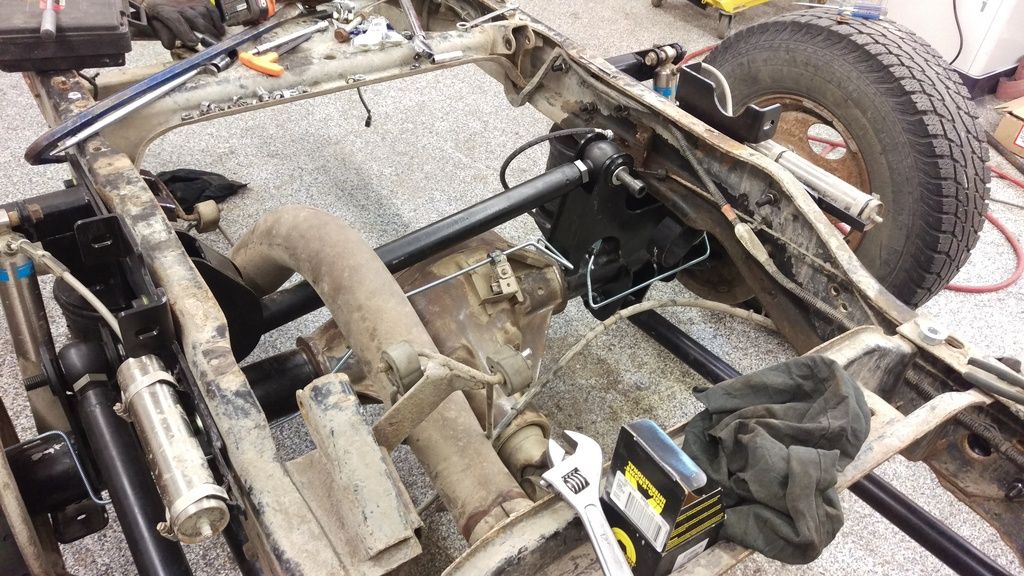
I'm using a spare D80 SRW and a '96 2500 LD 2WD to do all the mockup to make sure I'm happy with how it moves. Here is the diff all cleaned up.
Tacking the axle link mounts in place. The axle is rotated upside down currently. One of the lower links is also the one half of the bag mount.
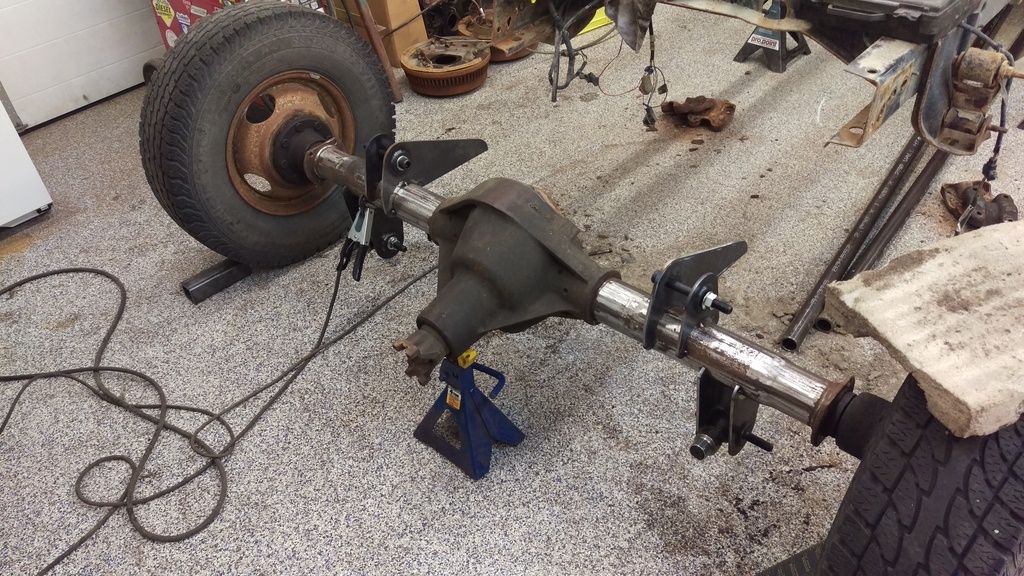
I'm using the front spring perches for the upper link bracket, and the lower mount is underneath the frame rail. This is looking down the frame for a rough alignment.
Another angle. You can see how the bag mount is gonna be, although it was tweaked slightly in the final build.

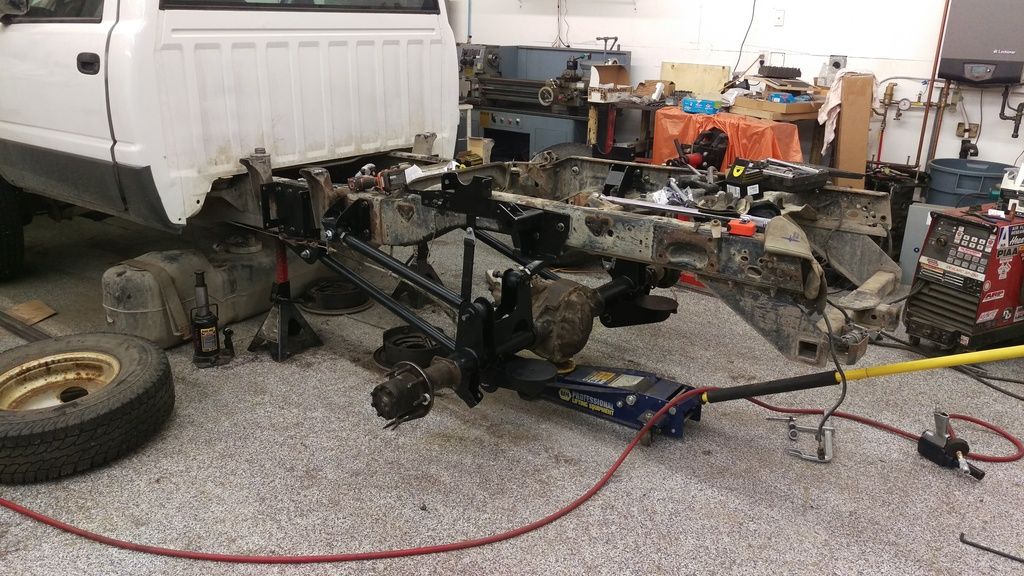
Using 2" ABS plastic for the link tubing here. The lower bracket hangs down low here as the HD frame is 2.5" taller than the LD frame. Come-alongs are to keep the weight of the pinion from pulling the lower links apart.
Bolt heads just clear the frame. Since its going on a 4wd, it'll never actually travel this high and has plenty of clearance.
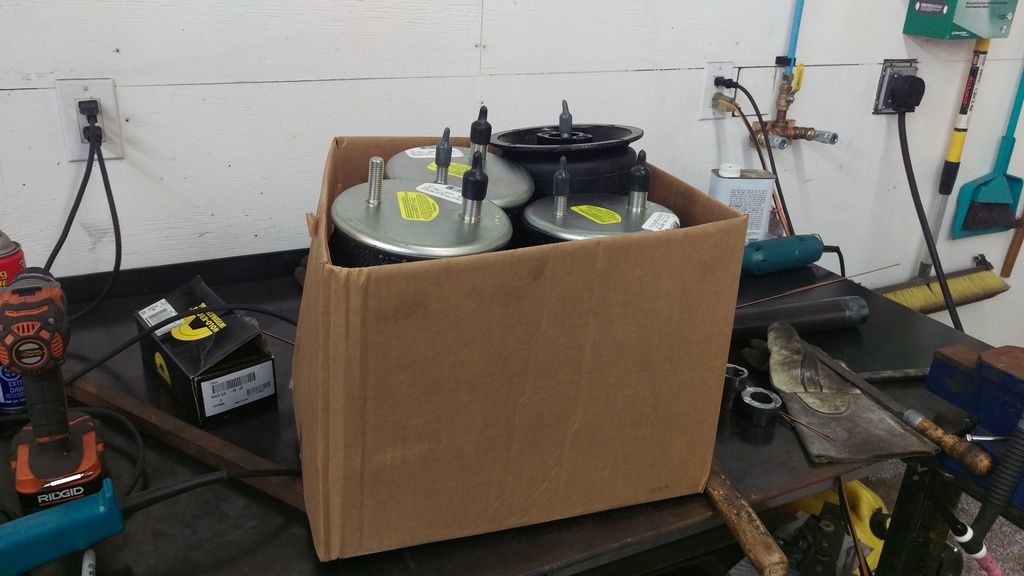
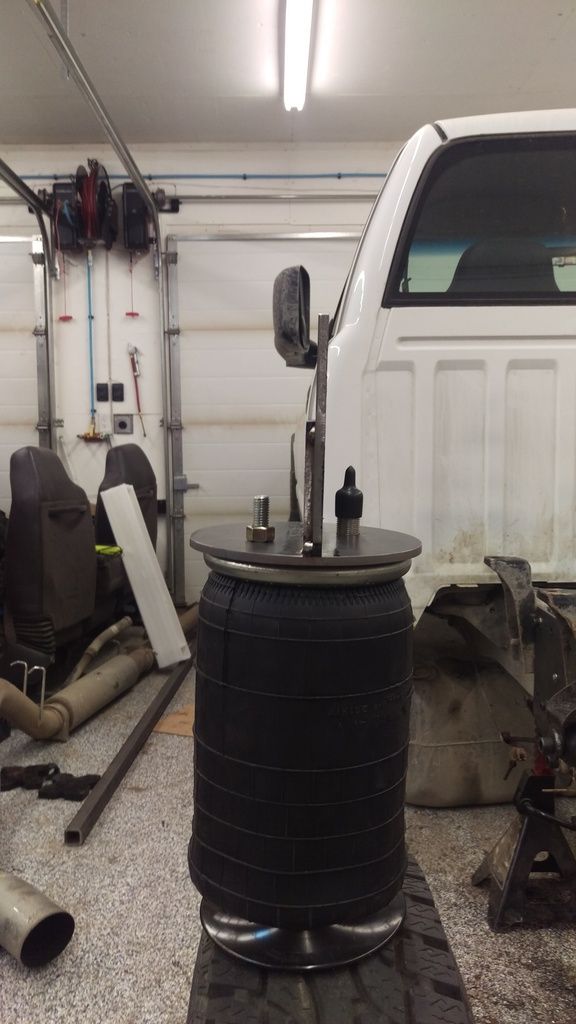
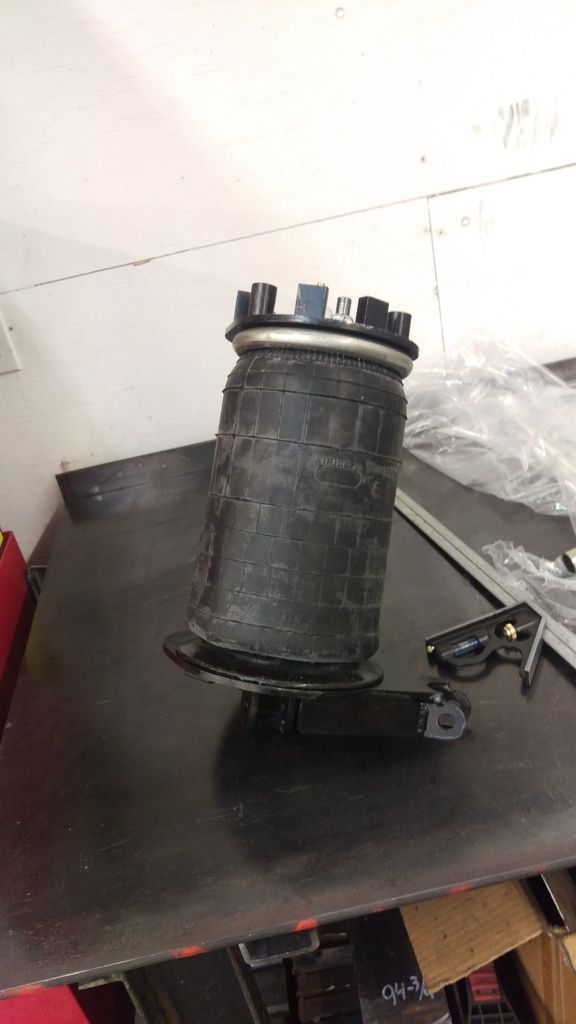
My bags arrive. The top has a 3/4NF stud that is tapped to 1/4" NPT. Other stud is 1/2NC.
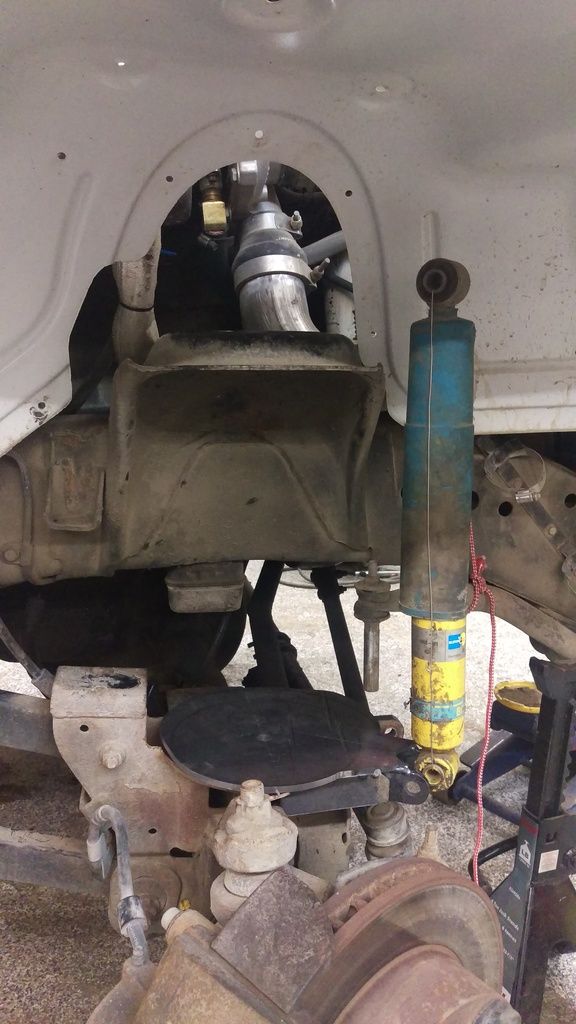
Mocking up rear bag and shock position. The springs are slightly more inboard than the stock leaf springs, but the shocks will be as far out as they can get. I'll be reusing the Bilstein 7100's that came with the Carli kit. These are the rear shocks off of my old 2wd.
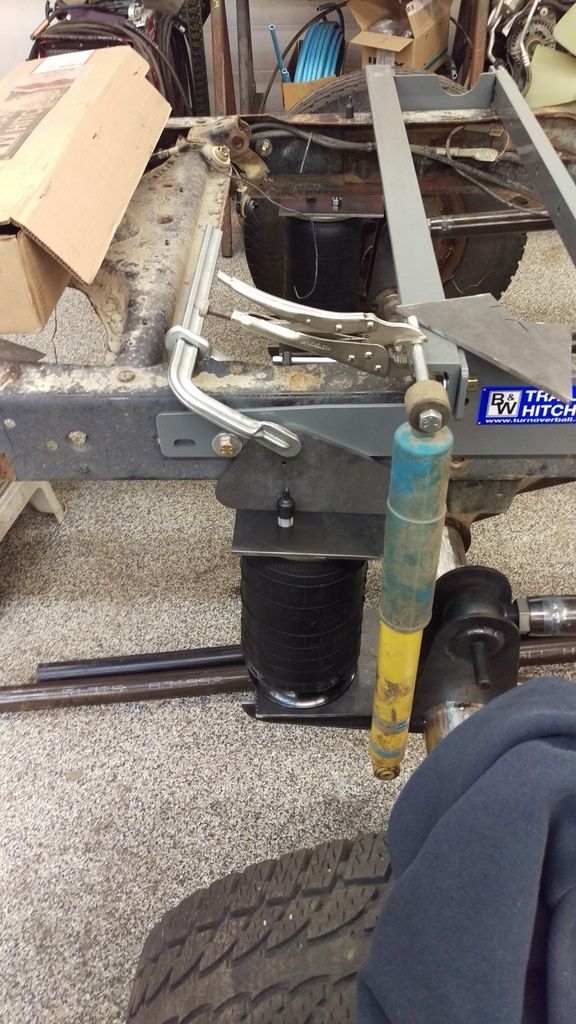
Getting a rough idea of panhard bar location.
__________________
'98 3500 2wd, 24v, 5 spd, p-pumped
'98 2500 4wd, 12v, 6 spd, VP'd
'02 VW Jetta, 5 spd.
My p-pump conversion pics
|
|
|
|
|
02-06-2016, 10:37 PM
|
#4
|
Name: Tate
Title: What?
Status: Not Here
Join Date: Nov 2007
Location: Airdrie, Alberta
Member`s Gallery
Posts: 3,419
|
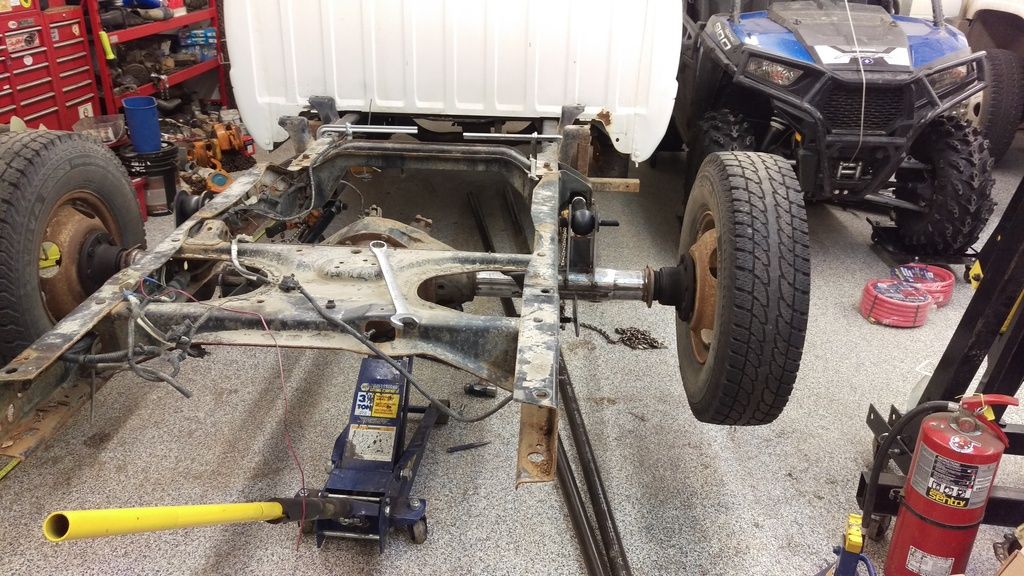
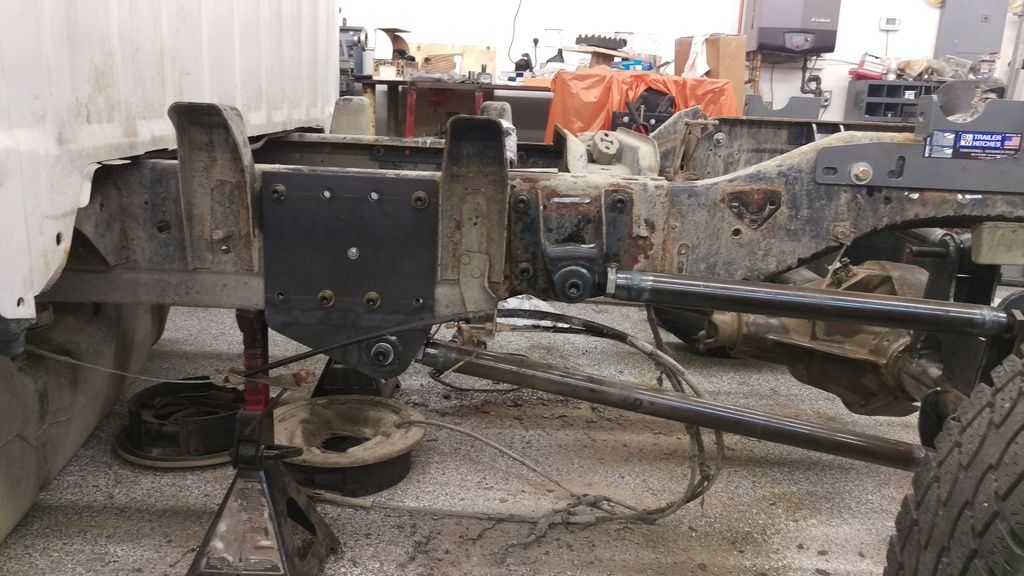
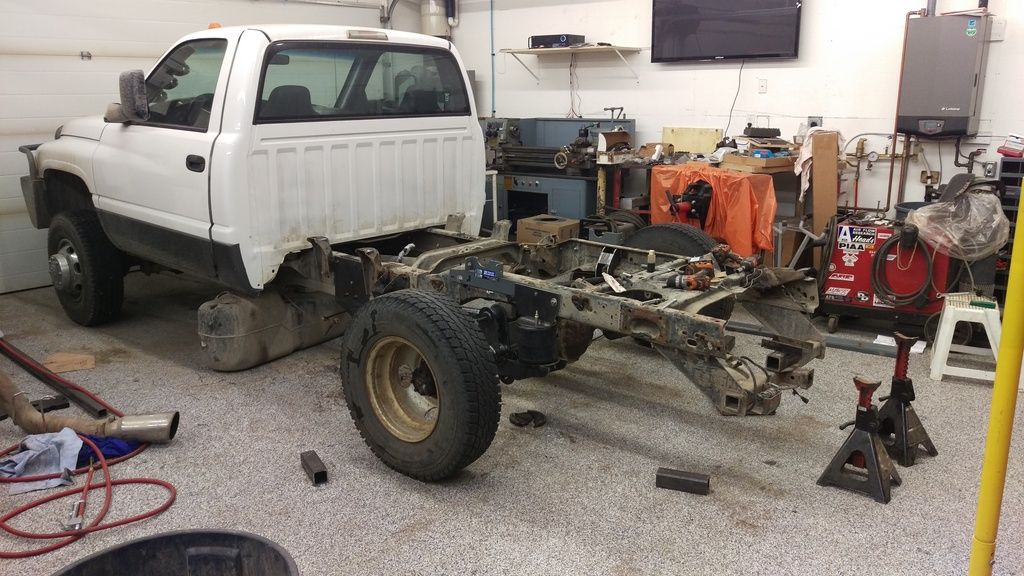
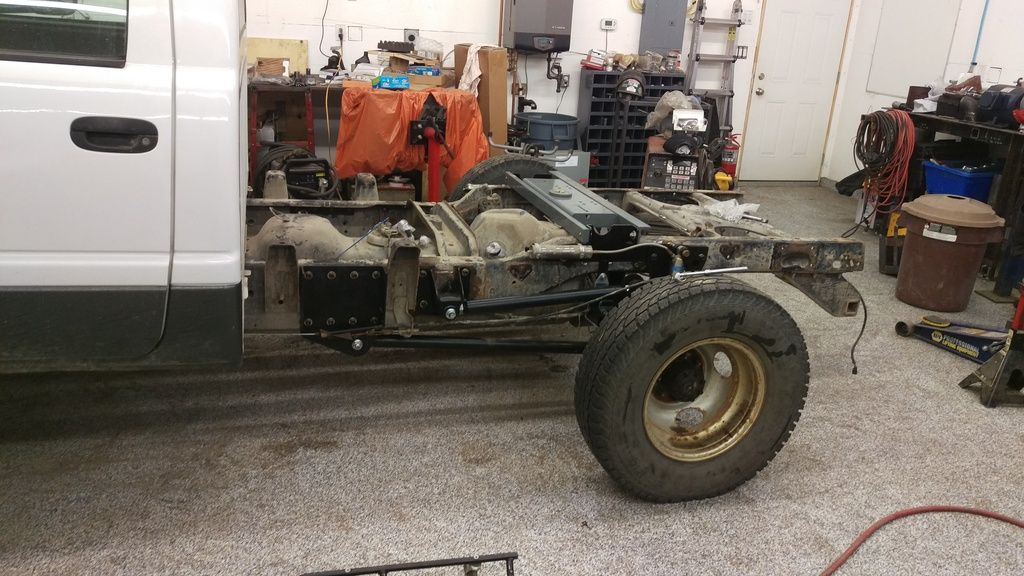
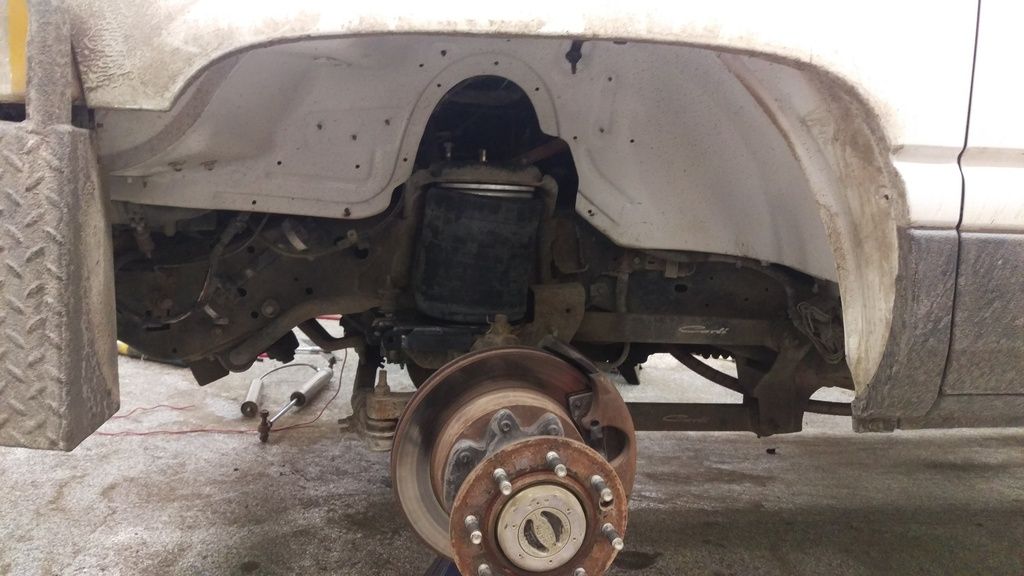
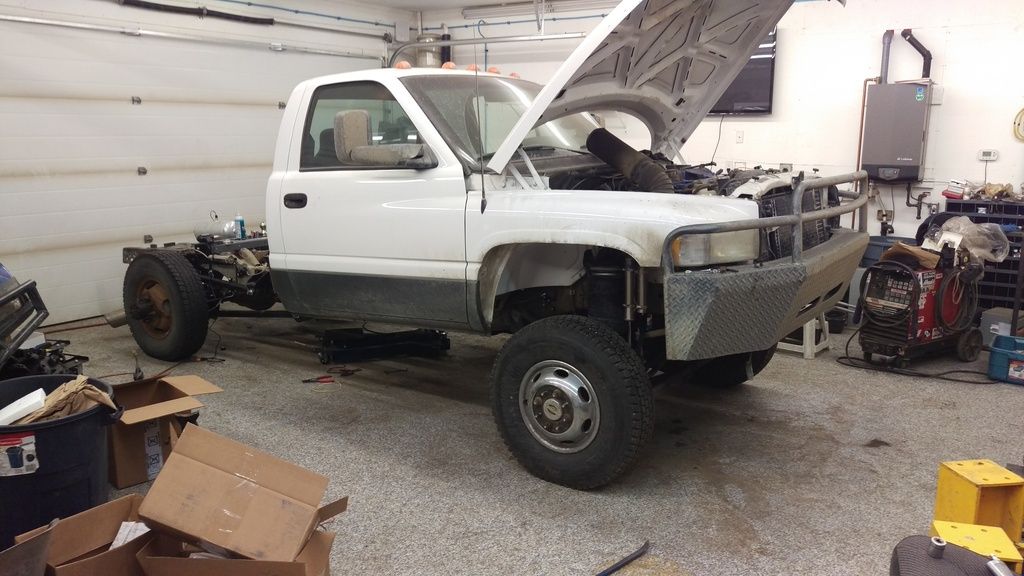
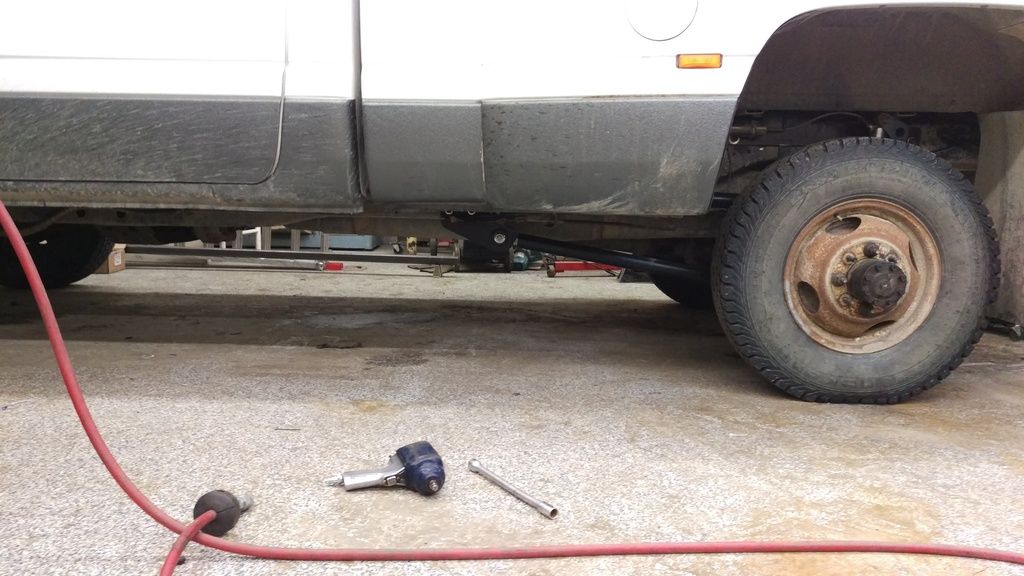
Got the bed off on the '98 and starting disassembly. Even though the truck is a 2500, I like training wheels.
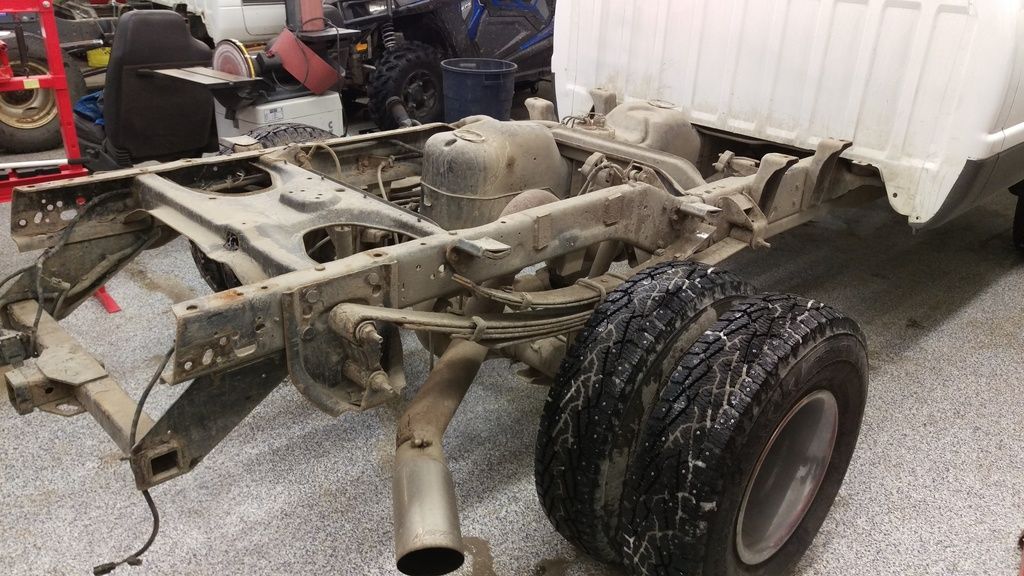
Everything off the rear that I don't need. Fuel tank dropped out of the way is a huge working improvement. This is the day after a 1600km mountain trip, and luckily the truck had less than an 1/8th of a tank left in it.
ABS plastic panhard bar, checking range of motion. Over 11 inches of vertical travel, I get about 3/8" lateral travel. 2" above and below ride height, its only about .040"
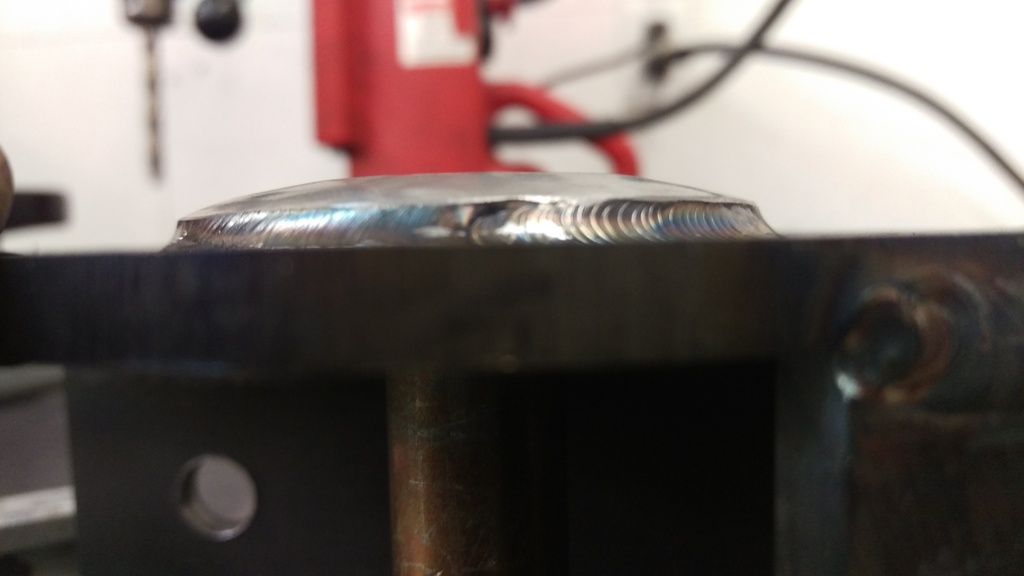
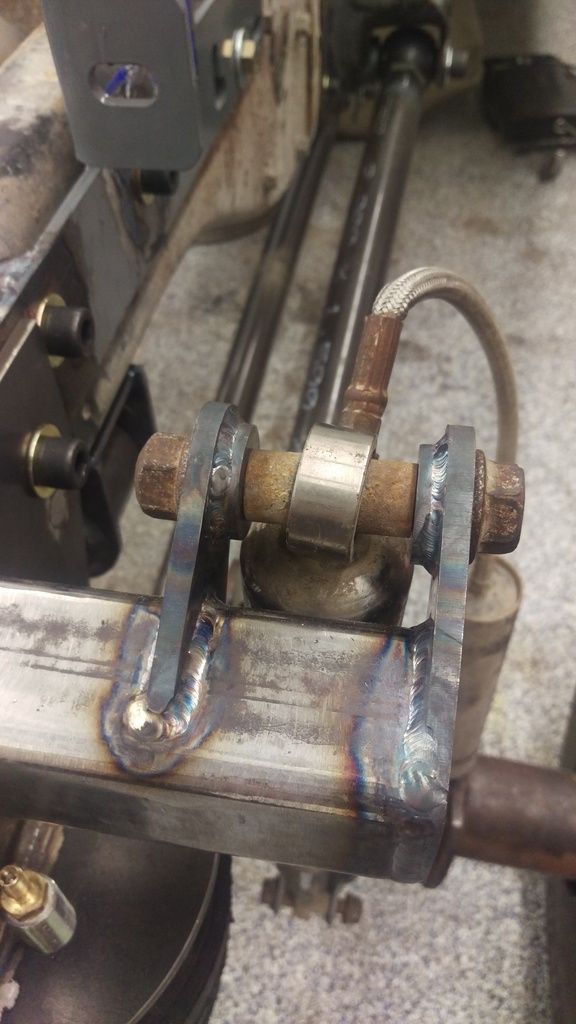
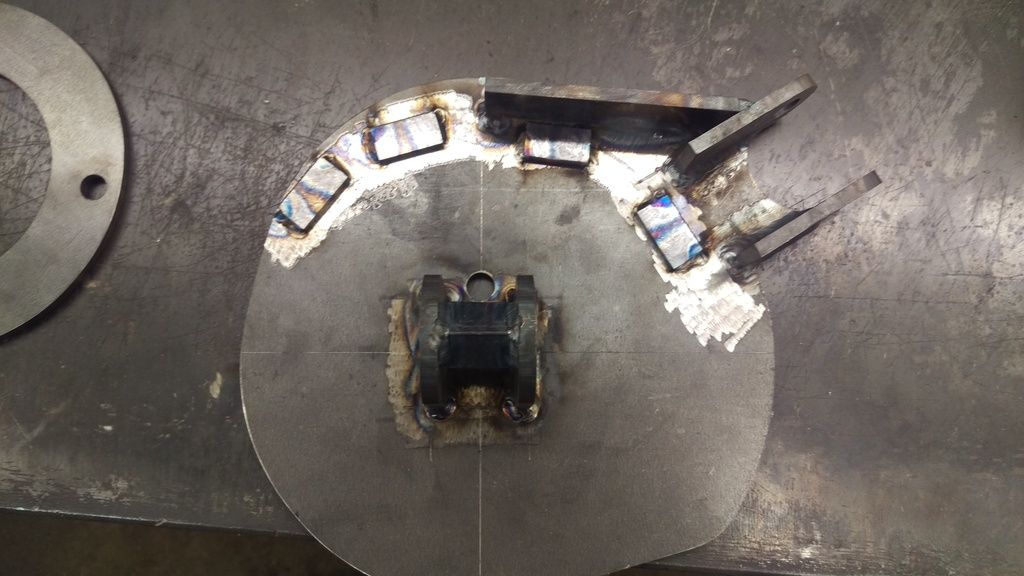
Welding the axle end link brackets in final.
Probably one of my prettiest welds. Not bad for just learning off of Youtube, I think. I TIG welded everything in this build, so I'm trusting that I did a good enough job on it.
Lower bag mounts and gussets.

Panhard bar bracket tacked in, and the lower bag mount plate partially welded in.
Upper bag mount. The mount buts up against the gooseneck frame plates. There will be a second plate that is welded to the mount and then will bolt through the hitch plates and frame.
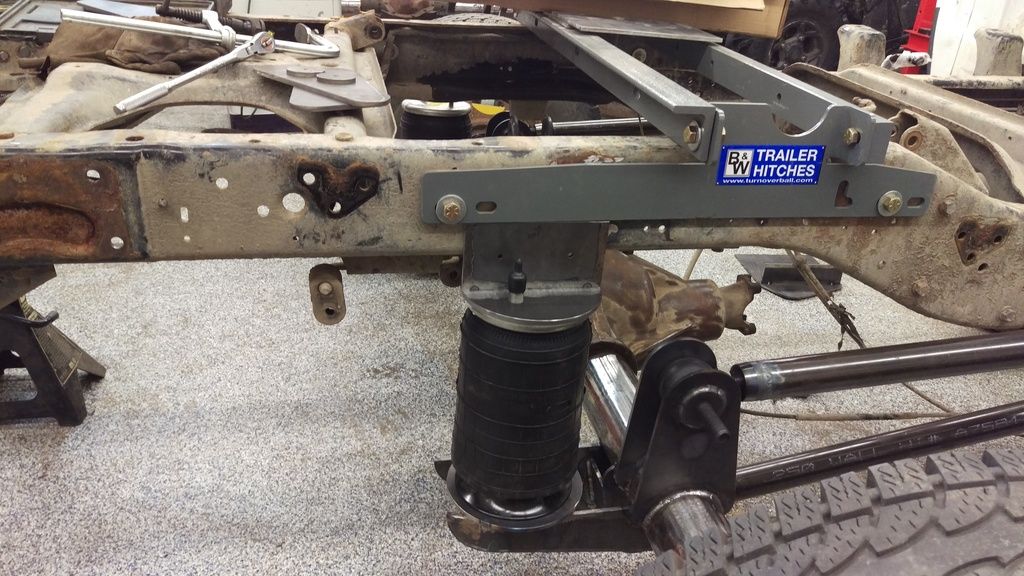
Frame end panhard bar bracket. Its sitting sideways in the picture. The horizontal flange bolts into the factory bumpstop bolts, and will have two more holes punched through the side of the frame.
__________________
'98 3500 2wd, 24v, 5 spd, p-pumped
'98 2500 4wd, 12v, 6 spd, VP'd
'02 VW Jetta, 5 spd.
My p-pump conversion pics
|
|
|
|
|
02-06-2016, 10:58 PM
|
#5
|
Name: Tate
Title: What?
Status: Not Here
Join Date: Nov 2007
Location: Airdrie, Alberta
Member`s Gallery
Posts: 3,419
|
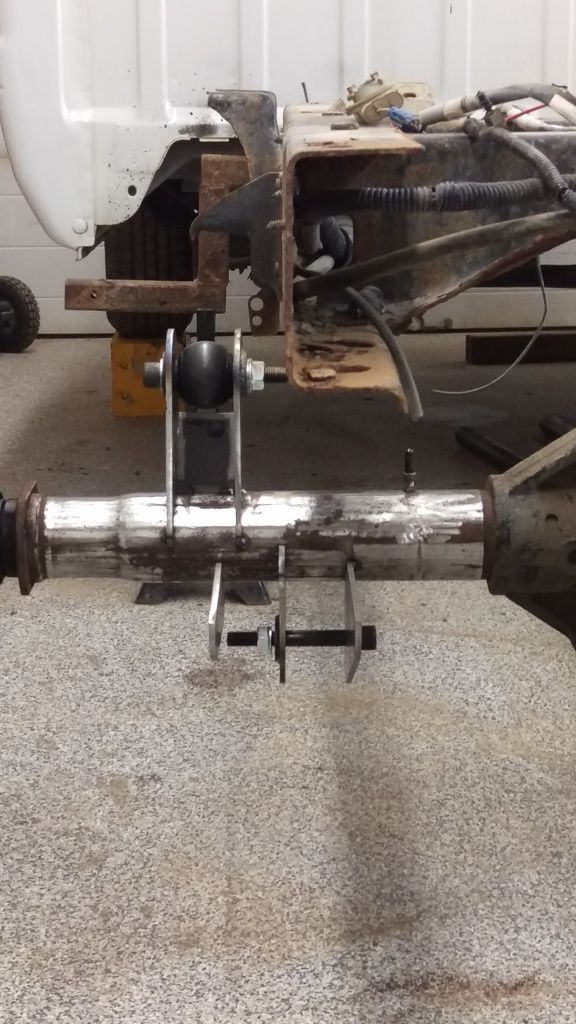
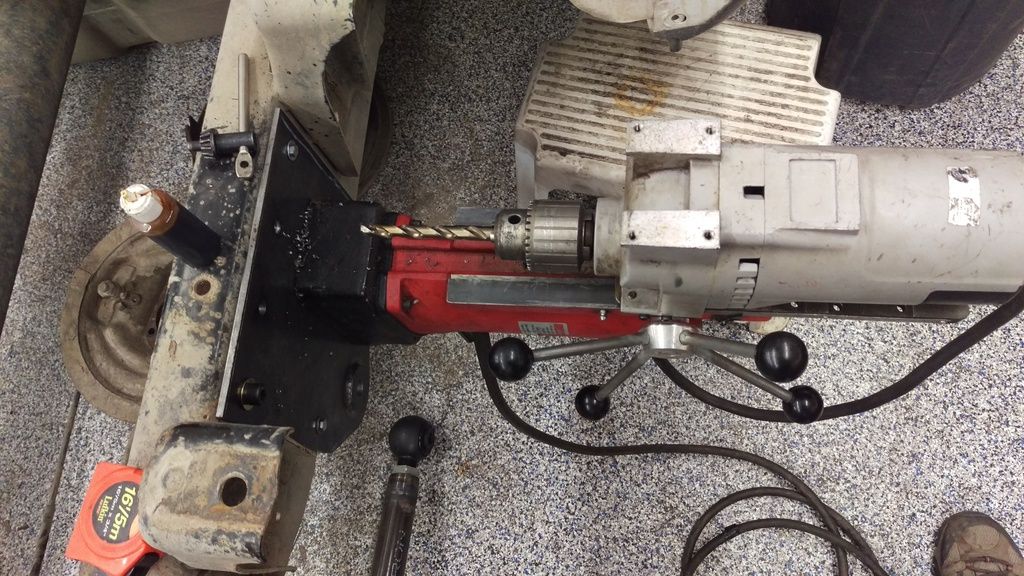
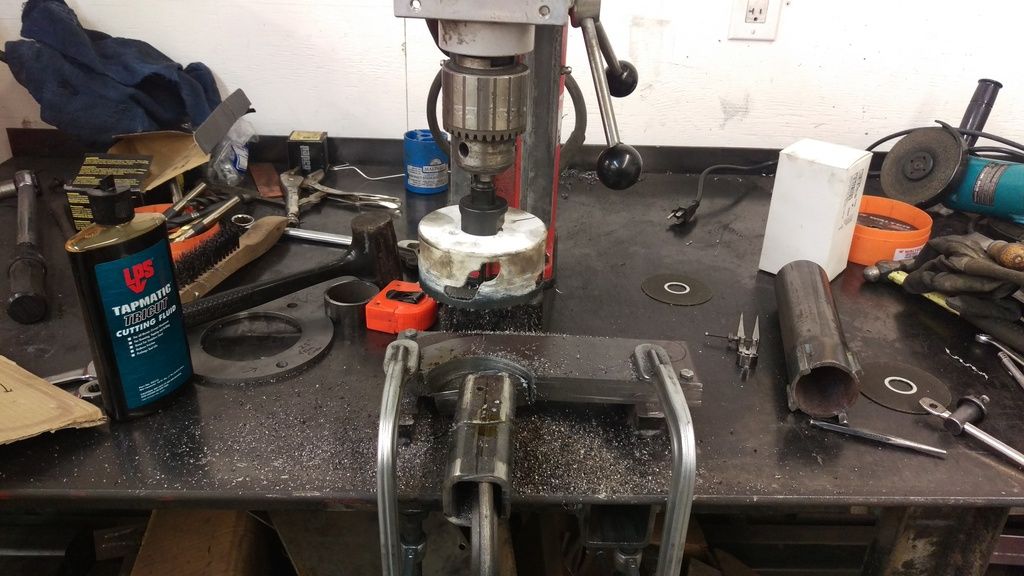
The joys of a mag drill. It may be awkward putting an 80 lbs. drill on the side, but its so worth it for drilling through almost 3/4" of steel repeatedly and accurately. Everything was drilled to 1/2".
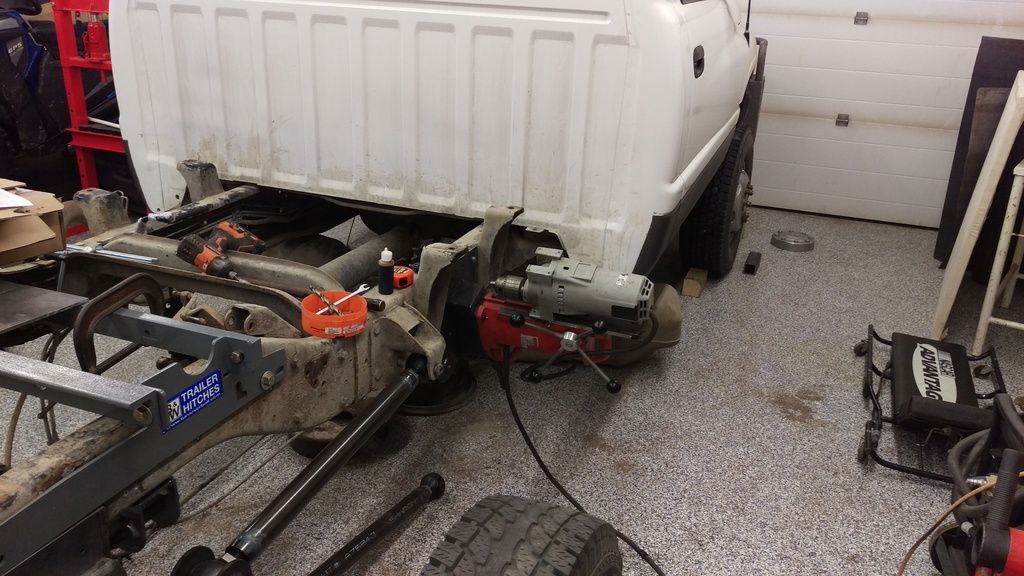
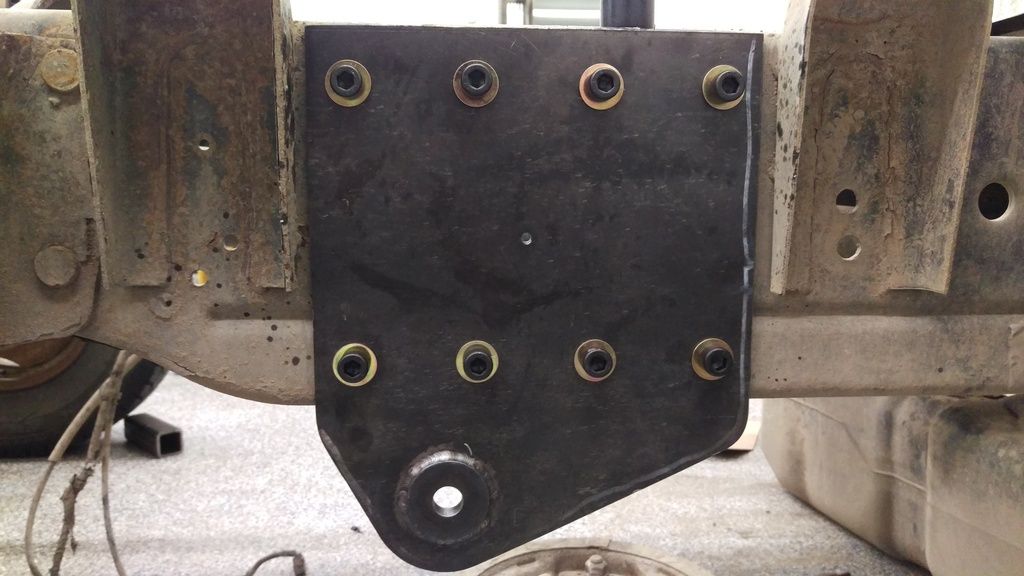
All 1/2" Socket head capscrews holding the brackets on. The center hole lines up with a factory hole on both sides of the frame and was used for aligning the brackets. Both brackets were drilled together to ensure they are in the same position relative to the hole. Thats assuming the factory holes are in identical locations, but I'll take that risk.
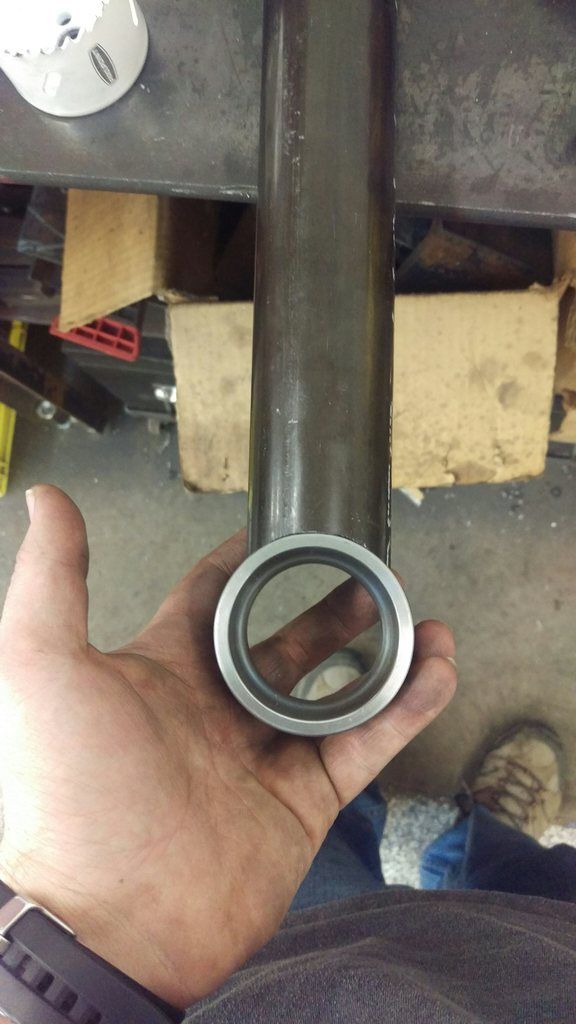
Checking the fit on the bushing end for the panhard bar. Only going with a threaded end on one end so I don't have to every worry about it moving over time. I used the same bushing ends on this as I did on the main links, since I bought 16 of them for two trucks. I had them here and I didn't want to have to wait for smaller ones to arrive from elsewhere. Better too big than too small, I figure.
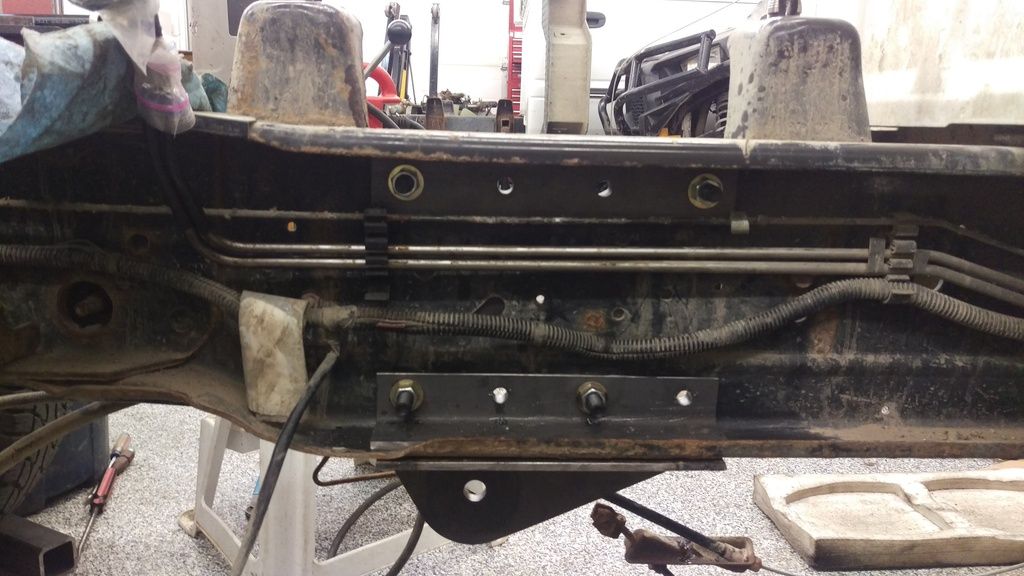
The plates I put inside the frame so I wouldn't have to worry about any pulling of the frame by the bolts. The top is just a piece of plate, the bottom was made out of a piece of tube that ties into the bottom of the link bracket. 10 bolts in each lower link brackets.
Panhard bar all welded up, as well as the axle end bracket. About 1/2" to 1" slope on the bar when at ride height.
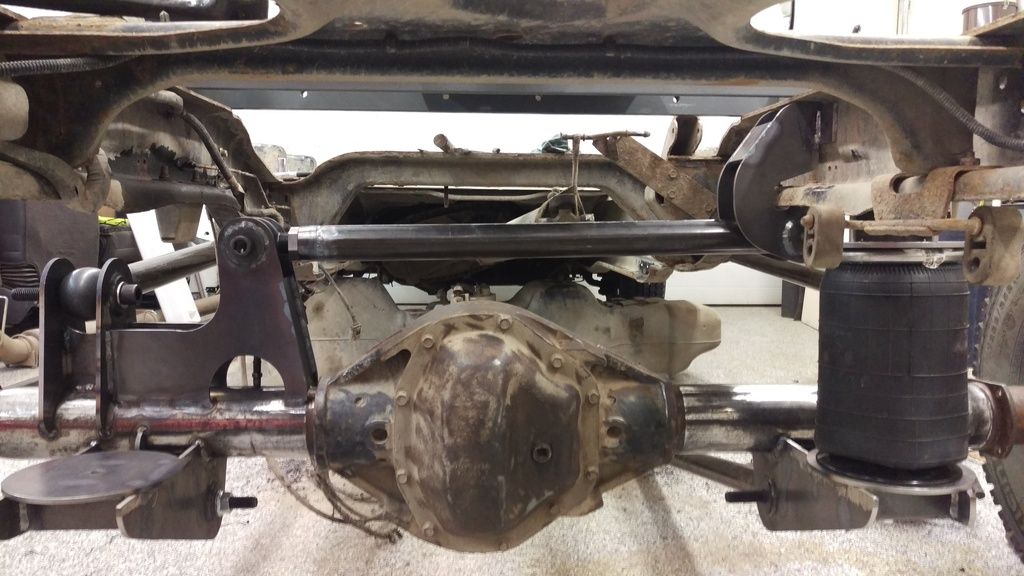
Links in place. The upper link mounts are the leaf spring hangers from the '96 2500 LD. They have 2-1/2" wide leafs compared to the 3" in the HD trucks, and the spring perch widths are slightly wider. I added some bushings to that as well and drilled to 3/4" to increase the bearing surface for the bolts. They are bolted on with 1/2" hardware in place of the 1/2" rivets. The rivets are much softer than the bolts, as I just knocked them off with a hammer and chisel, so no worries about bolts replacing them.
You can sort of make out what I was referring to with the doubled up plates on the upper bag mounts. The shorter one butts to the hitch plates.
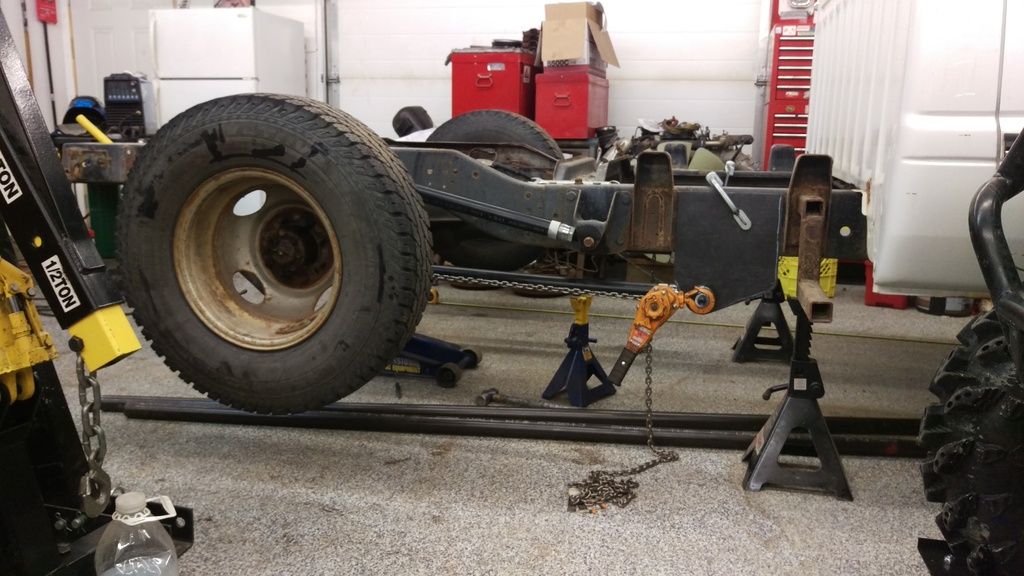
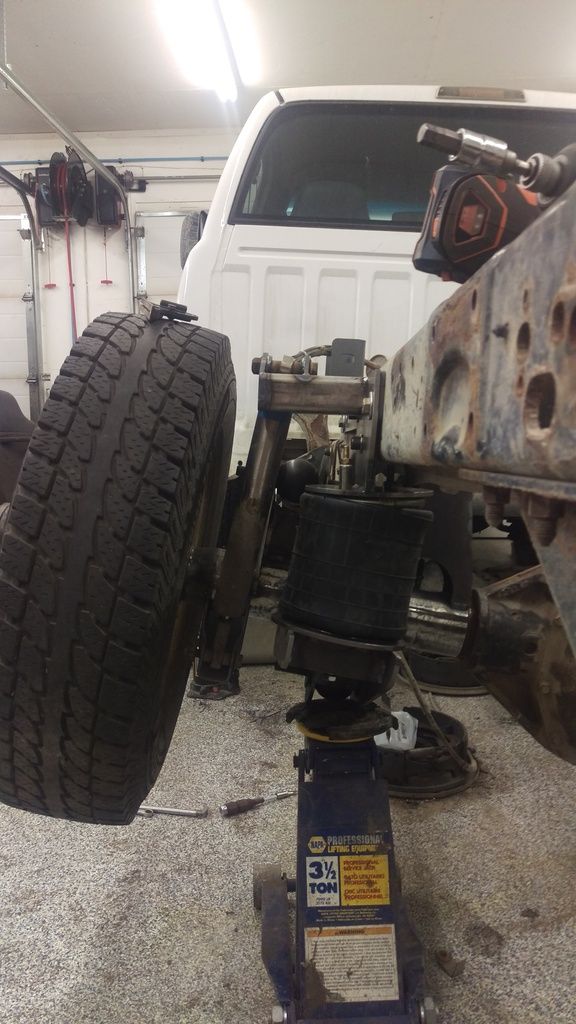
First time on air. Bought a couple schraeder valves from home depot. Checking articulation with air in the bags. Was 10-15 psi in the bags to set the rear end to height. Not sure how high the wheel is here, but I did have it up to 16 or 17" off the ground. Should be plenty considering it really doesn't go off road.
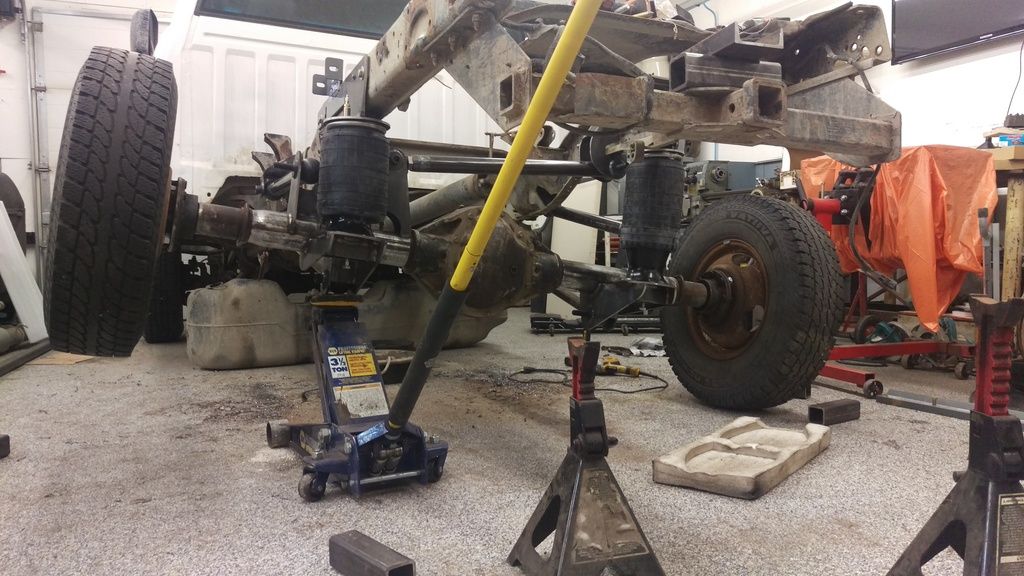
This is with the rear end dumped. The bags have internal bumpstops in them.
The only bracket on the axle I didn't make is the shock mounts, as I salvaged those from this axle. You can see how far out they are. The lower shock bolt almost touches the brake backing plates.
__________________
'98 3500 2wd, 24v, 5 spd, p-pumped
'98 2500 4wd, 12v, 6 spd, VP'd
'02 VW Jetta, 5 spd.
My p-pump conversion pics
|
|
|
|
|
02-06-2016, 11:12 PM
|
#6
|
Name: Tate
Title: What?
Status: Not Here
Join Date: Nov 2007
Location: Airdrie, Alberta
Member`s Gallery
Posts: 3,419
|
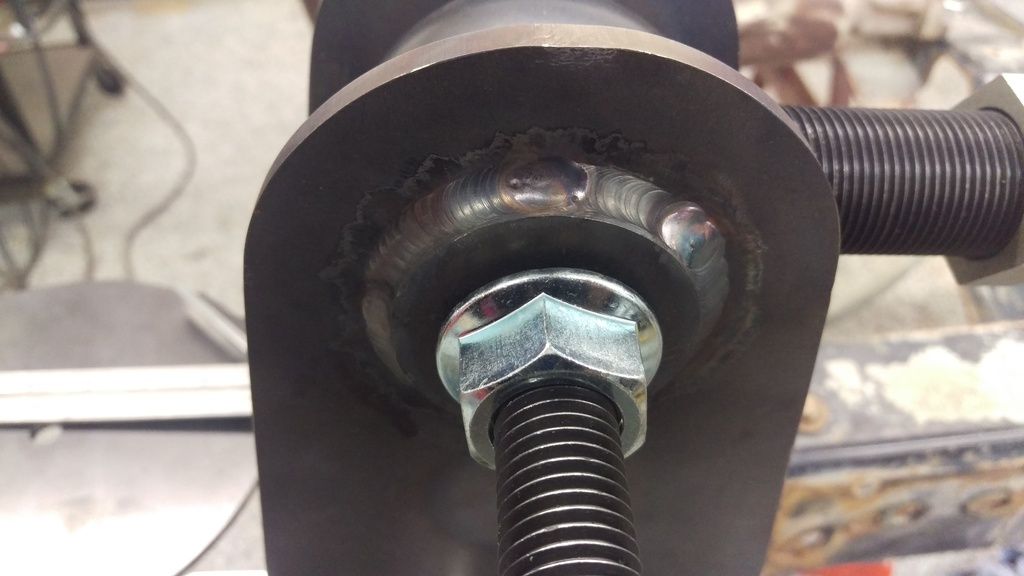
Because the driver side lower link bracket is so close to the fuel tank, I couldn't go with steel bushing and a SHCS like in every other link end. So I used a regular hex cap screw, ground the head down to 1/4" thick. I took a 6-point socket, cut that to 1/4" thick to keep the bolt from rotating, then added some material around it.
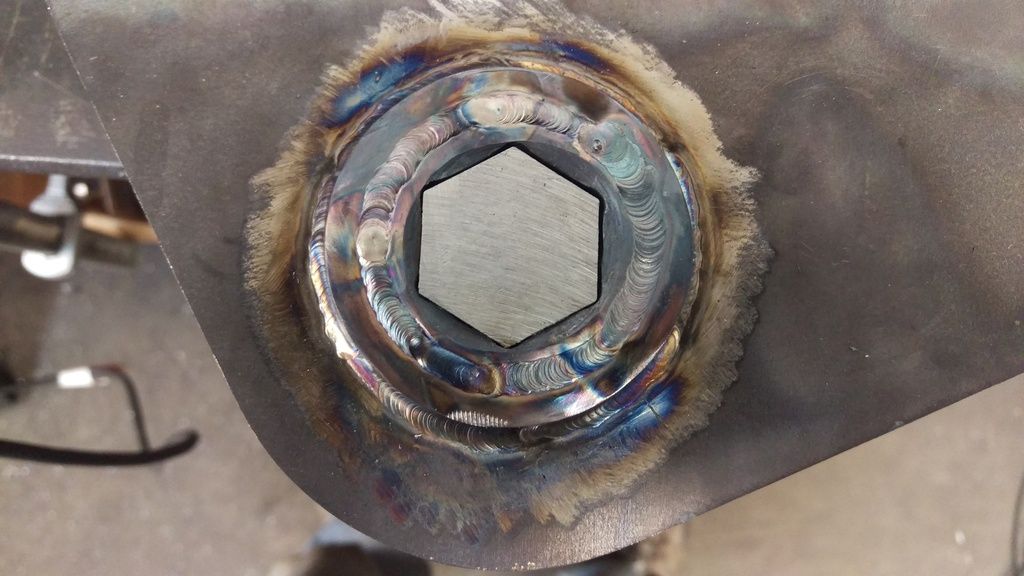
After profiling with a grinder.
Figuring out shock placement. There is about 20 pictures here that won't mean much to most people, so I'll post the start and end.
Tacked in and checking articulation clearance.
Had to add bushings on the upper end to give it a bit more side clearance.
The last of the welding on the axle. Finally borrowed a torch to bend the ears on the bag mounts so they tuck in and generally follow the profile.
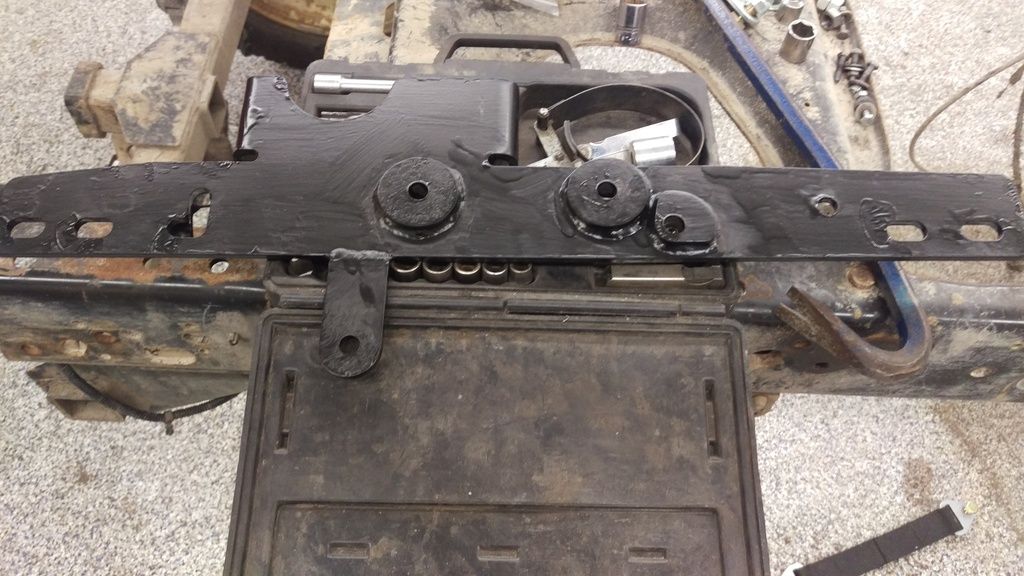
The passenger side hitch plate. There is a dip in both sides of the frame just above the axle, so I had to add some more bushings so I wouldn't bend the bracket when I bolted things too it. The two round bushings are where the panhard bracket bolts through the frame. The triangular one, along with the single round hole and rightmost slotted hole is for the bag mount. The tab on the left side is for the axle limit straps. The paint is rustoleum brush on stuff. It was cheap, and it shows. We'll see how it lasts. I'd prefer to powder coat everything, and I may do that in the future if everything turns to ass.
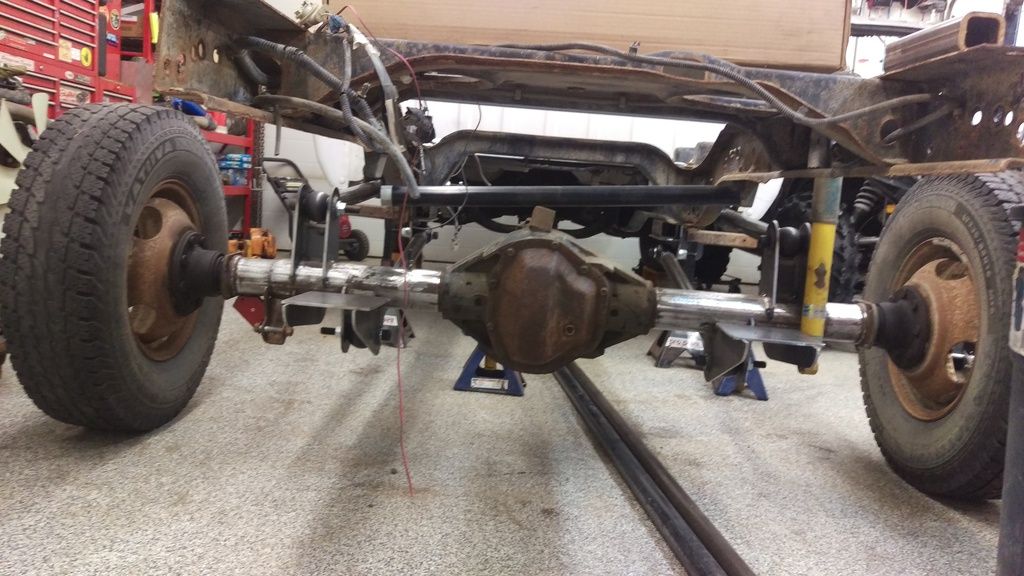
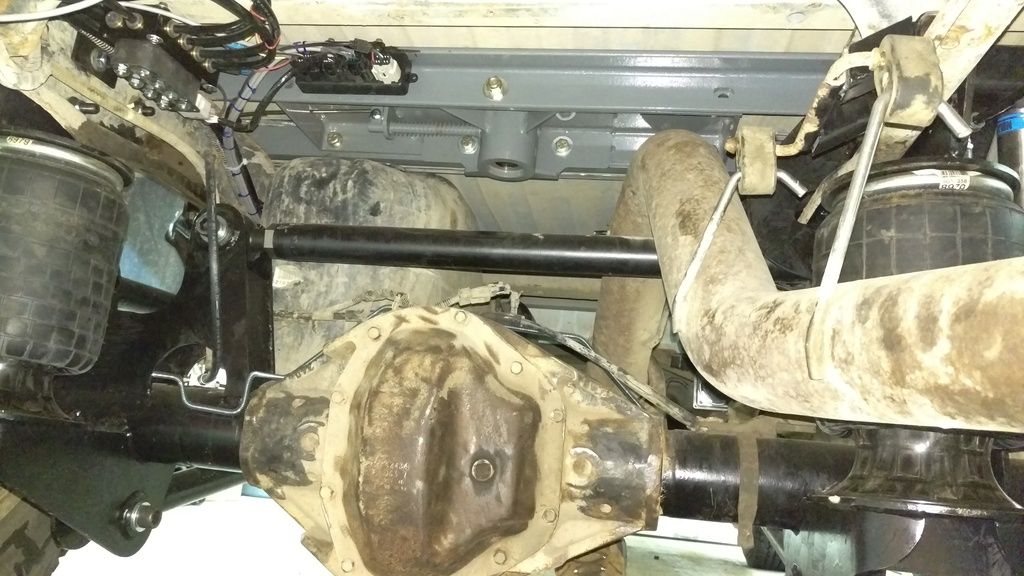
Final assembly after paint. I didn't want to spend the time to clean the center section of the diff for paint. I don't think most people will notice once the bed is on. I don't think most people will notice its on air either.
__________________
'98 3500 2wd, 24v, 5 spd, p-pumped
'98 2500 4wd, 12v, 6 spd, VP'd
'02 VW Jetta, 5 spd.
My p-pump conversion pics
|
|
|
|
|
02-06-2016, 11:25 PM
|
#7
|
Name: Tate
Title: What?
Status: Not Here
Join Date: Nov 2007
Location: Airdrie, Alberta
Member`s Gallery
Posts: 3,419
|
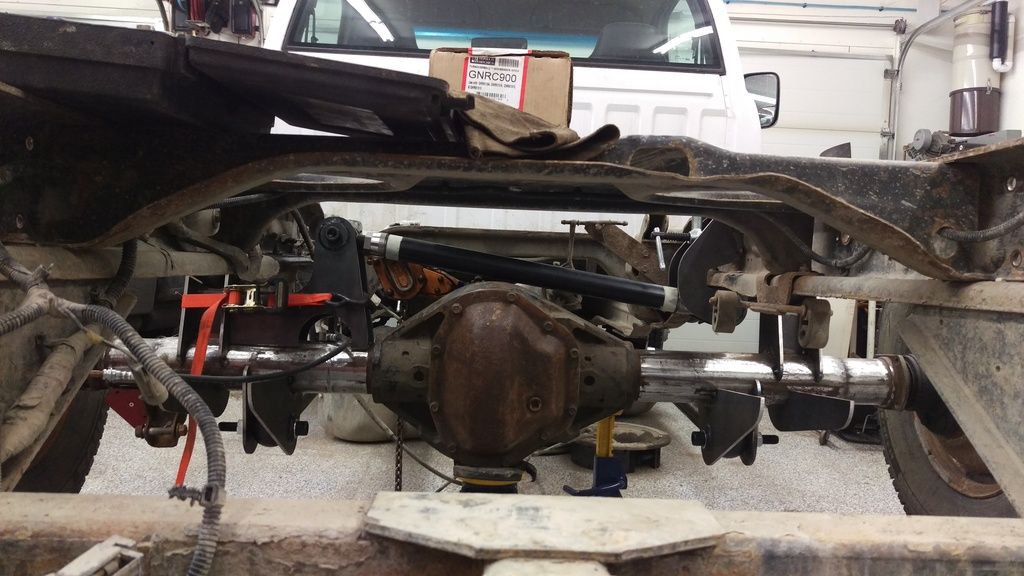
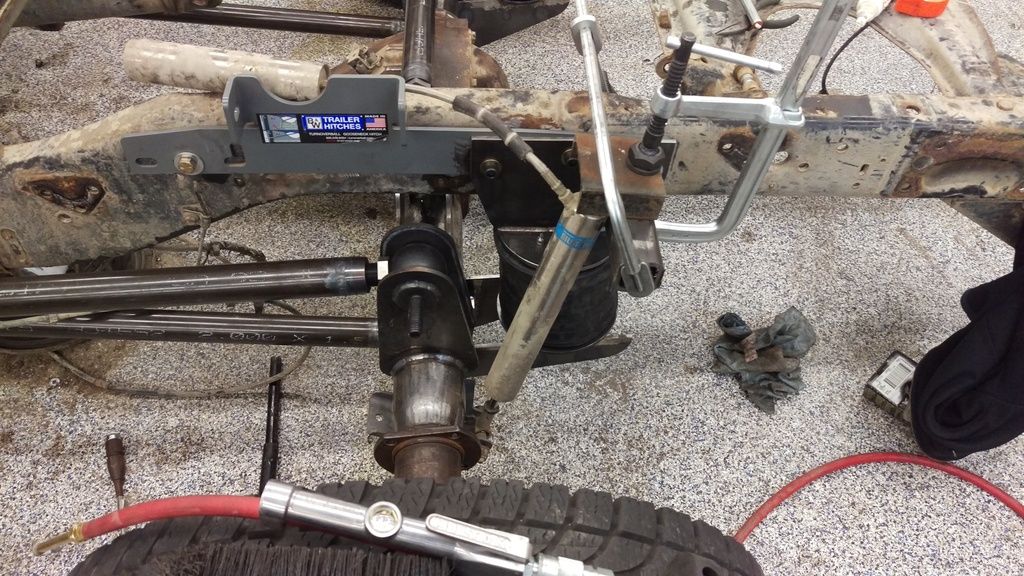
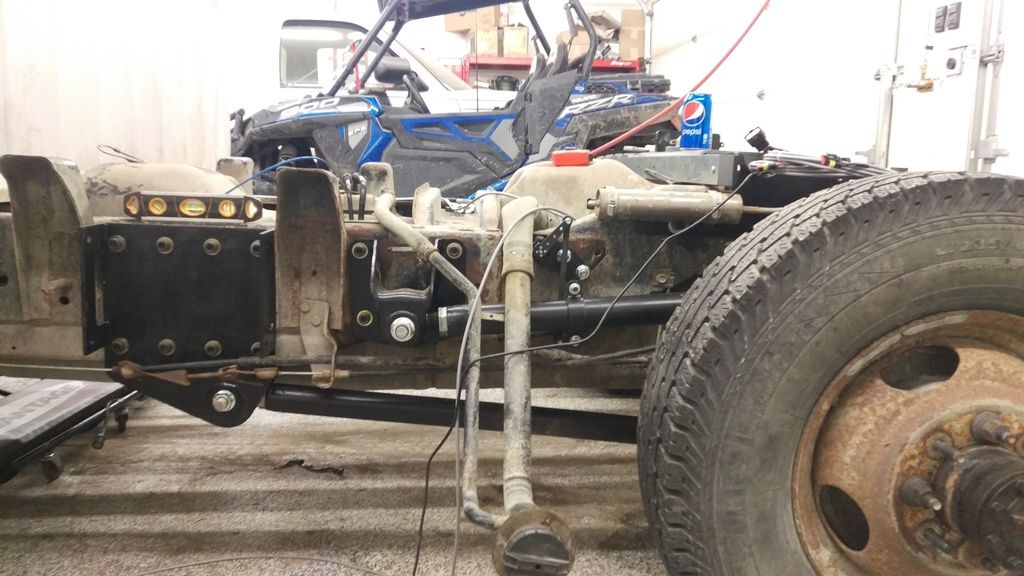
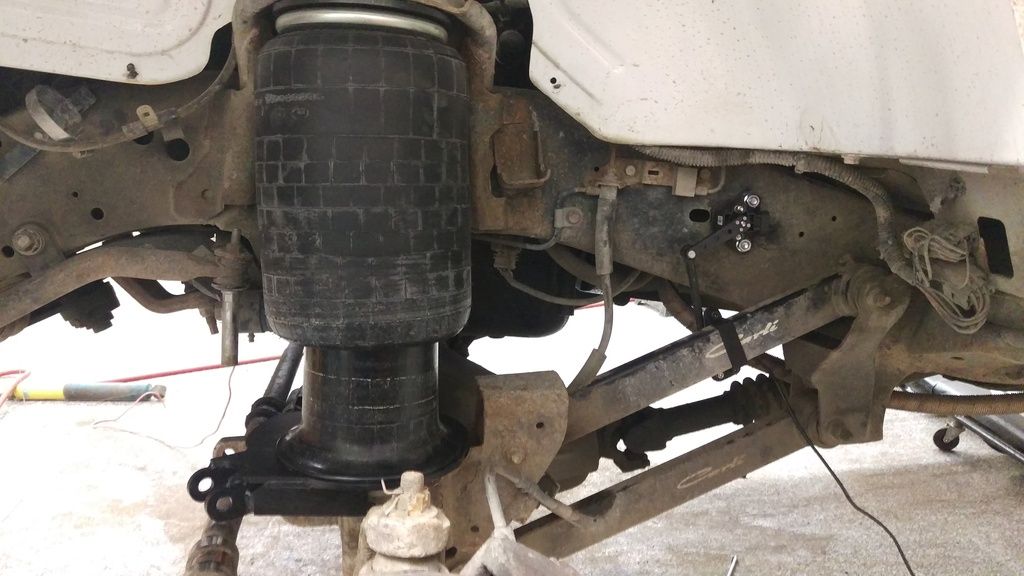
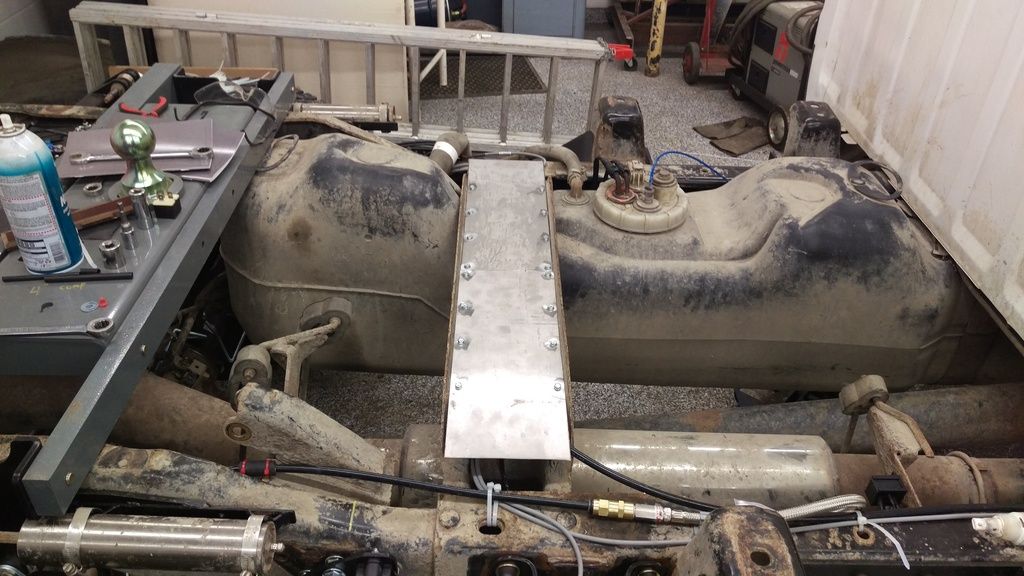
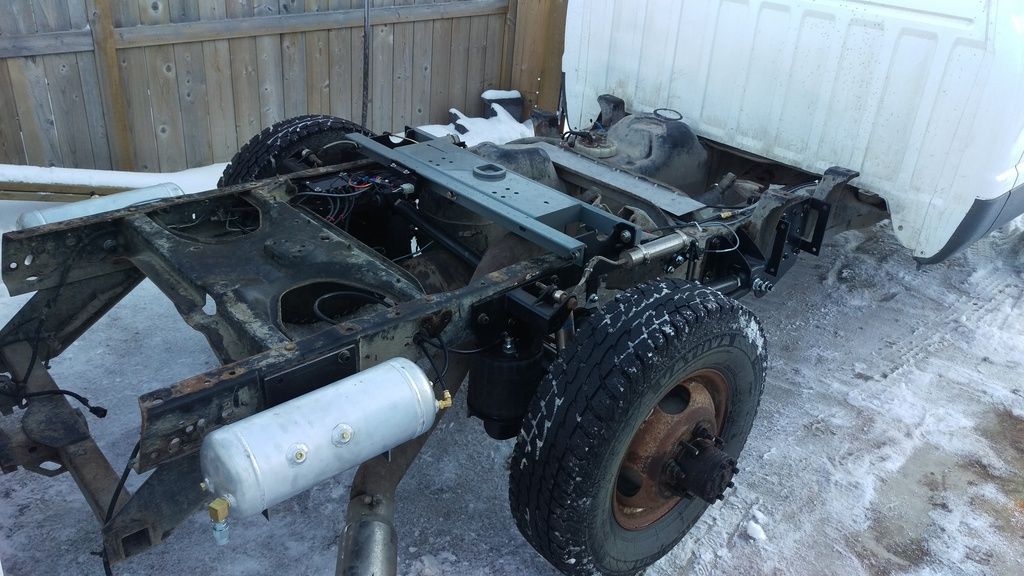
Shocks, bags and limit straps installed. Mounted the remote reservoirs to the hitch brackets. They used to be teck screwed to the crossmembers of the bed. I like this much better.
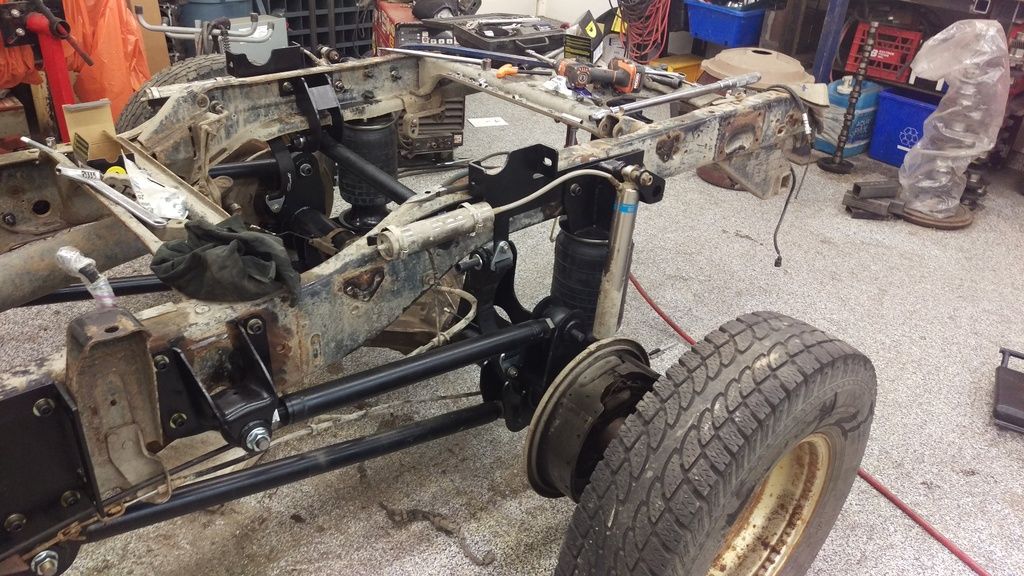
Unmodified MBRP exhaust to the panhard bar clearance.

Before and after modifying the rear exhaust hanger.
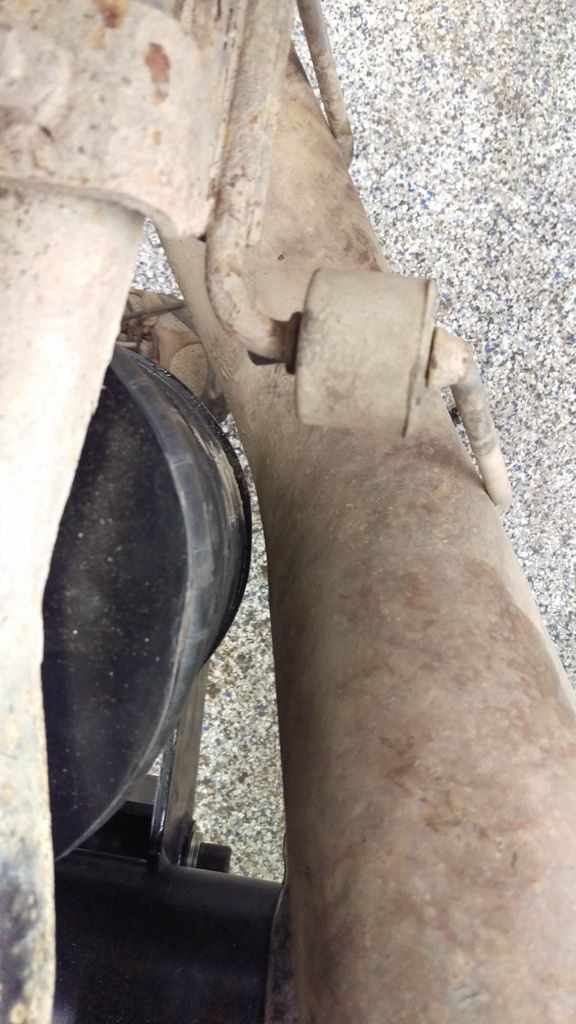
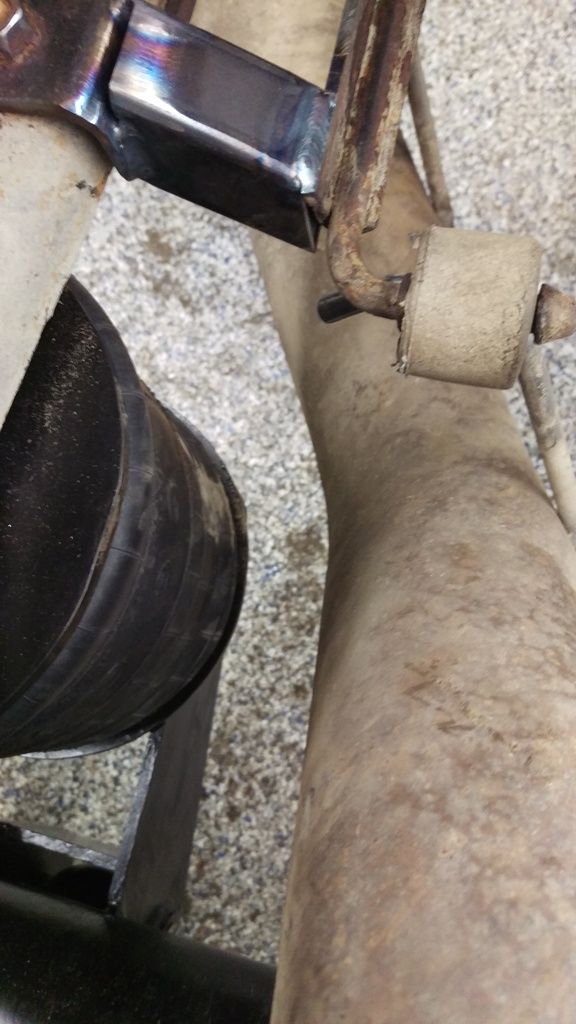
All new brake lines. Obviously the factory ones wouldn't work. That is what the hole in the axle panhard bracket was for, brake line access. Again, with the 4" hole saw.
A shot of the reservoir mount, as well as how close the shock is to the brake backing plate.
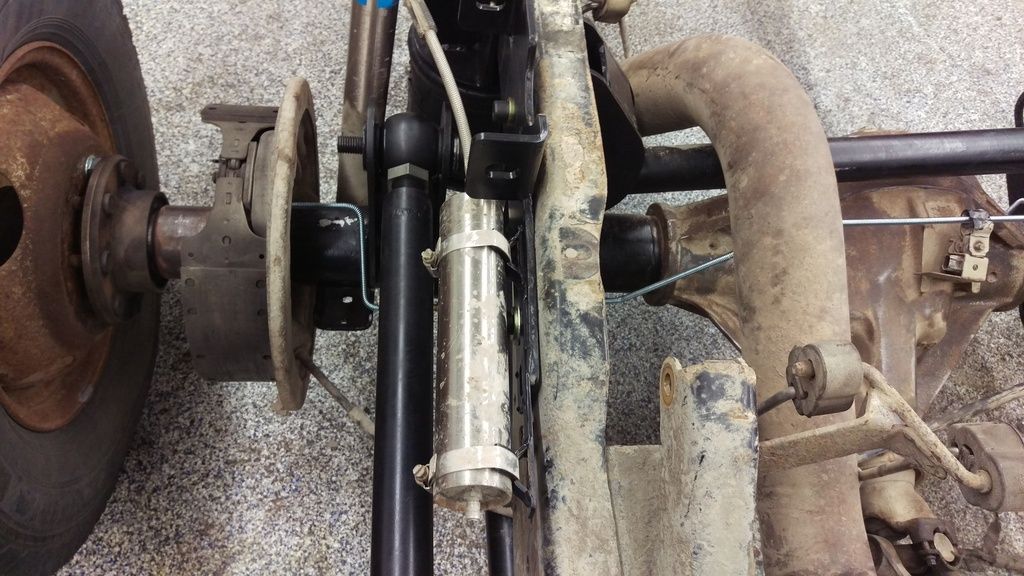
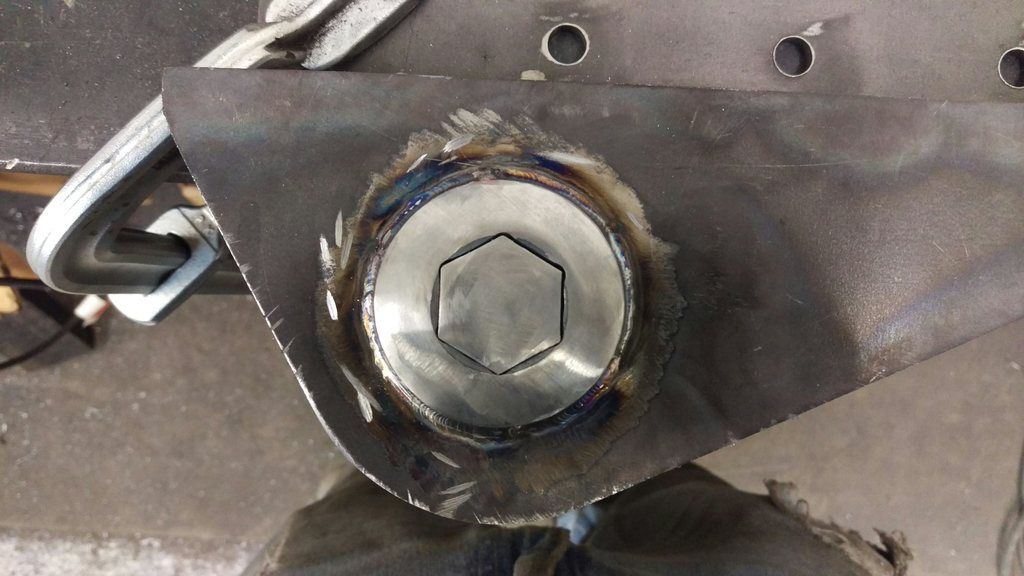
A shot of the finished driver side lower link bracket. I like the contrast of the shiny bolt and black bracket, although I know its only temporary. Soon rust. Rust everywhere!
Clearance of bracket to fuel tank.
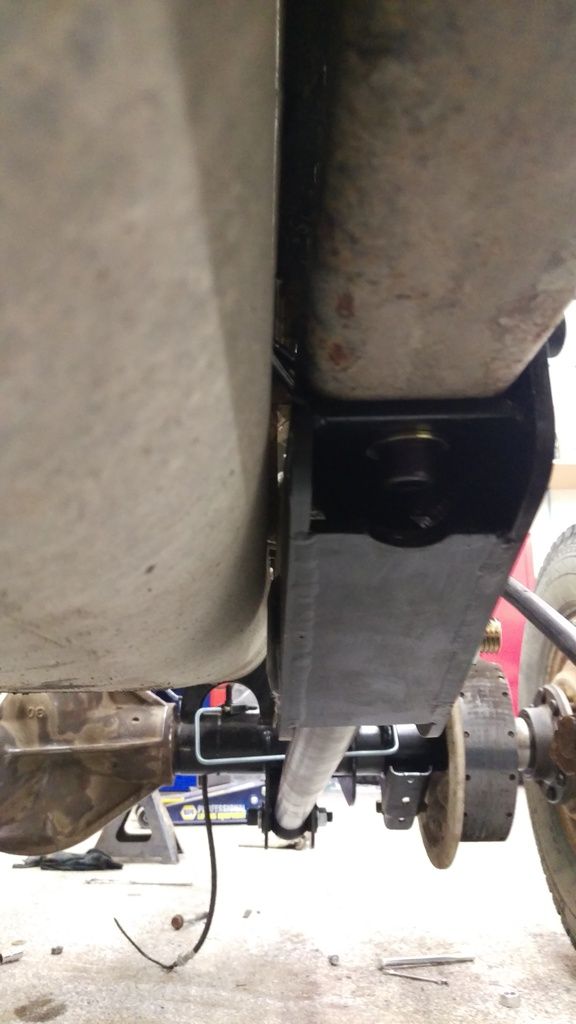
Clearance check with the ball flipped over with no air in the bags. The panhard bar has about 2-3 inches of clearance to the ball.
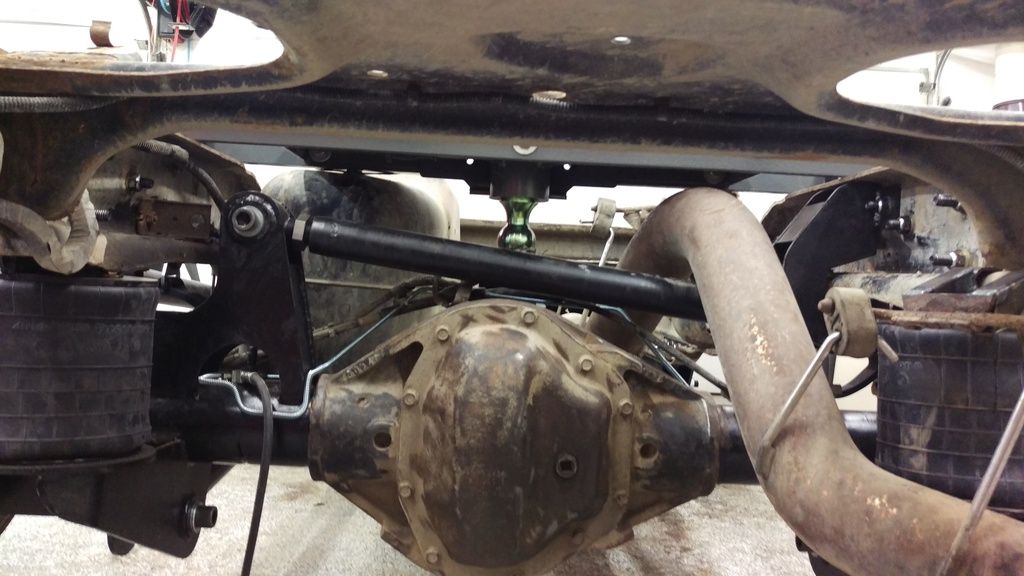
Back fully aired down with everything pretty much complete.
On to the front!
__________________
'98 3500 2wd, 24v, 5 spd, p-pumped
'98 2500 4wd, 12v, 6 spd, VP'd
'02 VW Jetta, 5 spd.
My p-pump conversion pics
|
|
|
|
|
02-06-2016, 11:33 PM
|
#8
|
Name: jimbo486
Title: Too Much Time
Status: Not Here
Join Date: Jan 2010
Location: Orange County, CA
Member`s Gallery
Posts: 1,617
|
Diggin' this! Nice work!
__________________
1990 Dodge D350
Giles' 12mm VE - Airdog II 165 - 370s @ 75lpm - BW S362fmw/68/12 - Hamilton 182/214 - '01 NV5600
|
|
|
|
|
02-07-2016, 12:08 AM
|
#9
|
Name: malibu795
Title: 2wd numb nut
Status: Not Here
Join Date: Mar 2007
Location: s. charelston ohio
Member`s Gallery
Posts: 6,730
|
Very nice!!!
__________________
adam
99 3500HD LBZ/4l85 C&C semi retired hotshot
07 3500hd LMM RCLB hotshot, GT4088R, ovals
99 FL60 mutt
Quote:
|
smooth seas never made a skillfull sailor
|
|
|
|
|
|
02-07-2016, 12:19 AM
|
#10
|
Name: Tate
Title: What?
Status: Not Here
Join Date: Nov 2007
Location: Airdrie, Alberta
Member`s Gallery
Posts: 3,419
|
Thank you. Its a big relief to finally have it done.
Now for the front stuff. My goal on the front end is to have everything bolt in without having to permanently modify it. Just in case it goes awry, I can go back to tried and proven relatively quickly.
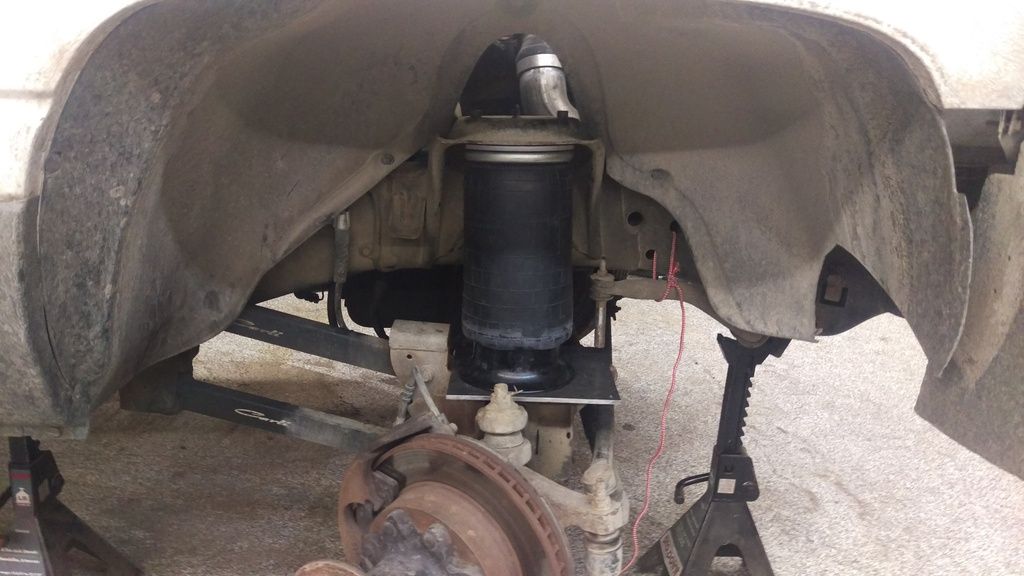
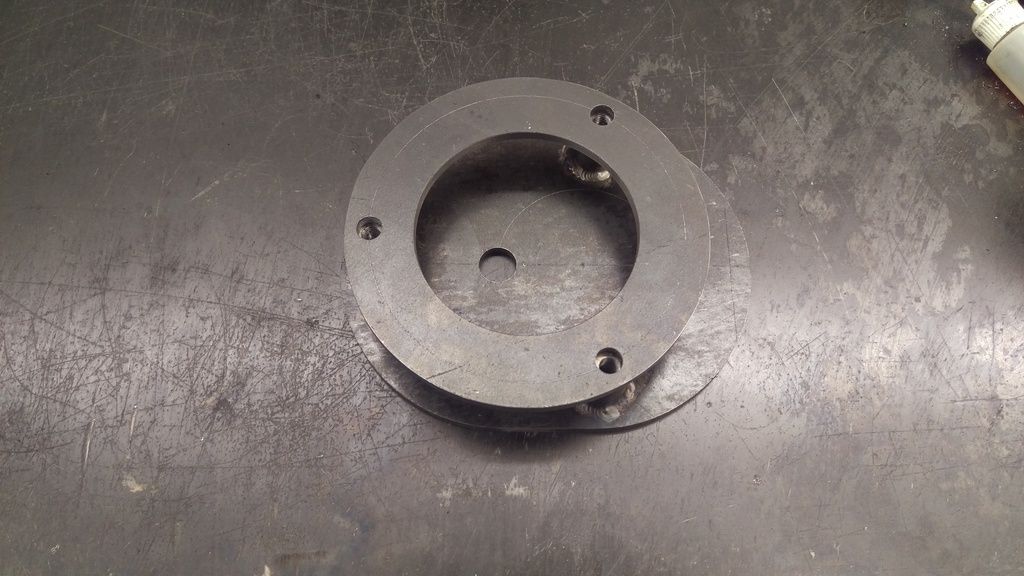
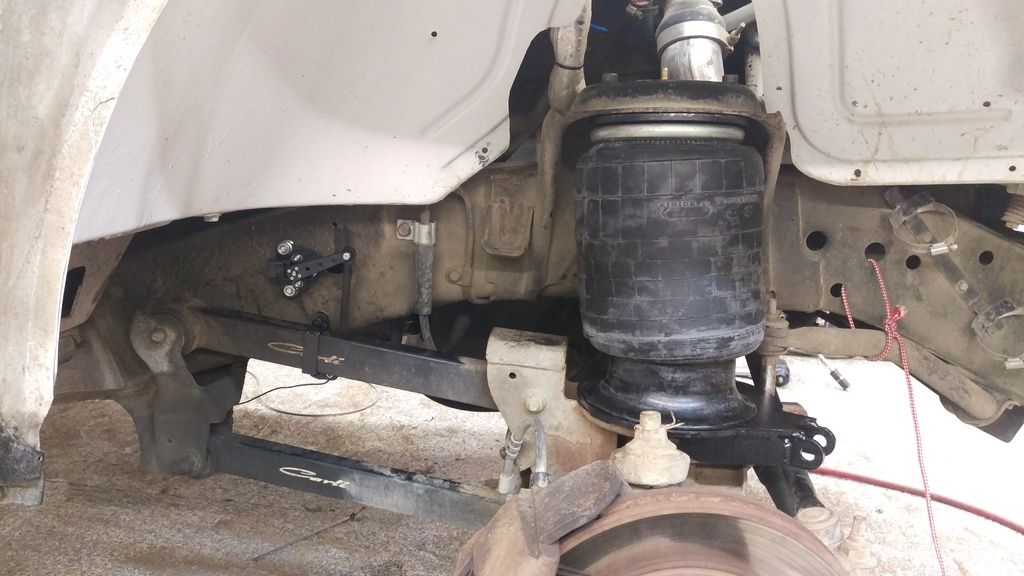
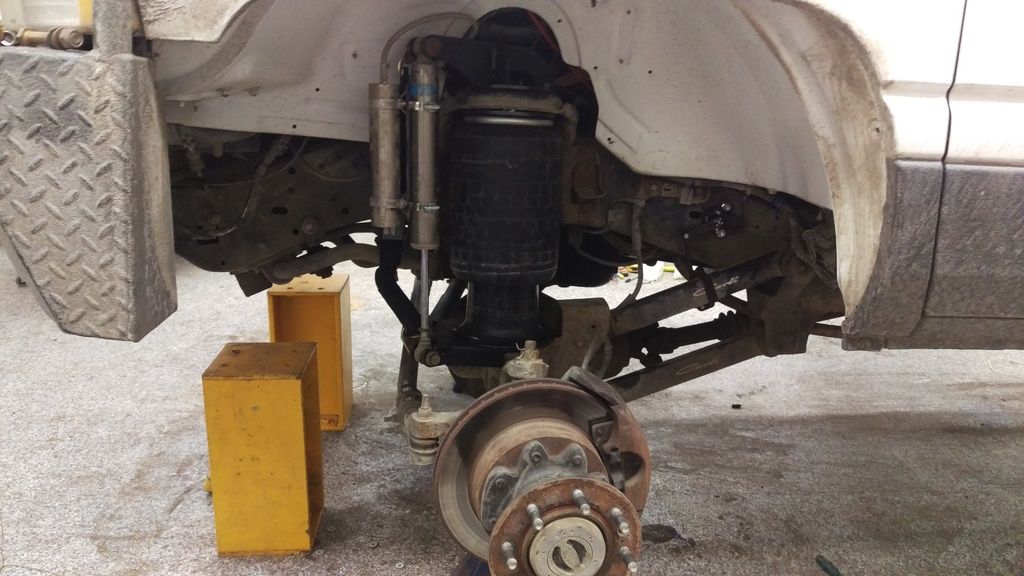
The upper bag mount obviously goes in the upper spring pocket. The bag can inflate to a maximum diameter of 9.1". The factory spring is roughly 6.5-7" diameter. So I had to offset the air bag outward a bit to maintain a safe distance from the frame. The three stand offs go through the holes for the shock tower. The 1/2" stud of the bag is gonna follow in the spring pocket recess, the 3/4" stud is just off center a bit.
Lower bag mount, which will also include the lower shock mount. The tabs go into the factory shock mount in the axle, and this will rest on the factory spring cup.
Rough idea where the shock is gonna be.
The beginning of the upper shock mount. If I had my lathe running, this would've been a piece of cake. But I don't, so hole saw, grinder and belt sander it is!
The lower bag mount again. Added a gusset to the shock mount that as tight to the factory spring cup, right to the inner C on the axle. Because the rim of the spring cup is lower than the center, I added a few 3/16" spacers so it'll contact the outside of the spring cup, since the bag is moved outboard of factory location.
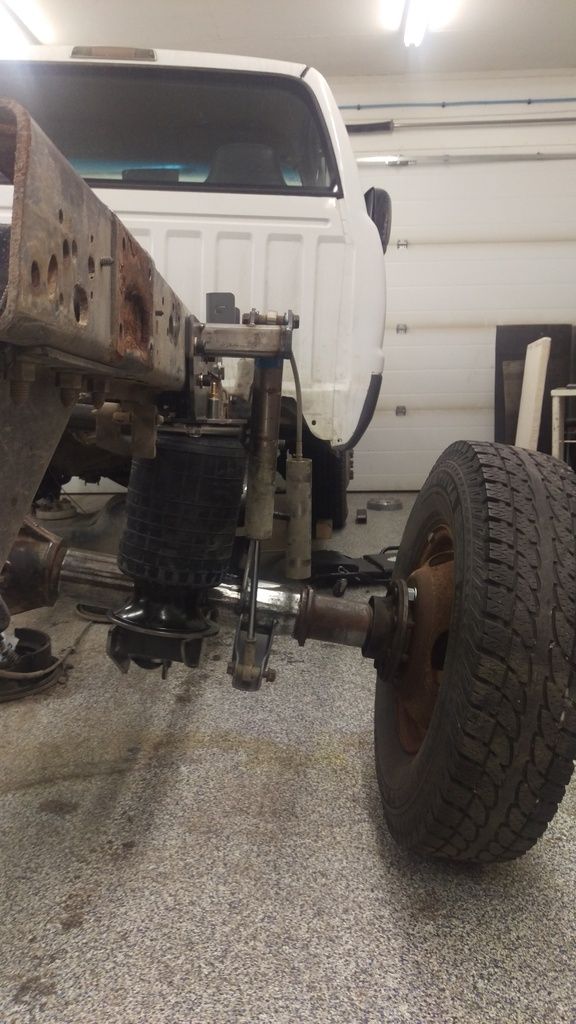
The passenger side bag inflated with the driver side at full drop. This will be close to the minimum bag clearance to the frame. Its roughly 70 psi in the front bags.
First time on air in all four corners.
__________________
'98 3500 2wd, 24v, 5 spd, p-pumped
'98 2500 4wd, 12v, 6 spd, VP'd
'02 VW Jetta, 5 spd.
My p-pump conversion pics
|
|
|
|
|
02-07-2016, 12:35 AM
|
#11
|
Name: Tate
Title: What?
Status: Not Here
Join Date: Nov 2007
Location: Airdrie, Alberta
Member`s Gallery
Posts: 3,419
|
Starting the upper shock mounts. Needed four of them, so stacked them all together and bolted them through. Getting my use out of the hole saw and mag drill. Money well spent.
Tacked onto the ring from earlier.
Full compression in the front, sitting on the factory bumpstops. The bags have internal bumpstops, but they are about 3" away from touching. I originally bought both sets as I didn't know which I wanted in the rear, it worked out quite well for the front.
Upper bag mounts again. I added 6 stand offs to each mount to help spread the load on the factory spring mount. I didn't want to punch through or bend where the factory shock power bolts. Ideally, I would've used a piece of pipe cut to 1.25" tall and drilled and tapped that for continuous contact, but I couldn't find any in the right diameter readily available.
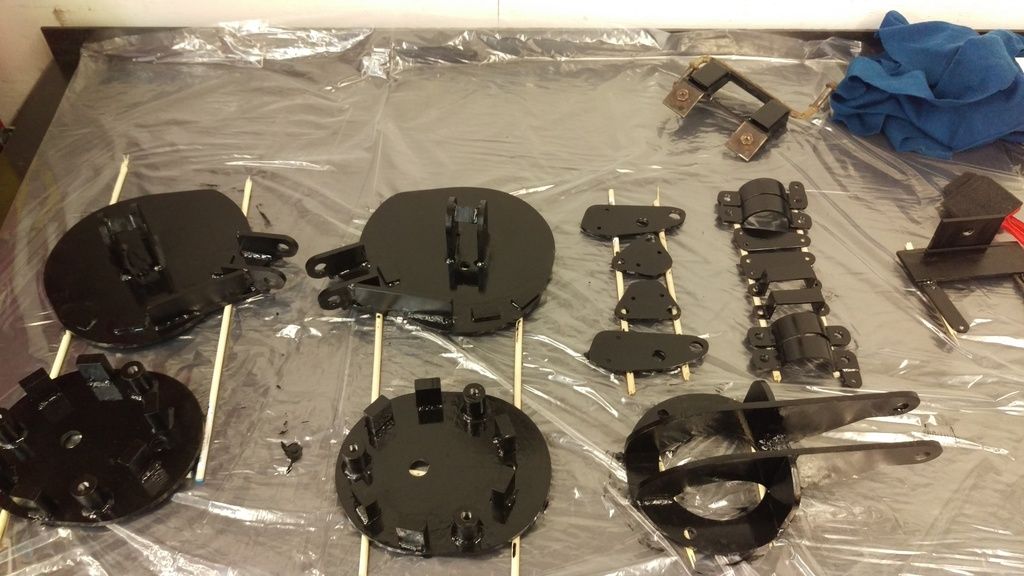
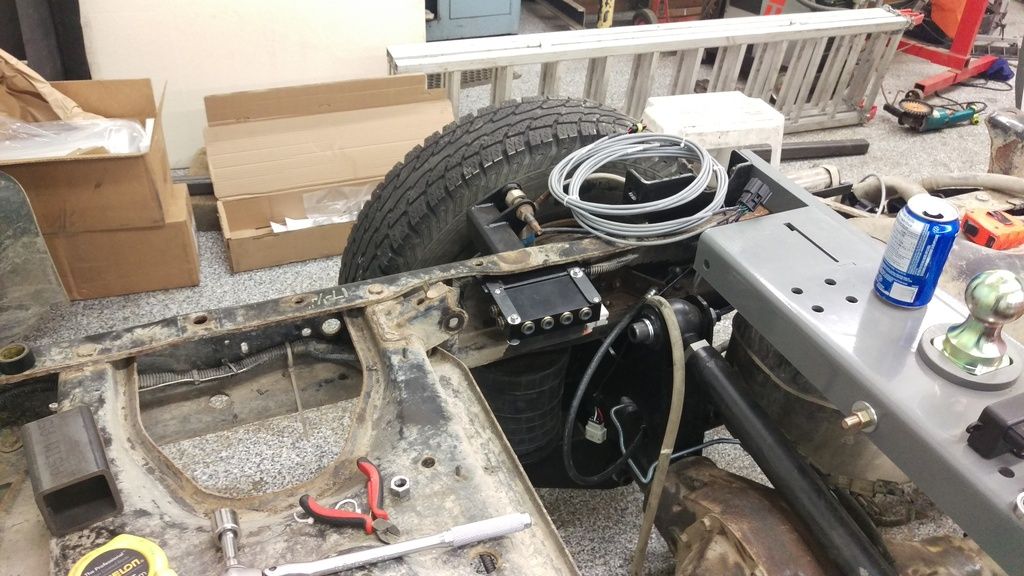
Painting the new brackets. The 4 small plates in the middle are for the height sensors in each corner. The pieces next to that are the clamps that go on the upper links in each corner for the height sensors. The bracket on the far right is for the valve block.
Bag mounts installed on the bags, final.
Height sensors. They have a maximum range of 4". The front has 9.5" of travel, the rear has 11".
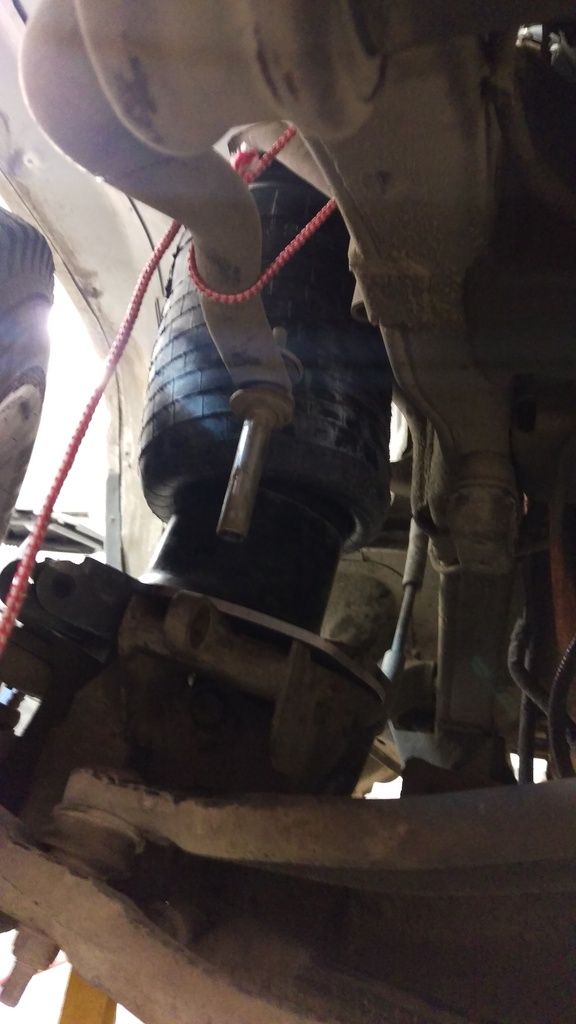
The rear sensor is right next to the filler neck. This is aired down fully.
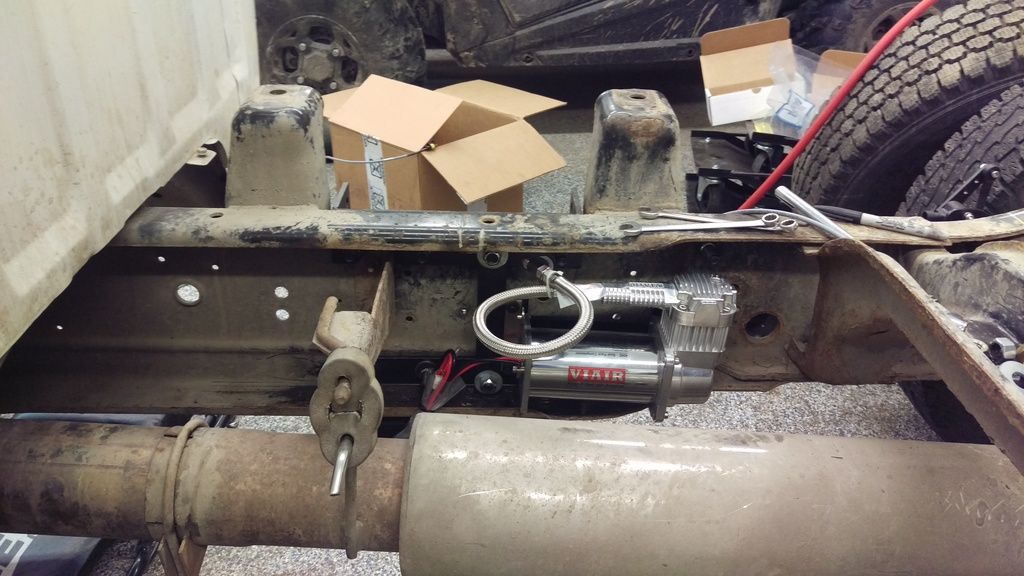
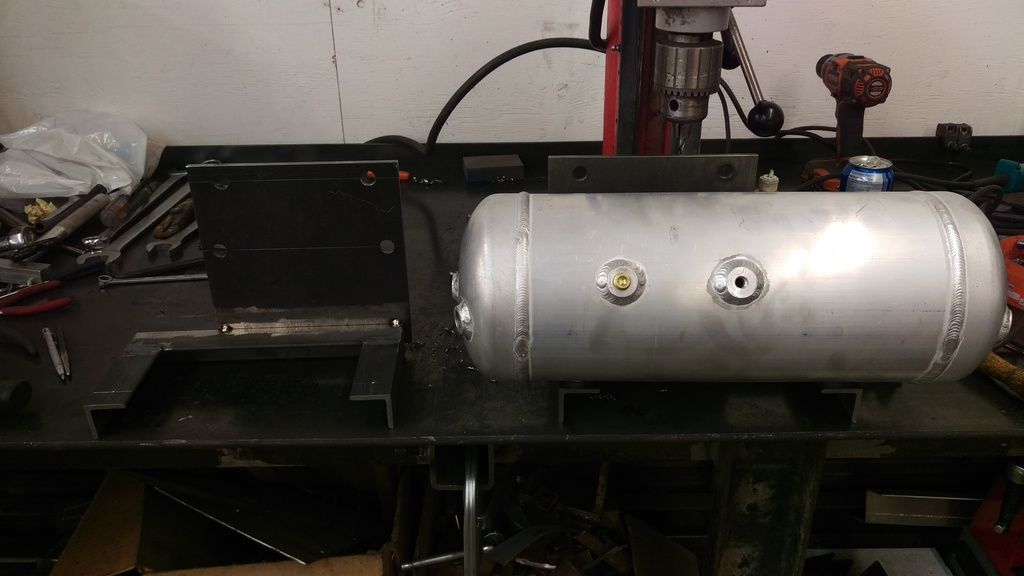
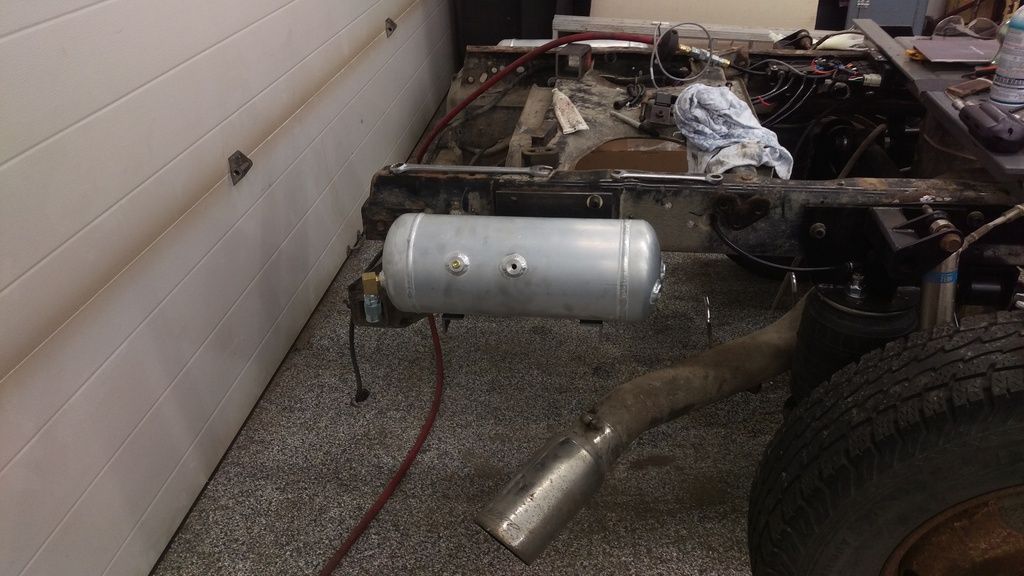
Compressor mount. Lots of room to the exhaust. A single compressor is definitely undersized for the volume in the bags, but it'll do for now. An engine driven compressor is in my head, but I work slow so that might happen in 2020.
Valve block on the driver side frame.
__________________
'98 3500 2wd, 24v, 5 spd, p-pumped
'98 2500 4wd, 12v, 6 spd, VP'd
'02 VW Jetta, 5 spd.
My p-pump conversion pics
|
|
|
|
|
02-07-2016, 12:47 AM
|
#12
|
Name: Tate
Title: What?
Status: Not Here
Join Date: Nov 2007
Location: Airdrie, Alberta
Member`s Gallery
Posts: 3,419
|
At full height.
Shocks in. Same 7100 Bilsteins as the back, but for the front. I bought longer hoses to relocate the reservoirs back to the frame like I had them originally, but this will do for now.
Full down, roughly the same height as a 2wd in the front.
Fully up. I have no idea when I'll ever need this, but I have it anyway.
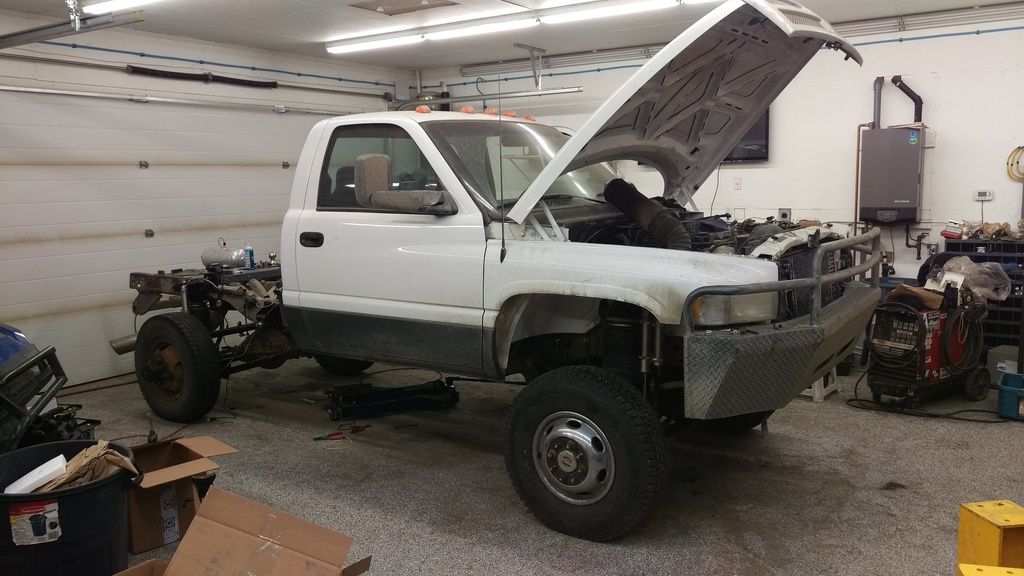
This is one of the settings I'll keep. Makes loading the RZR much easier, as the tailgate is 9" lower from normal ride height.
Tank mounts that bolt into the factory holes for the rear leaf spring hangers. Totally overkill as the brackets weigh about twice the tanks, but it was steel I had laying around.
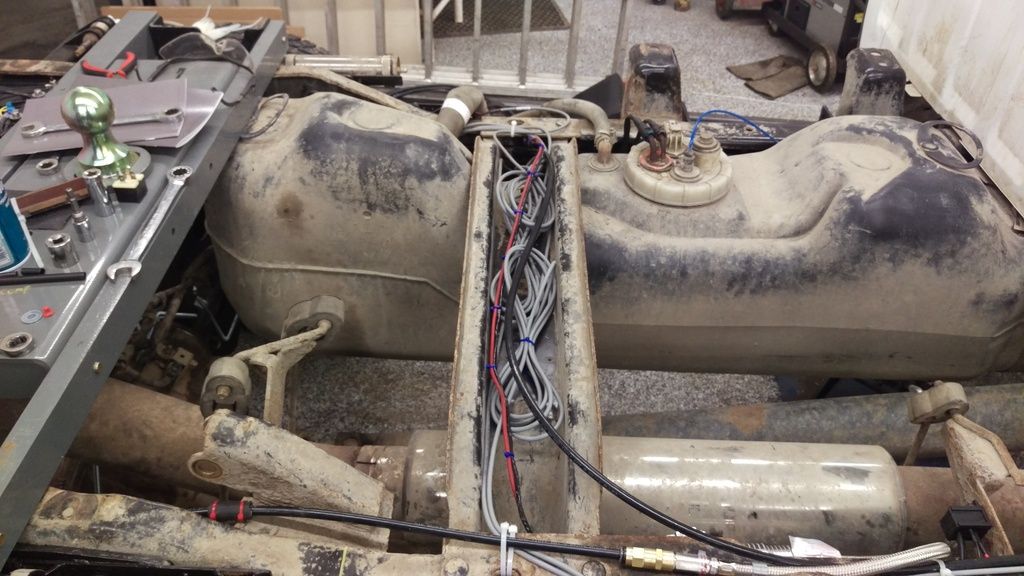
The height sensor wires are all pre-terminated, and there is a ridiculous amount of wire. Luckily the cross member has nothing in it. Except wires.
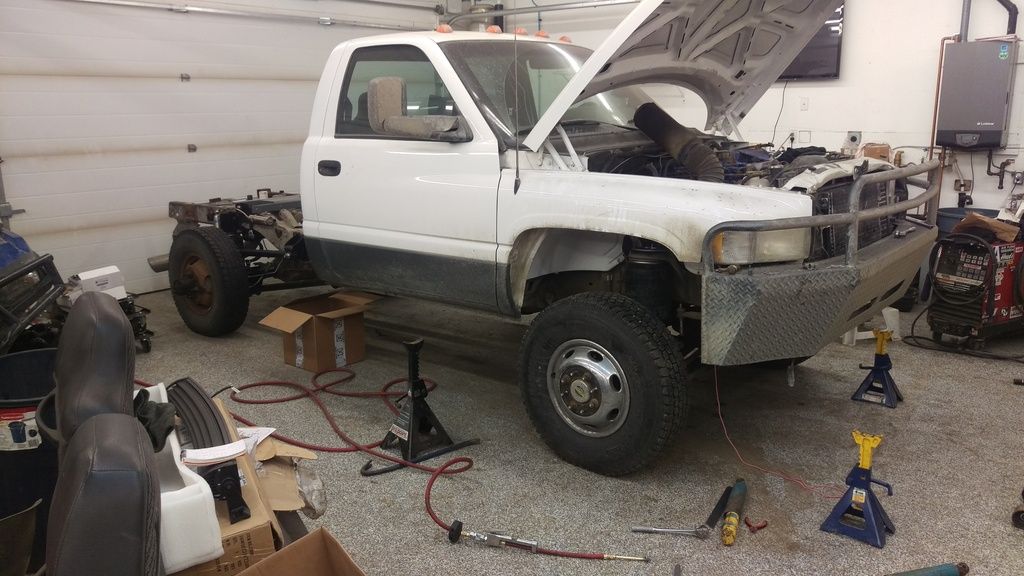
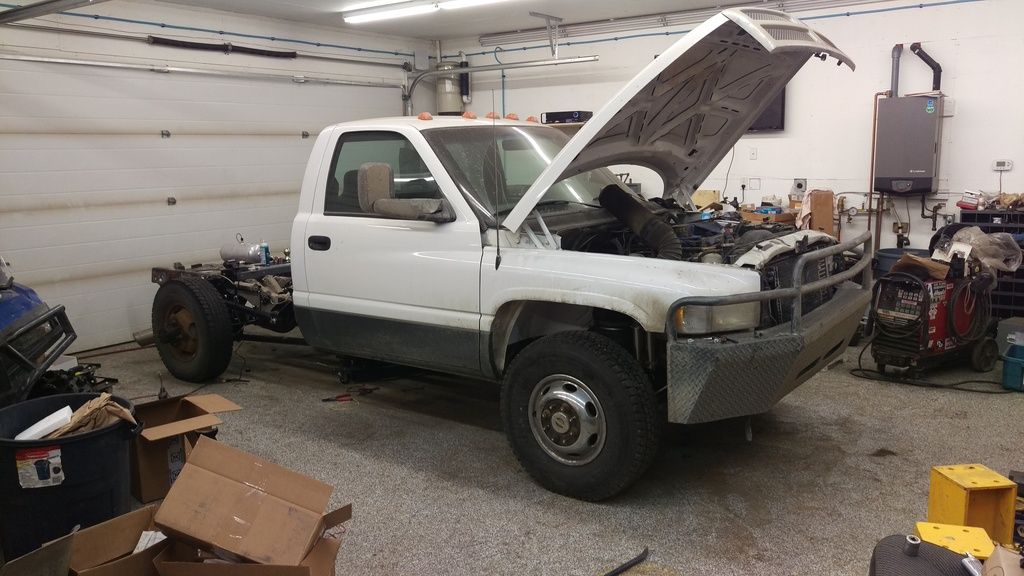
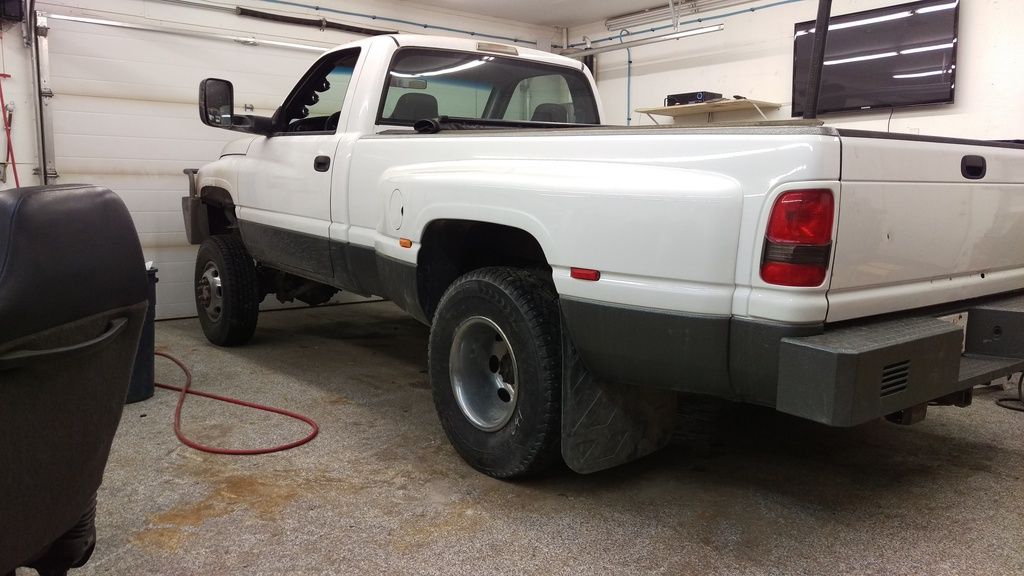
Lipstick on a pig.
Ready to put the bed on. On the lower link brackets, I added a couple flanges. I made some battery boxes a few years ago that will get mounted there. I made hatches in the floor of the bed when I did the body swap that will accommodate Group 31 batteries. I removed the passenger side battery for the twin set I'm gonna build at some point as well.
__________________
'98 3500 2wd, 24v, 5 spd, p-pumped
'98 2500 4wd, 12v, 6 spd, VP'd
'02 VW Jetta, 5 spd.
My p-pump conversion pics
|
|
|
|
|
02-07-2016, 12:57 AM
|
#13
|
Name: Tate
Title: What?
Status: Not Here
Join Date: Nov 2007
Location: Airdrie, Alberta
Member`s Gallery
Posts: 3,419
|
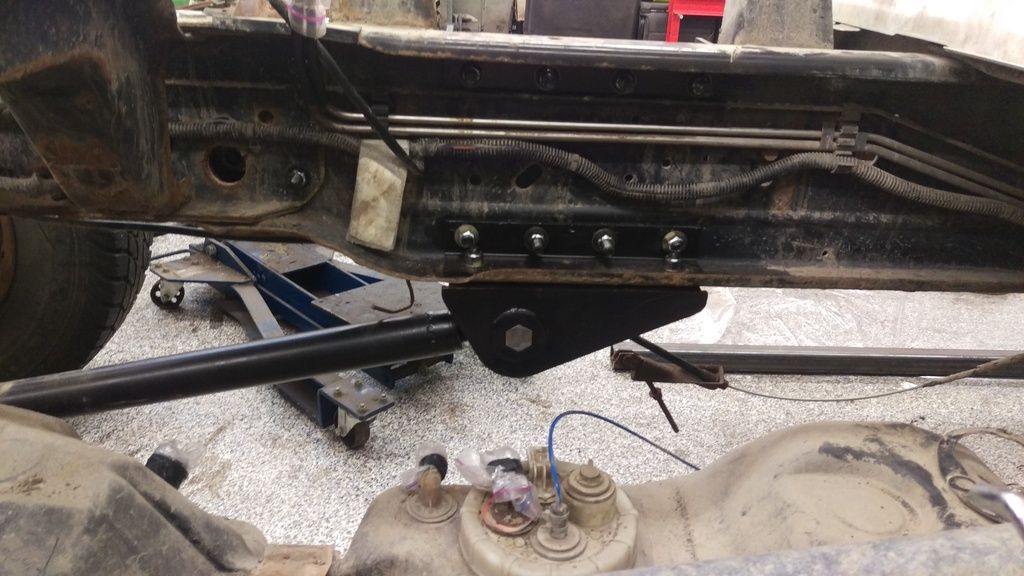
Got the bed on, but realized it was hitting the heavy steel bar on the hitch. So off it came, and back out with the grinder.
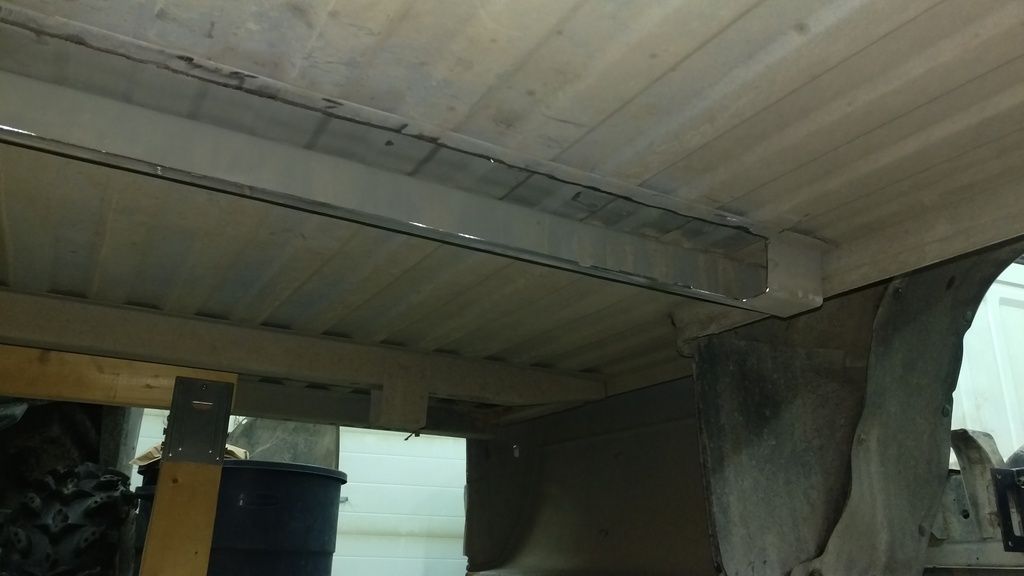
Bed back on again. The shock mounts worked out just about perfect if I do say so.
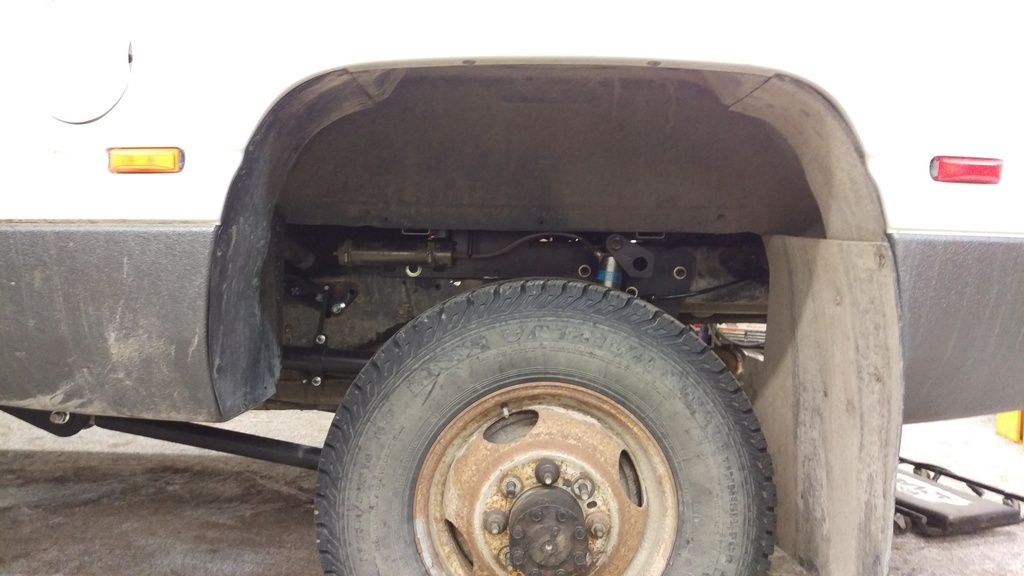
The lower link isn't too visible unless you get down to look. I imagine people will assume I just have real short traction bars.
Underneath. The ECU is whats attached to the hitch.

Final product, in the loading position.
That's all I have. I might get some more pictures out in the daylight tomorrow, although its all dirty once again. I've got about 400 km on it so far. The front is about the same as it was before, but the rear definitely rides smoother. Don't even feel rail road tracks anymore. And all those km so far have had the rzr in the back, so I have stayed off the throttle. According to the calculator, it has about 120% anti-squat at ride height, so it should dig hard with throttle. I'd like to get a video from someone next to me going down the road to see how much it lifts going full throttle.
__________________
'98 3500 2wd, 24v, 5 spd, p-pumped
'98 2500 4wd, 12v, 6 spd, VP'd
'02 VW Jetta, 5 spd.
My p-pump conversion pics
|
|
|
|
|
02-07-2016, 06:52 AM
|
#14
|
Name: badbowtie
Title: custom engine daydreamer
Status: Not Here
Join Date: Apr 2008
Location: Plainfield IN
Member`s Gallery
Posts: 475
|
Amazing work, I would love to try something like this one day
__________________
1996 3500 4x4 5spd
1991 D350 5spd
|
|
|
|
|
02-07-2016, 06:52 AM
|
#15
|
Name: SKYNYRD
Title: "Drunkard"
Status: Not Here
Join Date: May 2007
Location: Harpers Ferry, WV
Member`s Gallery
Posts: 5,666
|
Awesome job with the fabrication. I'll be doing the same here hopefully this summer to 4-link my reg cab short bed truck.
__________________
Leonard
79 VW rabbit diesel (ALH & 4motion  )
04.5 rclb 4x4 
01 & 03 VW Golf TDI 
05 rcsb 2wd (in progress  )
ROSKOE115: "It's ain't avatar material but I'd hit it!" 
|
|
|
|
|
02-07-2016, 12:15 PM
|
#16
|
Name: bgreen776
Title: White Collar Fabricator
Status: Not Here
Join Date: Jul 2012
Location: Kenai, AK
Member`s Gallery
Posts: 578
|
Nice work!
#racegreen
|
|
|
|
|
02-07-2016, 04:35 PM
|
#17
|
Name: malibu795
Title: 2wd numb nut
Status: Not Here
Join Date: Mar 2007
Location: s. charelston ohio
Member`s Gallery
Posts: 6,730
|
In case to rear 3000lb springs aren't enough..
This is what Keldderman uses in their 4 link
http://www.truckspring.com/products/...-358-5770.aspx
__________________
adam
99 3500HD LBZ/4l85 C&C semi retired hotshot
07 3500hd LMM RCLB hotshot, GT4088R, ovals
99 FL60 mutt
Quote:
|
smooth seas never made a skillfull sailor
|
|
|
|
|
|
02-07-2016, 05:07 PM
|
#18
|
Name: SWALLDOG
Title: Too Much Time
Status: Not Here
Join Date: Jun 2008
Location: Woods Cross, Utah
Member`s Gallery
Posts: 454
|
Awesome! Definitely one of the best setups I've seen. Thanks for sharing. Keep us posted on how it continues to work.
|
|
|
|
|
02-07-2016, 05:42 PM
|
#19
|
Name: SWALLDOG
Title: Too Much Time
Status: Not Here
Join Date: Jun 2008
Location: Woods Cross, Utah
Member`s Gallery
Posts: 454
|
I also really like the weld washers on all the bracket bolt holes! It's all in the little details!
Wondering, if your worried about the rear end lifting up under hard acceleration why didn't you go with a little lower anti squat? Like raise the upper links on the frame side to get it around 75% or something? Just wondering.
|
|
|
|
|
02-07-2016, 10:44 PM
|
#20
|
Name: Tate
Title: What?
Status: Not Here
Join Date: Nov 2007
Location: Airdrie, Alberta
Member`s Gallery
Posts: 3,419
|
Quote:
Originally Posted by malibu795

|
I looked at several bags in that size, but I couldn't justify 9000 lbs. capacity. AFAIK from other documents I've seen, the bags are good to at least 120 psi, so that puts my capacity around 7200 on the axle at ride height. Looking at the load curves on other bags like it, it increases quite dramatically as height decreases. If you check Page 89, that is the same bellows as what I run on the front. It goes from 3200 to 4000 lbs at the same pressure when the height collapses. I haven't found the document like this one for my rear bags, sadly.
Quote:
Originally Posted by SWALLDOG
I also really like the weld washers on all the bracket bolt holes! It's all in the little details!
Wondering, if your worried about the rear end lifting up under hard acceleration why didn't you go with a little lower anti squat? Like raise the upper links on the frame side to get it around 75% or something? Just wondering.
|
I designed it to have that much anti-squat, so when I do decide to get on it, it should plant well. I was just curious how much it actually raises. So far it rides well.
Something I forgot to mention, I used an Accu-Air E-level air management system. For the most part, its a well put together kit. As it should be. It was about 60% of the budget on this thing.
__________________
'98 3500 2wd, 24v, 5 spd, p-pumped
'98 2500 4wd, 12v, 6 spd, VP'd
'02 VW Jetta, 5 spd.
My p-pump conversion pics
|
|
|
|
 Posting Rules
|
You may not post new threads
You may not post replies
You may not post attachments
You may not edit your posts
HTML code is Off
|
|
|
All times are GMT -5. The time now is 02:19 PM.
|


