Willys Tow Rig

I love the paint color for that. Either a dark green or a tan sandy color would look great!

For the receiver, I'd put it under your diamond plate and paint it black. I bet you wouldn't even see it if you didn't have a hitch on there. My truck is on 37's and I invested in a really heavy duty drop hitch, but I still don't like it nearly as much as when the receiver is solid and mounted lower.
 
April 27th 2016

Starting to get an idea of what it could look like. I'm really trying to go for that "industrial era" look. So far I have used bronze on wheels, shocks, injector lines, some misc brackets, and the horizontal grill bars. I have used hammered copper on the suspension links and diff covers; and regular copper on the valve covers, timing cover, oil pan, and trans pan. Ive used a pewter bright silver color on the exhaust manifold and a couple small engine brackets.

I don't want any chrome on the truck. I still need to decide colors for the headlight rings, door handles, tail light housings, tail light brackets, interior window trim, and I'm sure many more pieces I'm not thinkin of.

3CB1ADC7-AA7F-496A-BFFA-5AE08B73E08B_zpszlyum7hx.jpg


7758115E-E42D-4AFE-9765-E20EF74C9CCD_zpsl2neclls.jpg


E28CC393-5FDA-46AA-983C-70D137B447B7_zpspir7vcoz.jpg
[/URL]
 
April 29th 2016

One of the guys at the tire store next door wanted me to get sideways in the gravel. I told him that was too easy so I did some doughnuts on the asphalt instead. Lol

[ame]http://www.youtube.com/watch?v=6uKKG4gAgik[/ame]

So I needed to replace my stock 56mm compressor wheel cause it was all chewed up. Went ahead and purchased a rebuild kit with the upgraded bearings from an HX35 as well as an OEM 60mm x 86mm cast wheel from a He351.

I cant believe this thing was even making boost. 65psi total with the primary only contributing about 20psi. I found out what caused the damage, the oring from the v band on the s475 output got sucked into the intermediate piping and went through the turbo. There were a few rubber pieces still stuck under the silencer ring.

D48714B0-281B-4F95-A651-6CD5BF4B2731_zpsqdsq0ul2.jpg


Side by side.

F78D9D44-6AC6-40DD-9C46-31BED596F818_zpss84etdth.jpg


0A3140BD-3BDD-4416-8D35-E5EBB91E834C_zpsxbwdjtg7.jpg


I had to turn the backing plate to accept the bigger OD of the He351 wheel as well as make the seat a little deeper.

D49E5619-FD5F-4F25-B680-886FC200DA56_zpsbu0wucqo.jpg


Nice fit.

56A0E351-650E-47AB-A8F8-22D1BD3B06A6_zps0kgkarvw.jpg


Getting ready to turn the compressor housing.

FAAD0B44-D800-4F82-8C69-FFBB0049C364_zpssoopnzu1.jpg


Nice clean radius. .015 tolerance on the wheel.

F0849DFD-64B0-49F6-A0B7-F5A6D0A09D4F_zpseqap3tw3.jpg


Looking good.

75115010-1DA3-4ADF-9885-1044B111028D_zpsp6lfmqln.jpg


All in all, I am still making the same boost and it still seems to come on the same; I am majorly limited by fueling right now (stock injectors). I do have a leak at the T4 flange from the exhaust manifold. I get a decent puff of smoke out of the gasket when I hammer the throttle (the hood is off the truck so its very visible). Im sure this is hindering spool time too. I guess I probably wont see the potential of the bigger wheel until I get some injectors.
 
April 29th 2016

So I needed to replace my stock 56mm compressor wheel cause it was all chewed up. Went ahead and purchased a rebuild kit with the upgraded bearings from an HX35 as well as an OEM 60mm x 86mm cast wheel from a He351.


What's the upgraded HX35 bearing kit you ordered? Curious as I'm needing to rebuild mine.

--Eric
 
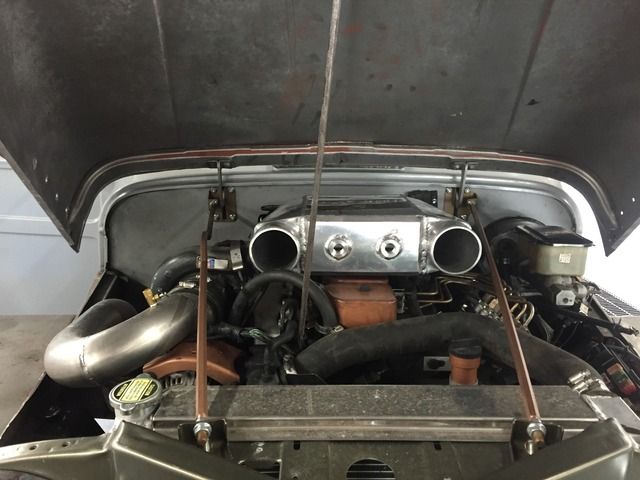
I finally bought some injectors for my rig after only running a 14.8 in the 1/4 mile. The stock ones just aren't cutting it. I found a good price on some used 5x.012 injectors so I snatched em up. Should be here on Friday. I figured while I'm waiting on the injectors I should do some upgrading to the stock 131 delivery valves to compliment them...

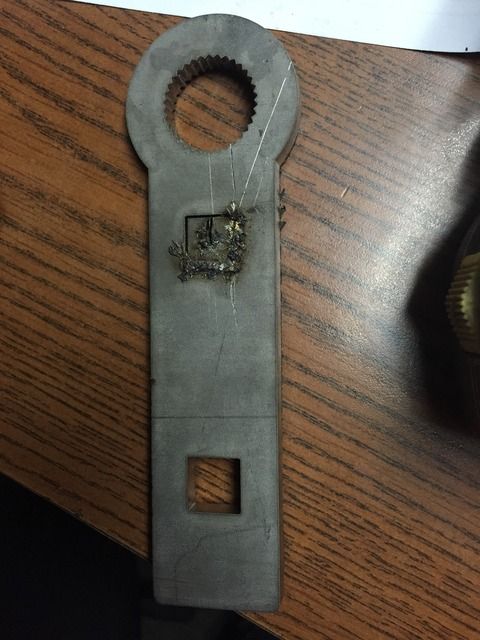
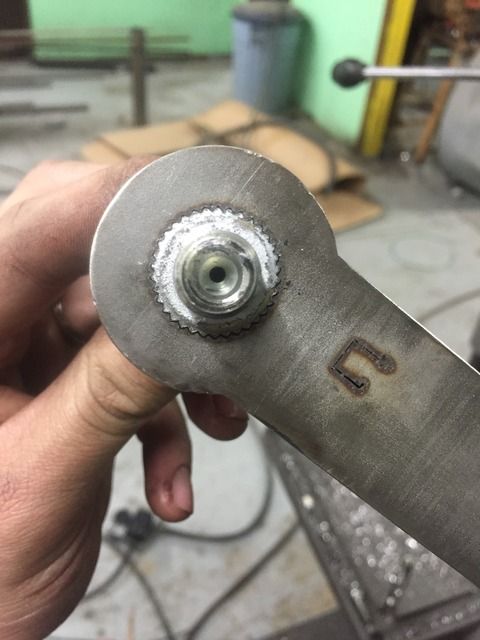
So I didn't have a delivery valve socket and I am too impatient to wait.

So I drew up and lasers out my own wrench out of some 1/4" stainless.

47758CAB-2E53-46D6-B797-A81AF65AC2AC_zpsxh1vhlqh.jpg


For anyone who cares; the spline count on the delivery valves IS NOT 32 splines, it is actually 34 splines. Drove myself crazy trying to figure out where I went wrong on the first attempt.

Attempt 2 matched up to the delivery valve perfectly.

9BD03961-1DDF-4827-A152-E3C0E247FD0C_zpsfally58k.jpg


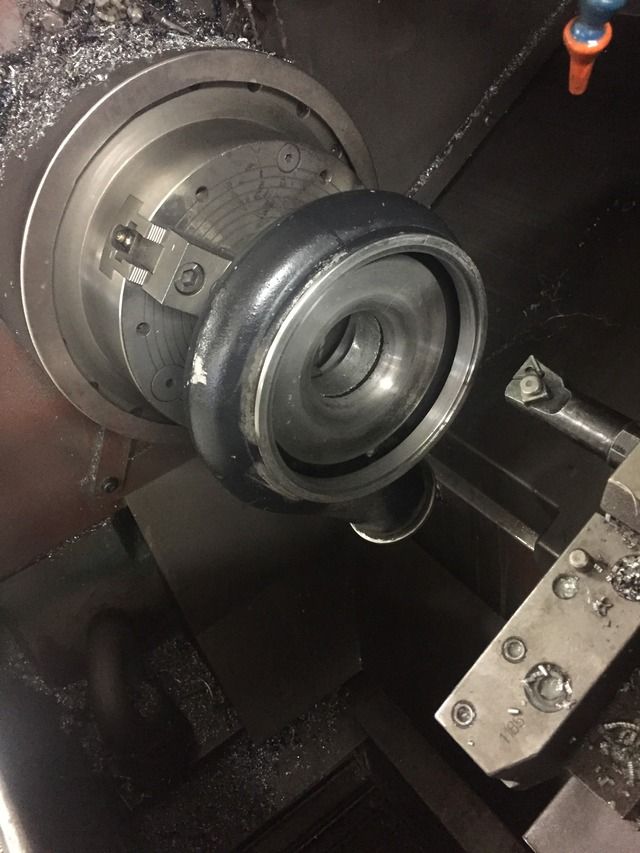
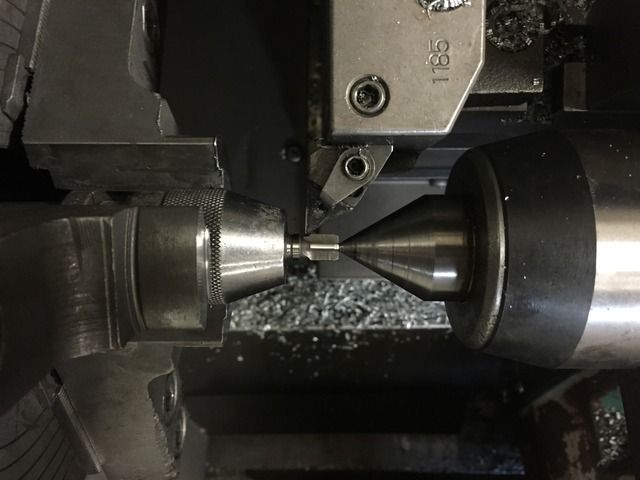
Used a 3 jaw drill chuck to hold the valve by the top tit that the spring sits over then chucked that up in the lathe. Since there isn't much meat to hold on to and I'm sure tool pressure would push it out easily, I decided to use a center to keep her nice and true and held in place. Luckily, the valve already has a little center indent on the end.

84D04FD5-D19E-47F6-9AA1-D3B27D6D33E7_zps8cnrhp4l.jpg


To my surprise, the material didn't seem too hard; my carbide insert cut right through it like butter.

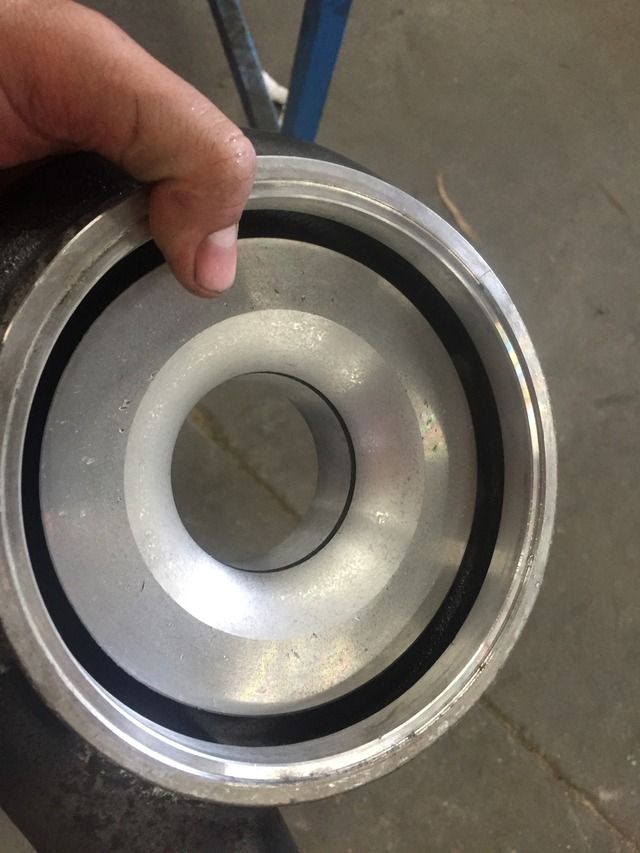
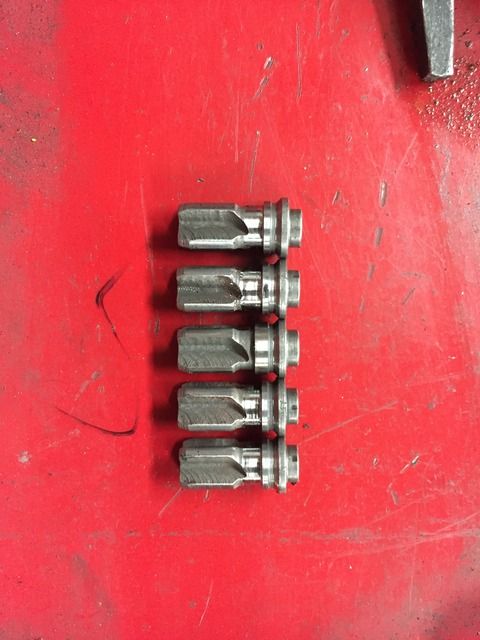
I decided to take .040" off the collar. This is about half of the normal thickness and appears to be close to the 024 valves judging by the pictures. I was able to keep consistently within 0.001 across all 6.

You can see the 2 already turned on each side and the original in the middle.

E2E381DD-8B6A-42EA-A918-F71E516379EA_zpslufkkzku.jpg


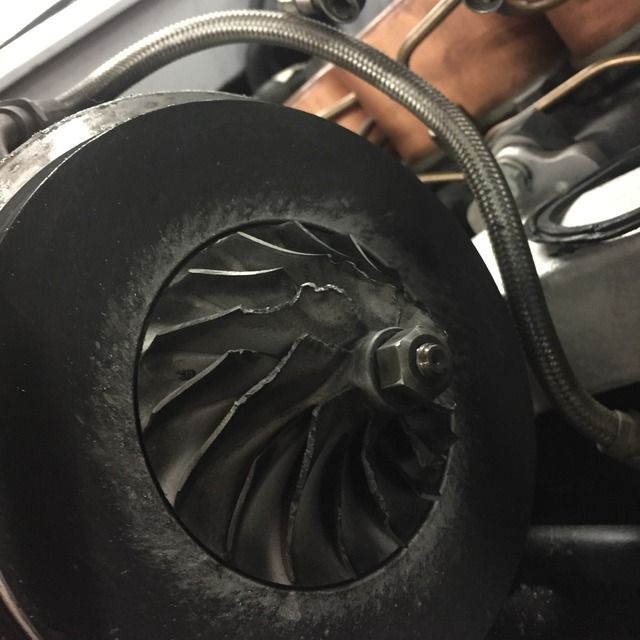
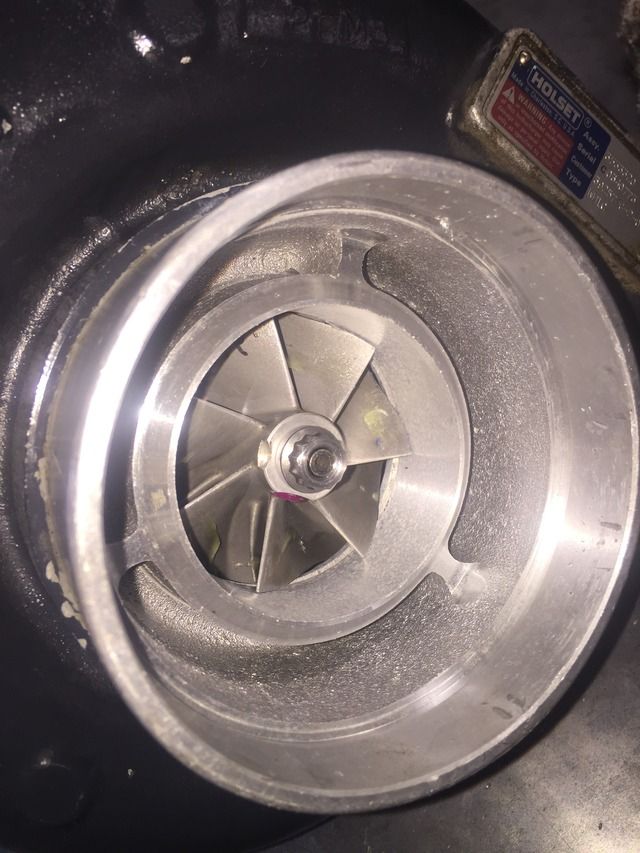
Overall, I was super happy when I started up the truck and it idles just as smooth as it was before. No hazing at idle. Throttle response is a lot quicker and the turbo seems to light a good 100rpm lower. I can hit 75psi now EASY with the compounds compared to my previous 65psi and the 37s squeal for a good half second when shifting into 2nd gear when before there was nothing.

I would definitely say I am happy with the improvement and cant wait for my injectors! Wish I had time to go to the track to see how much time I shaved off just by doing this mod. Going to be after I install the injectors though.
 
May 27th 2016 (this has got to be one of my funniest updates ever.....)

So.... Just installed the used 5x.012s. And HOLY FREAKIN COW!! The 37s break loose in 3rd gear going down the highway! I can honestly tell you I have never been scared of a vehicle before... Im going to put an intercooler on this thing and I am done. haha
 
May 29th 2016

Bought 5 yard of some nice faux leather the other day. Quick mock up to get an idea of what it will look like. There will be antiqued bronze buttons around the parameter. Going to be making custom door and window cranks, most likely painted a bronze or copper color. Will recover the original arm rest/pull handle that goes on the top right. Thinking maybe add a 1" wide antiqued brass strip horizontally about mid door?...

5ADFBBF9-899B-4F73-AA57-07C0A4615D2C_zps6fbjkqom.jpg


8063EF96-EACB-4A4E-A53D-FA8BBBFAB2C8_zps7jpkawp9.jpg


June 16th 2016

Project this week has been trying to fit this air/water intercooler under the hood.

E8733490-5D72-4A93-B1BD-08B13EBBCB9B_zpsnxyz1wmv.jpg


CC407FA4-57B1-44C3-91D8-0B78F724AC36_zps3atxpljn.jpg


Umm. So. I need to figure out how to route the charge air without losing a bunch of efficiency. How much do I need to worry about turbulence here? Or is it kind of just a high pressure area (intercooler, charge pipe, and intake plenum) being forced into a low pressure area (cylinders) and flow velocity isn't such a concern?

This is kind of what quickly came across my mind. Feel free to pick it apart if you have helpful ideas on how I can make this work.

Intercooler_zpsqfte1rw1.png


My main worry right now is how the charge air is going to be forced out of the turbo and directly into a "wall" before it makes its way around the left turn. Is this going to be a big issue? I did notice that a lot of air/air intercoolers kind of do the same thing on the end tanks...

I've never messed with the flow simulation in Solidworks so I decided to do a little trial and error to get some results. I don't exactly know how to properly interpret the data for my use but found it interesting to see less "red" than I expected. Maybe some of you guys more experienced in fluid dynamics can help me out.

There were a lot of options for the analysis but I selected the ones I felt were relevant.

All simulations were ran at 67lb/min on the inlet and atmospheric pressure at the outlet. I know the outlet parameters aren't atmospheric but I didn't know what to put here for the sake of the test.

Velocity.

Velocity_zpsekrhvav7.png


Pressure.

Pressure_zps6esi9dwr.png


Turbulent Energy.

Turbulence_zpsadmurgh6.png


Stagnation.

Stagnation_zpscglgfl1l.png
[/URL]
 
June 17th 2016

Last night I made a decision on what to do on the intake manifold side.

I hate cutting in to a new product to modify for my needs, but No turning back now. I guess that's part of making a completely custom rig. lol

]
8BBCDC77-C1CE-4FCF-B9A4-16348697F220_zpsub6gc5ap.jpg


Banks and some other companies sell these "dual ram" intake horns for ridiculous prices. The theory is that the back 2 cylinders get robbed of air because of the offset. So I decided to incorporate that into my setup. Didn't really cost me any extra work or anything.

A little manipulation to get everything lined up before I TIG it all together.

35662FD1-9D2E-4B35-9FA9-ECB1BFD44C18_zpsjdhkrota.jpg


I haven't made a decision for sure on the turbo side. By the end of the day hopefully I will have something figured out.
 
Back
Top