48RE Performance Transmission Rebuild

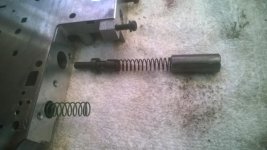
Next clean-up the wear scuffs and de-burr the overdrive piston retainer with lubed up fine sand paper, I like to use 500 grit, then install new gasket and bolt the retainer to the main case.

48reMainTrans38_zpsd8ad0629.jpg


48reMainTrans39_zpsf9ca5edd.jpg


48reMainTrans41_zps5960d74b.jpg


48reMainTrans42_zpsbd9aece8.jpg


Next install the low-reverse drum with the metal upgraded tabbed thrust washer:
48reMainTrans43_zps14912a68.jpg


Remember to install the low reverse band on the drum before place it in the main transmission case.

48reMainTrans44_zpsa8a36731.jpg


Lube and install new sprag before installing the drum and snap ring:
48reMainTrans45_zps807df9ac.jpg


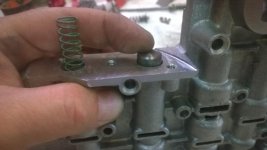
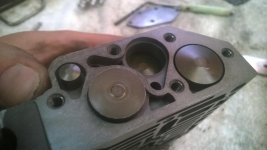
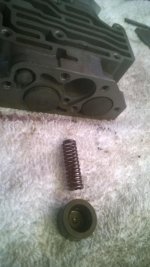
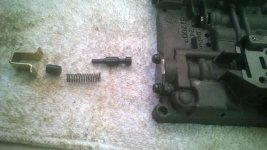
After the drum is in-place, install the low/reverse lever and pivot shaft from rear of main case complete with fresh oring seals.

48reMainTrans46_zps0e4d0b87.jpg


48reMainTrans47_zps40ee8839.jpg


Next replace the thrust washers between the moving planetaries and rings that spline onto the intermediate shaft:

48reMainTrans48_zps47268ec5.jpg


48reMainTrans49_zps4bd6c660.jpg


48reMainTrans50_zps7ac3269c.jpg


48re has (6) pinion steel planetary, 47rh/re has (5) pinion aluminum planetary although this planetary is not a common failure point.

48reMainTrans51_zpsabe46892.jpg


48reMainTrans52_zps1a73a7b2.jpg


Next is the sunshell:
48reMainTrans53_zpsc54ac708.jpg


48reMainTrans54_zps2b419c00.jpg


48reMainTrans55_zpsd70af54c.jpg


48reMainTrans56_zpsa7fdc57a.jpg


48reMainTrans57_zps150febfa.jpg


The 48re stock forward planetary has (6) pinion gears and is made from steel, 47re has (5) pinion steel, 47rh has (5) pinion aluminum. The aluminum 47rh planetary is a common failure point and is usually upgraded with a steel planetary. The stock 48re forward planetary is not a common failure point.

48reMainTrans58_zps35d386de.jpg


48reMainTrans59_zps20ce44cb.jpg


48reMainTrans60_zps4d3b6e45.jpg


48reMainTrans61_zpsd1655538.jpg


48reMainTrans62_zps4bcccddb.jpg


Install snap ring after sliding forward gear and planetary into place:
48reMainTrans63_zpsa8470e26.jpg
 
Last edited:
Then set snap ring end of intermediate shaft on the bench and check planetary/geartrain endplay:

48reMainTrans64_zps075d5b3a.jpg


48reMainTrans65_zps514c5e95.jpg


Set main trans case up on a stool with hole in center for intermediate shaft, then install the geartrain-loaded intermediate shaft.

48reMainTrans66_zps7d2720d6.jpg


48reMainTrans67_zpsf40e3a11.jpg


48reMainTrans68_zps232ab25c.jpg


48reMainTrans69_zps737db105.jpg


Notice how the assembly fits neatly down into the low/reverse drum with rear planetary tabs engaged into low/reverse drum.

48reMainTrans70_zps8454db49.jpg
 
Keep it going! Good stuff.

Its funny this thread came up, i did a 48re this sunday that was in almost as bad condition. 90% of the band was down to the steel LOL. Amazing how much clutch material can find its way into everything. Auto's are like body work. Half the work is prep and cleaning.

A valvebody upgrade walkthrough would be awesome. Very intimidating when you first tackle one.

With a valvebody you want a manual in front of you the first time. I laid mine out on shop towels and wrote the corresponding number for each part from the ATSG next to them

Seriously, I'm still finding clutch material in odd places and my trans was a lot cleaner inside
 
Last edited:
Next install new seals on the billet input shaft. The Transgo shift kit provides new upgraded scarf-cut teflon seals.

48reMainTrans71_zps8663b657.jpg


48reMainTrans73_zps3ecf5f7b.jpg


Install the upgraded green teflon seal, then install (2) new seals provided in the rebuild kit.

48reMainTrans74_zps30d15779.jpg


48reMainTrans75_zps4b3f7491.jpg


Install the forward drum on the input shaft and place it shaft down to work on the forward (rearmost) clutch pack.
48reMainTrans76_zps380ae531.jpg


48reMainTrans77_zps4e0176c7.jpg


Replace seals on the piston:
48reMainTrans78_zpsa4419aa2.jpg


Use lip wizard (supplied in rebuild kit) to ease piston with seals installed into bottom of input shaft hub.

48reMainTrans79_zps747df815.jpg


48reMainTrans80_zpsaedba26f.jpg


Pictured below is the stock 48re belleville spring which is a weaker design than the 47rh & 47re. This spring is fine for stock or mildly upgraded pressure. For safe capacity in the 200 psi line pressure range, it's best to upgrade this spring with a stock belleville spring from an older model.

48reMainTrans81_zps4be33d6d.jpg


Upgraded spring on-top, stock 48re spring on bottom.
48reMainTrans82_zpsdcf3b3af.jpg


This isn't a 100% direct swap since the piston to forward drum distance is not identical between the older and newer transmission. The old style belleville spring is loose when swapped in-place of the stock 48re spring. A simple shim can be added, a custom billet piston, or "other" custom tricks can be used, sticking with the stock 48re spring is fine for 90% of tranny builds out there. It's the full-blown race trucks utilizing 195+ psi line pressure that need an upgraded spring and 250+psi that need a doubled up or billet spring because the old style fails in the 250 psi range.

48reMainTrans83_zps210faeb3.jpg


Install cushion spacer and waved snap ring:
48reMainTrans84_zpsfc1a2faa.jpg


48reMainTrans86_zpsa5f9accb.jpg


Next install stepped pressure plate:
48reMainTrans87_zpsde0fa05e.jpg


48reMainTrans88_zps6b5ce3f4.jpg


Install stock count (4) frictions and (3) steels topped off with the stock thick reaction plate, remember to soak the frictions for a minute or two to get them wet with trans fluid:

48reMainTrans89_zps57139db9.jpg


48reMainTrans90_zps88defc1a.jpg


Check clearance between the snap ring and top reaction plate, I like to see .020" minimum, if sticking with stock spring and clutch setup, the clearance will be perfect, no need to mess with thicker or thinner snap rings, steels, frictions, etc. This clutch is applied in all forward gears so clearance is only an issue when driving in reverse and the clutch pack is forced to slip.
 
Next comes the direct drum also known as the 3rd gear drum, start by compressing the release springs to remove the snap ring in preparation for piston removal.

48reMainTrans91_zps5b68827f.jpg


Stock 48re utilizes (9) return springs, I've found (9) to be adequate although some builders do install all (15) return springs.

48reMainTrans92_zps5a3084fe.jpg


48reMainTrans93_zps6de4024d.jpg


Install new bushing:
48reMainTrans94_zpsd67ffada.jpg


Picture of wear marks, add a hole between the wear marks to aid in direct clutch application. I like to go .125" on this added feed hole opposite the factory feed slot.

48reMainTrans95_zps60197acf.jpg


48reMainTrans96_zps98b4cfee.jpg


48reMainTrans97_zps5ccbf413.jpg


48reMainTrans98_zpscb2a954a.jpg


48reMainTrans99_zpsbe6aa5c5.jpg


Replace large outer seal on the piston and smaller inner seal on the drum itself:

48reMainTrans100_zps635010ac.jpg


48reMainTrans101_zps5f031231.jpg


There are aftermarket pistons available for this drum, however, the stock piston provides adequate space for clutch pack I like to run so I don't upgrade the piston. When the day arrives that (6) clutches won't hold, it's probably best to upgrade the whole drum assembly for a billet steel unit.

Install piston, be sure to pre-lube the seals with ATF.
48reMainTrans102_zps7be22dca.jpg


48reMainTrans103_zps8ff006f3.jpg


48reMainTrans104_zps26a08074.jpg


The stock 48re clutches and steels measure roughly .086", utilizing a stepped reaction plate, there was enough room to run (4) .086" frictions and (2) .064" frictions for a grand total of (6) clutches and (6) steels. The rebuild kit came with (5) .086" frictions and steels so I supplemented the kit with (2) .064" high energy frictions and (2) .069" steels.


48reMainTrans105_zpse1fd81b4.jpg


48reMainTrans106_zps3936cfe4.jpg


48reMainTrans107_zps82736010.jpg


48reMainTrans108_zps21f72bd5.jpg


Then the pack is topped off with the custom stepped reaction plate and selectable thickness snap ring. The stock setup used a waved snap ring to cushion the application of 3rd gear, for firmer application, a flat snap ring can be used.

Then check clearance, it's good to end up with .010" minimum per friction so .060" minimum for this build.

48reMainTrans109_zps2306e3e5.jpg


This one ended up at .072"
48reMainTrans110_zps78a45396.jpg
 
Big blue, what kind of power will this 48 hold the way you are building it?

Sent from my XT1080 using Tapatalk

HP capacity is really more related to the amount of torque put through the tranny. Big single turbos produce less torque that quick spooling twins so trucks with quick spooling twins need more line pressure to prevent clutch slippage.

This tranny is being built for the customer's future upgrade plans for 700 ish HP or up to 1500 ft lbs of torque at the tire. With simple line pressure adjustments, this tranny is smooth and tame for the lower powered daily driver and aggressive and firm when pressure is cranked up to 200 psi for bigger HP and TQ capacity.
 
A couple of Issues while doing my Valve Body

I have a couple of questions about my rebuild.
While at work my workbench "got messed with"
So I need so help in solving the puzzle of what order a couple of valves go in.

this first and last pic shows that this is as far as the steel plug?? will go in. and the order I put them in, I know this one came out and back in in the correct order.


does the second, third, and fourth pic look correct?
Lastly the Lock up valve, I cant figure out how it goes in with that plug.. is it plug valve spring?, does that plug belong with this valve..

thanks in advance
 

Attachments

  • WP_20140804_011.jpg
    WP_20140804_011.jpg
    32.3 KB · Views: 0
  • WP_20140804_005.jpg
    WP_20140804_005.jpg
    34.5 KB · Views: 0
  • WP_20140804_004.jpg
    WP_20140804_004.jpg
    28.7 KB · Views: 0
  • WP_20140804_007.jpg
    WP_20140804_007.jpg
    48.8 KB · Views: 0
  • WP_20140804_010.jpg
    WP_20140804_010.jpg
    43 KB · Views: 0
Test Drive after Transgo and some Sonnax Parts

Question - HELP
SO I just installed my trans-go kit, Sonnax billet accumulator and 2nd gear super hold servo kit.
My Trans-Go kit did not come with the green TV Spring..
I turned the PR Valve spring adjuster in 2 turns
Drilled the the separator plate 2 to 3 (A & B) holes to .110 and 1 to 2 hole to .088
Drilled the Lock up pressure plate to .075
Installed Borg Warner solenoid, and new transducer
Trans as far as I know is stock besides what I have just done.
I followed Big Blues instructions for the most part, did not drill as large as its easier to drill bigger than to fill a hole back in..lol

So here is my issues I would like to correct;

1st to 2nd gear shift happens very quickly, like before half way through a left turn, I would like to see that wait a bit.
The shift is not as firm as I would like ether.

Second Issue at half throttle or more the 3 to 4 shift hangs a bit then shifts and some times it comes off of 3rd then shifts to 4th.

Lock up feels nice and firm.

Should I bump the line pressure up another turn to firm up the shifts?
 
I disconnected my TV cable, then ziptied the lever, and kept tightening it a little each day until I liked how the 1st to 2nd gear shift was. Then I dropped the pan and adjusted the tv screw to hold the lever there (as a minimum, obviously). Then hooked everything back up and I LOVE the difference. Now it shifts just after the turbo starts to light, so when it shifts it is still just starting to light and it doesn't fall on it's face and smoke. My truck is actually 100% smoke free if I am DDing it, and not getting crazy which I love. And towing is much much better from a stop.

2-3 doesn't change much, but I'm moving fast enough by that point that it could be increased another 100rpm to be perfect, but it's good.

3-OD is based on your TPS and your speed, so is TCLockUp. I have 37's and the stock gear/tone ring thing in my tcase, so my speedo is pretty far off. That makes it shift early. I've been saying I'll change it for years.
http://www.transmissioncenter.org/speedometer_gears_for_dodge_and_jeep.htm
I also loosened my TPS and rotated it to make the PCM think I am pushing on the throttle a little more.
 
Got a 47re torn down today. I've only found 2 issues. Overdrive piston seal was blown out and overdrive clutches are burnt to hell. This is going in a stock grandpa truck. Should I upgrade either of the servos or bands?
I'm going to do a shift kit, converter, seals and bearings for sure.
apu3e8e7.jpg

pudyveja.jpg
 
Next, Rebuilding the Pump:

48reMainTrans123_zpsba9375c0.jpg


Flip it over and remove the 1/2" bolts connecting the stator to the main pump body:
48reMainTrans124_zps0cb4adba.jpg


48reMainTrans125_zpsaa57ef7d.jpg


Remove stock pump gears
48reMainTrans126_zps35596431.jpg


48reMainTrans127_zps1ddf5b76.jpg


Next drive out the torque converter bushing and replace it with a new one. Be sure to stake-it at (2) locations like the old one or it will eventually catch the converter snout and spin and eventually wipe out the main seal and cause a big leak!!!

48reMainTrans128_zps137afdce.jpg


I didn't get a good picture of the bushing or new torque converter seal install, but here's a picture I borrowed from one of my 47re builds which uses the same bushing and seal on the pump:

Transmission16.jpg


Transmission15.jpg


Next replace the bushing from inside the stator, this supports the first land on the input shaft. It's usually still in pretty good condition so some guys get away with just reusing the old one.
48reMainTrans134_zps0b0fece8.jpg


Next lube the new teflon coated pump gears with tranny grease:
48reMainTrans129_zpsc98bf942.jpg


48reMainTrans130_zpsa5d58b48.jpg


Install new seals on stator:

48reMainTrans131_zps49a8ea25.jpg


48reMainTrans132_zps0593a17b.jpg


48reMainTrans133_zpsb1938473.jpg


Add a little tranny grease to keep the seals seated tight until final assembly is complete:
48reMainTrans135_zps7ccd2056.jpg


Replace pump outer seal:

48reMainTrans136_zps5fd892bd.jpg


Bolt it back together with the 1/2" bolts and it's finished:
48reMainTrans137_zpsbcc18557.jpg
 
Back
Top