| Advertisement |
|
|
|
|
|
|
|
If this is your first visit, be sure to check out the FAQ by clicking the link above.
You may have to register before you can post: click the register link above to proceed.
To start viewing messages, select the forum that you want to visit from the selection below.
|
 03-07-2019, 01:38 PM
|
#1
|
Name: Chassisman
Title: Gator Out...
Status: Not Here
Join Date: Aug 2016
Member`s Gallery
Posts: 266
|
Death Wobble
I haven't seen ne1 complain here about DW or offer any fix but here's mine. Oversized trac bar bushings. I have two trac bars I'm experimenting with. One has a poly bushing w/3/4 in bolt and the other a Uni-ball type. The trac bar in the pic is an aftermarket Carli trac bar donor getting ready for surgery.
__________________

Last edited by Chassisman; 03-07-2019 at 01:39 PM.
|
|
|
|
|
03-08-2019, 12:06 PM
|
#2
|
Name: CorneliusRox
Title: Seasoned Rookie
Status: Not Here
Join Date: Dec 2012
Location: Detroit, MI
Member`s Gallery
Posts: 4,154
|
I like your idea and have been thinking about something similar. I don't have death wobble, but I do have slop even though everything is new. When i swapped for another new OEM track bar, I kept my old one around. My idea is to machine up a new compression limiter (inside metal piece) that has a larger OD, then turn some UHMW or Delrin and make a stiffer joint that still has some compliance.
I still want it to be a press in bushing instead of welding onto the OEM bar because they use something other than mild steel, and I'm assuming it's a spring steel with some tempering (otherwise the definitely would have welded the bushing collar on).
I just need to find the time, but it shouldn't take more than a couple hours to do it all.
I was also looking at geometry based rate change if it's too stiff. You can put groves/dimples into the plastic to change it's application durometer.
I also might beef up the bracket on the frame side. It doesn't appear to flex, but I have a suspicion it does when it sees high speed inputs.
Keep us updated!
I'll try to post here if I get some time to do anything.
__________________
Corey - BSME '21 Tesla Model 3 Perf
'22 DMax AT4 2500
|
|
|
|
|
03-08-2019, 04:44 PM
|
#3
|
Name: Chassisman
Title: Gator Out...
Status: Not Here
Join Date: Aug 2016
Member`s Gallery
Posts: 266
|
I've never had Death Wobble either, but there is play there in the bolt holes on the frame and axle. So I replaced the frame side bracket with one 1/4 inch thick and also welded hardened washers on to the brackets to keep them from wearing out and getting elongated. I'm expecting my steering to tighten up at the very least. I hope having no give joints won't cause any vibrations or noise, but I doubt I'd hear it over the exhaust. lol
__________________
|
|
|
|
|
03-08-2019, 06:04 PM
|
#4
|
Name: CorneliusRox
Title: Seasoned Rookie
Status: Not Here
Join Date: Dec 2012
Location: Detroit, MI
Member`s Gallery
Posts: 4,154
|
Quote:
Originally Posted by Chassisman

I've never had Death Wobble either, but there is play there in the bolt holes on the frame and axle. So I replaced the frame side bracket with one 1/4 inch thick and also welded hardened washers on to the brackets to keep them from wearing out and getting elongated. I'm expecting my steering to tighten up at the very least. I hope having no give joints won't cause any vibrations or noise, but I doubt I'd hear it over the exhaust. lol
|
So, on my 12V I did heim joints top and bottom with a beefy frame side bracket I made. It transmitted a TON of noise, which was okay since it's a 12V and definitely not set up for comfort.
On my daily truck I want it a bit quieter. I torqued the bolts with a new track bar and the bolts don't move at all while I have someone move the wheel stationary. I also don't see any worn paint around them. The bushings however, move a TON. That's what made me think I needed to stiffen them up.
I'm hoping I can find some middle ground where steering tightens, but the noise just barely increases.
__________________
Corey - BSME '21 Tesla Model 3 Perf
'22 DMax AT4 2500
|
|
|
|
|
03-08-2019, 06:39 PM
|
#5
|
Name: Chassisman
Title: Gator Out...
Status: Not Here
Join Date: Aug 2016
Member`s Gallery
Posts: 266
|
Ya, that's why I was thinking Poly bushing instead of rubber. We'll see if I can ever get the new bracket lined up right!
__________________
|
|
|
|
|
03-08-2019, 08:34 PM
|
#6
|
Name: Chassisman
Title: Gator Out...
Status: Not Here
Join Date: Aug 2016
Member`s Gallery
Posts: 266
|
I got the bracket close enough. With a 2 in ball there's some room for misalignment, not as much as a hiem joint, but no worries about blowing it out. The races in my uniballs are "Prothane" instead of bronze or some other metal so they should be very quiet .
__________________
|
|
|
|
|
03-09-2019, 02:27 PM
|
#7
|
Name: Chassisman
Title: Gator Out...
Status: Not Here
Join Date: Aug 2016
Member`s Gallery
Posts: 266
|
Wow, just came back from a test run. Everything is tight and right, and zero noise! It steers better, corners better, and no more popping or clunk when cornering or shifting the trucks weight from side to side. My old trac bar was not that worn out, just a little bit of play.... but this is a noticeable improvement!
__________________
|
|
|
|
|
03-09-2019, 02:35 PM
|
#8
|
Name: bracker8040
Title: Too Much Time
Status: Not Here
Join Date: Jan 2007
Member`s Gallery
Posts: 818
|
Quote:
Originally Posted by Chassisman
Wow, just came back from a test run. Everything is tight and right, and zero noise! It steers better, corners better, and no more popping or clunk when cornering or shifting the trucks weight from side to side. My old trac bar was not that worn out, just a little bit of play.... but this is a noticeable improvement!
|
Its always a good feeling when changes have a positive outcome. 
|
|
|
|
|
03-10-2019, 07:43 PM
|
#9
|
Name: Chassisman
Title: Gator Out...
Status: Not Here
Join Date: Aug 2016
Member`s Gallery
Posts: 266
|
Quote:
Originally Posted by bracker8040
Its always a good feeling when changes have a positive outcome. |
Yes sir, and since there is no cure for my disease of re-engineering everything it's good to know it wasn't wasted time!
__________________
|
|
|
|
|
03-10-2019, 08:30 PM
|
#10
|
Name: CorneliusRox
Title: Seasoned Rookie
Status: Not Here
Join Date: Dec 2012
Location: Detroit, MI
Member`s Gallery
Posts: 4,154
|
Quote:
Originally Posted by Chassisman
Wow, just came back from a test run. Everything is tight and right, and zero noise! It steers better, corners better, and no more popping or clunk when cornering or shifting the trucks weight from side to side. My old trac bar was not that worn out, just a little bit of play.... but this is a noticeable improvement!
|
That's awesome! Mind taking a picture of the frame and axle side mounts that you modified? Looking at mine, it looks like I'd have to grind off a lot of weld at the frame to make it accept a wider bushing. Wither that or chop up the current bracket.
And then what was your final configuration with bushing, washers, and bolts?
__________________
Corey - BSME '21 Tesla Model 3 Perf
'22 DMax AT4 2500
|
|
|
|
|
03-11-2019, 10:49 AM
|
#11
|
Name: Chassisman
Title: Gator Out...
Status: Not Here
Join Date: Aug 2016
Member`s Gallery
Posts: 266
|
Pics of the frame bracket I made since it's a 6in lift it's a drop bracket, so I just welded it onto the existing factory bracket after cutting some off to give the correct geometry. Axle side I just drilled the hole bigger and reinforced factory bracket, and added an EMF rod end, (non heim joint) 3in Uniball on drop bracket, with 3/4 in bolts and hardened weld washers to give 1/2" total thickness to support the bolt in a double shear mount...Yes the bracket needs to be wider and that's the whole point, to make it bomb proof!
__________________
|
|
|
|
|
03-11-2019, 01:47 PM
|
#12
|
Name: jasonc
Title: Too Much Time
Status: Not Here
Join Date: Nov 2009
Member`s Gallery
Posts: 4,412
|
Looks good.
Have a pic of the whole trac bar installed?
|
|
|
|
|
03-11-2019, 03:43 PM
|
#13
|
Name: Chassisman
Title: Gator Out...
Status: Not Here
Join Date: Aug 2016
Member`s Gallery
Posts: 266
|
Quote:
Originally Posted by jasonc
Looks good.
Have a pic of the whole trac bar installed?
|
Yep, just finished up. Hopefully I got the geometry close enough.
__________________
|
|
|
|
|
03-11-2019, 03:48 PM
|
#14
|
Name: jasonc
Title: Too Much Time
Status: Not Here
Join Date: Nov 2009
Member`s Gallery
Posts: 4,412
|
Looks solid!
You must beat on it good running a truss.
|
|
|
|
|
03-11-2019, 05:53 PM
|
#15
|
Name: Chassisman
Title: Gator Out...
Status: Not Here
Join Date: Aug 2016
Member`s Gallery
Posts: 266
|
Quote:
Originally Posted by jasonc
Looks solid!
You must beat on it good running a truss.
|
I hear that quite a bit, but I'm just one of those guys that likes to tinker, and make things more than actually use them. I have a truss on the rear axle as well and a triangulated 4 link. You'd be surprised how easy these axles bend, one trip to the dunes and it was smiling at me!!!
__________________
|
|
|
|
|
03-13-2019, 09:28 AM
|
#16
|
Name: CorneliusRox
Title: Seasoned Rookie
Status: Not Here
Join Date: Dec 2012
Location: Detroit, MI
Member`s Gallery
Posts: 4,154
|
Found a little bit of time to work on my setup. I'm planning on going after a very OEM solution.
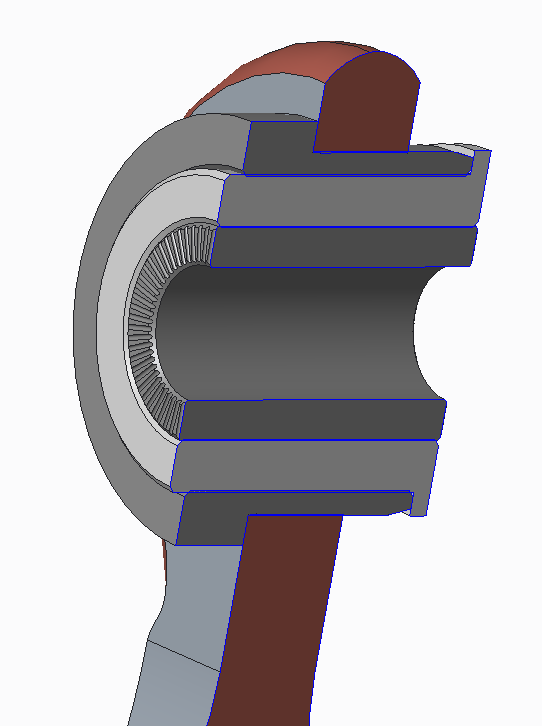
After doing some measuring and hand calcs, I'd like to use Delrin (self-lubricating, high duro, high impact resistant, readily available) with a machined outer housing, same geometry on the inner compression limiter, and pressed into the same OEM forged track bar. Once installed, you'd never know the difference other than hopefully tighter steering.
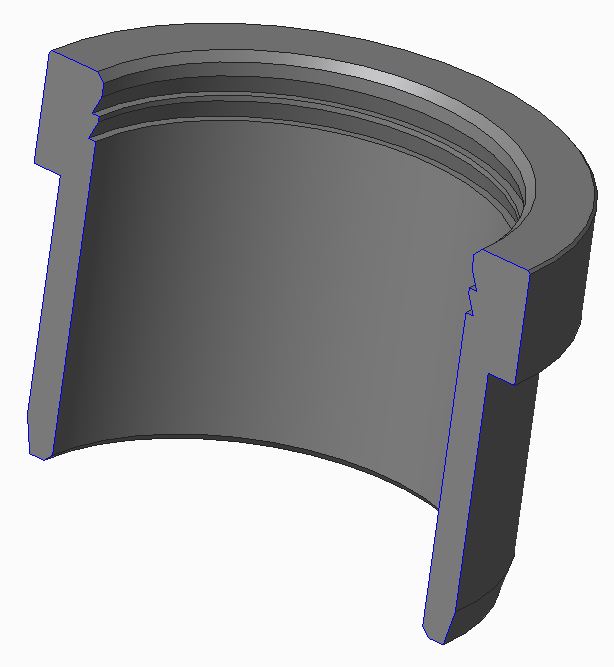
I started by measuring everything, and copying that geometry into a CAD model.

Then I pressed out the bushings (they were SNUG), and sand blasted the rust off and measured some more. Looks like these were forged, then machined with a slight chamfer for the bushings.
I decided to cross section one of the bushings for measurements on material durometer and curiosity. Turns out they use natural rubber with an over molded mild steel piece to achieve the stiffness they’re looking for. The two biggest advantages here, for OEM are 1) Natural Rubber does not fatigue through use. That’s why it’s still used in all tires instead of purely synthetic solutions, the downside is it’s really soft so you need to do fancy stuff to hit your stiffness and displacement targets 2) Overmolding allows OEMs to not worry about contaminates. My biggest issue will be contaminates and plastic degradation based on that. Some use poly bushings with zert fittings, to grease, but Delrin doesn’t like grease (changes its properties a bit) and if you don’t keep up on the grease, it’ll do the opposite and just hold dirt in there.

I then modeled everything as OEM to have a baseline. I could probably supply .stp files if anyone needed them.
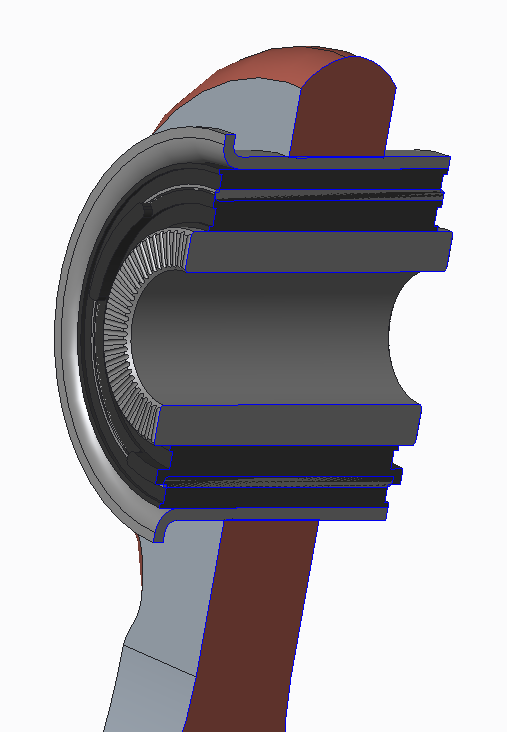
Them I engineered a new setup. This uses a machined outer housing that has a positive stop (so it’ll self-center when I press it in), and a thick side to aid in pressing it in without deformation. I’m using the same five thousandths interference as OEM. I might have to take a little more off since this will be more rigid than the OEM stamped one, but I’ll deal with than when I get there.
The Delrin center section has a shoulder on one side to help it from walking, and to make sure it’s centered when fully pressed in. This will have a decent amount of preload/interference to help combat the contaminates. I’m going to start at .25” wall thickness and 0.01” interference and see if I can press it in. I might have to take a little more off. Planning on 0.005” interference on both sides (ID and OD).
For the compression limiter/inner section, I’m going to copy the OEM geometry. I haven’t had any issues with that deflecting when torqueing the joint or walking during road events. Why change what works?
I’m really hoping this setup initially feels much better, doesn’t transmit much more noise/vibration, and lasts almost as long as the OEM ones do.
Next steps are finding time to machine two outer housings. The Delrin and compression limiter should be easy, pressing everything together should be easy, and install should be easy.
__________________
Corey - BSME '21 Tesla Model 3 Perf
'22 DMax AT4 2500
|
|
|
|
|
03-13-2019, 07:20 PM
|
#17
|
Name: Chassisman
Title: Gator Out...
Status: Not Here
Join Date: Aug 2016
Member`s Gallery
Posts: 266
|
Wow, you're for sure taking the more scientific route! I don't even possess the vocabulary to describe what I do. I just know if I like it or not, and I like to melt things. lol I'm not feeling any vibrations, or hearing any noise at all with the joints I used. The biggest issue I noticed after the old bushings being toast was the bolts, and bolt holes were also worn out as I could wiggle the bolts in the mounts by hand. In my mind I feel there should be little or zero play from the bolts in the mounting brackets even before tightening. That's how I gauge a good fit. Then once torqued down they should stay that way.
__________________
Last edited by Chassisman; 03-13-2019 at 07:26 PM.
|
|
|
|
|
03-13-2019, 07:35 PM
|
#18
|
Name: Chassisman
Title: Gator Out...
Status: Not Here
Join Date: Aug 2016
Member`s Gallery
Posts: 266
|
Did you give any thought to Virgin Teflon? I have no idea about it's properties, but it's amazing stuff. It looks, cuts and machines like nylon, and requires a sharp tool to machine or cut. We used to use it in the mold making trade for it's natural lubricity without oil, or grease. The one downside is the cost, it's not at all cheap.
__________________
Last edited by Chassisman; 03-13-2019 at 07:44 PM.
|
|
|
|
|
03-14-2019, 08:50 AM
|
#19
|
Name: CorneliusRox
Title: Seasoned Rookie
Status: Not Here
Join Date: Dec 2012
Location: Detroit, MI
Member`s Gallery
Posts: 4,154
|
Quote:
Originally Posted by Chassisman
Wow, you're for sure taking the more scientific route! I don't even possess the vocabulary to describe what I do. I just know if I like it or not, and I like to melt things. lol I'm not feeling any vibrations, or hearing any noise at all with the joints I used. The biggest issue I noticed after the old bushings being toast was the bolts, and bolt holes were also worn out as I could wiggle the bolts in the mounts by hand. In my mind I feel there should be little or zero play from the bolts in the mounting brackets even before tightening. That's how I gauge a good fit. Then once torqued down they should stay that way.
|
Ha ha I just want it to be repeatable and the more notes I take, the easier it'll be to adjust the design and note changes. I really don't want to change the frame and axle geometry so if I am ever in a mind, I can go to any dealership and still pick up replacement parts.
And who knows, if it works really well, maybe I could sell a few to the community (through a machine house, I don't want to make a bunch of these on my manual lathe! ha ha)
I agree that those holes should be damn near reamed and extremely tight to the bolt, but also the system looks like it was designed to use the center compression limiter at a high toque to take up all the slip. I just think it'd be even better set up like yours so the compression limiter would share the load with the hardened washer.
I'm guessing yours got loose at some point because my truck is at close to 180,000 miles and the hole still looks brand new. No elongating or walking.
Quote:
Originally Posted by Chassisman
Did you give any thought to Virgin Teflon? I have no idea about it's properties, but it's amazing stuff. It looks, cuts and machines like nylon, and requires a sharp tool to machine or cut. We used to use it in the mold making trade for it's natural lubricity without oil, or grease. The one downside is the cost, it's not at all cheap.
|
I actually use PTFE (Virgin Teflon) a ton at work, but it's typically used as a 'bearing' since you can toss a tiny bit of grease on it and it lasts forever! It has a stupidly low coefficient of friction, BUT it gets destroyed with debris, so it usually drives a dust cap. I just don't want to put that level of complexity into this.
__________________
Corey - BSME '21 Tesla Model 3 Perf
'22 DMax AT4 2500
|
|
|
|
|
03-14-2019, 01:42 PM
|
#20
|
Name: CorneliusRox
Title: Seasoned Rookie
Status: Not Here
Join Date: Dec 2012
Location: Detroit, MI
Member`s Gallery
Posts: 4,154
|
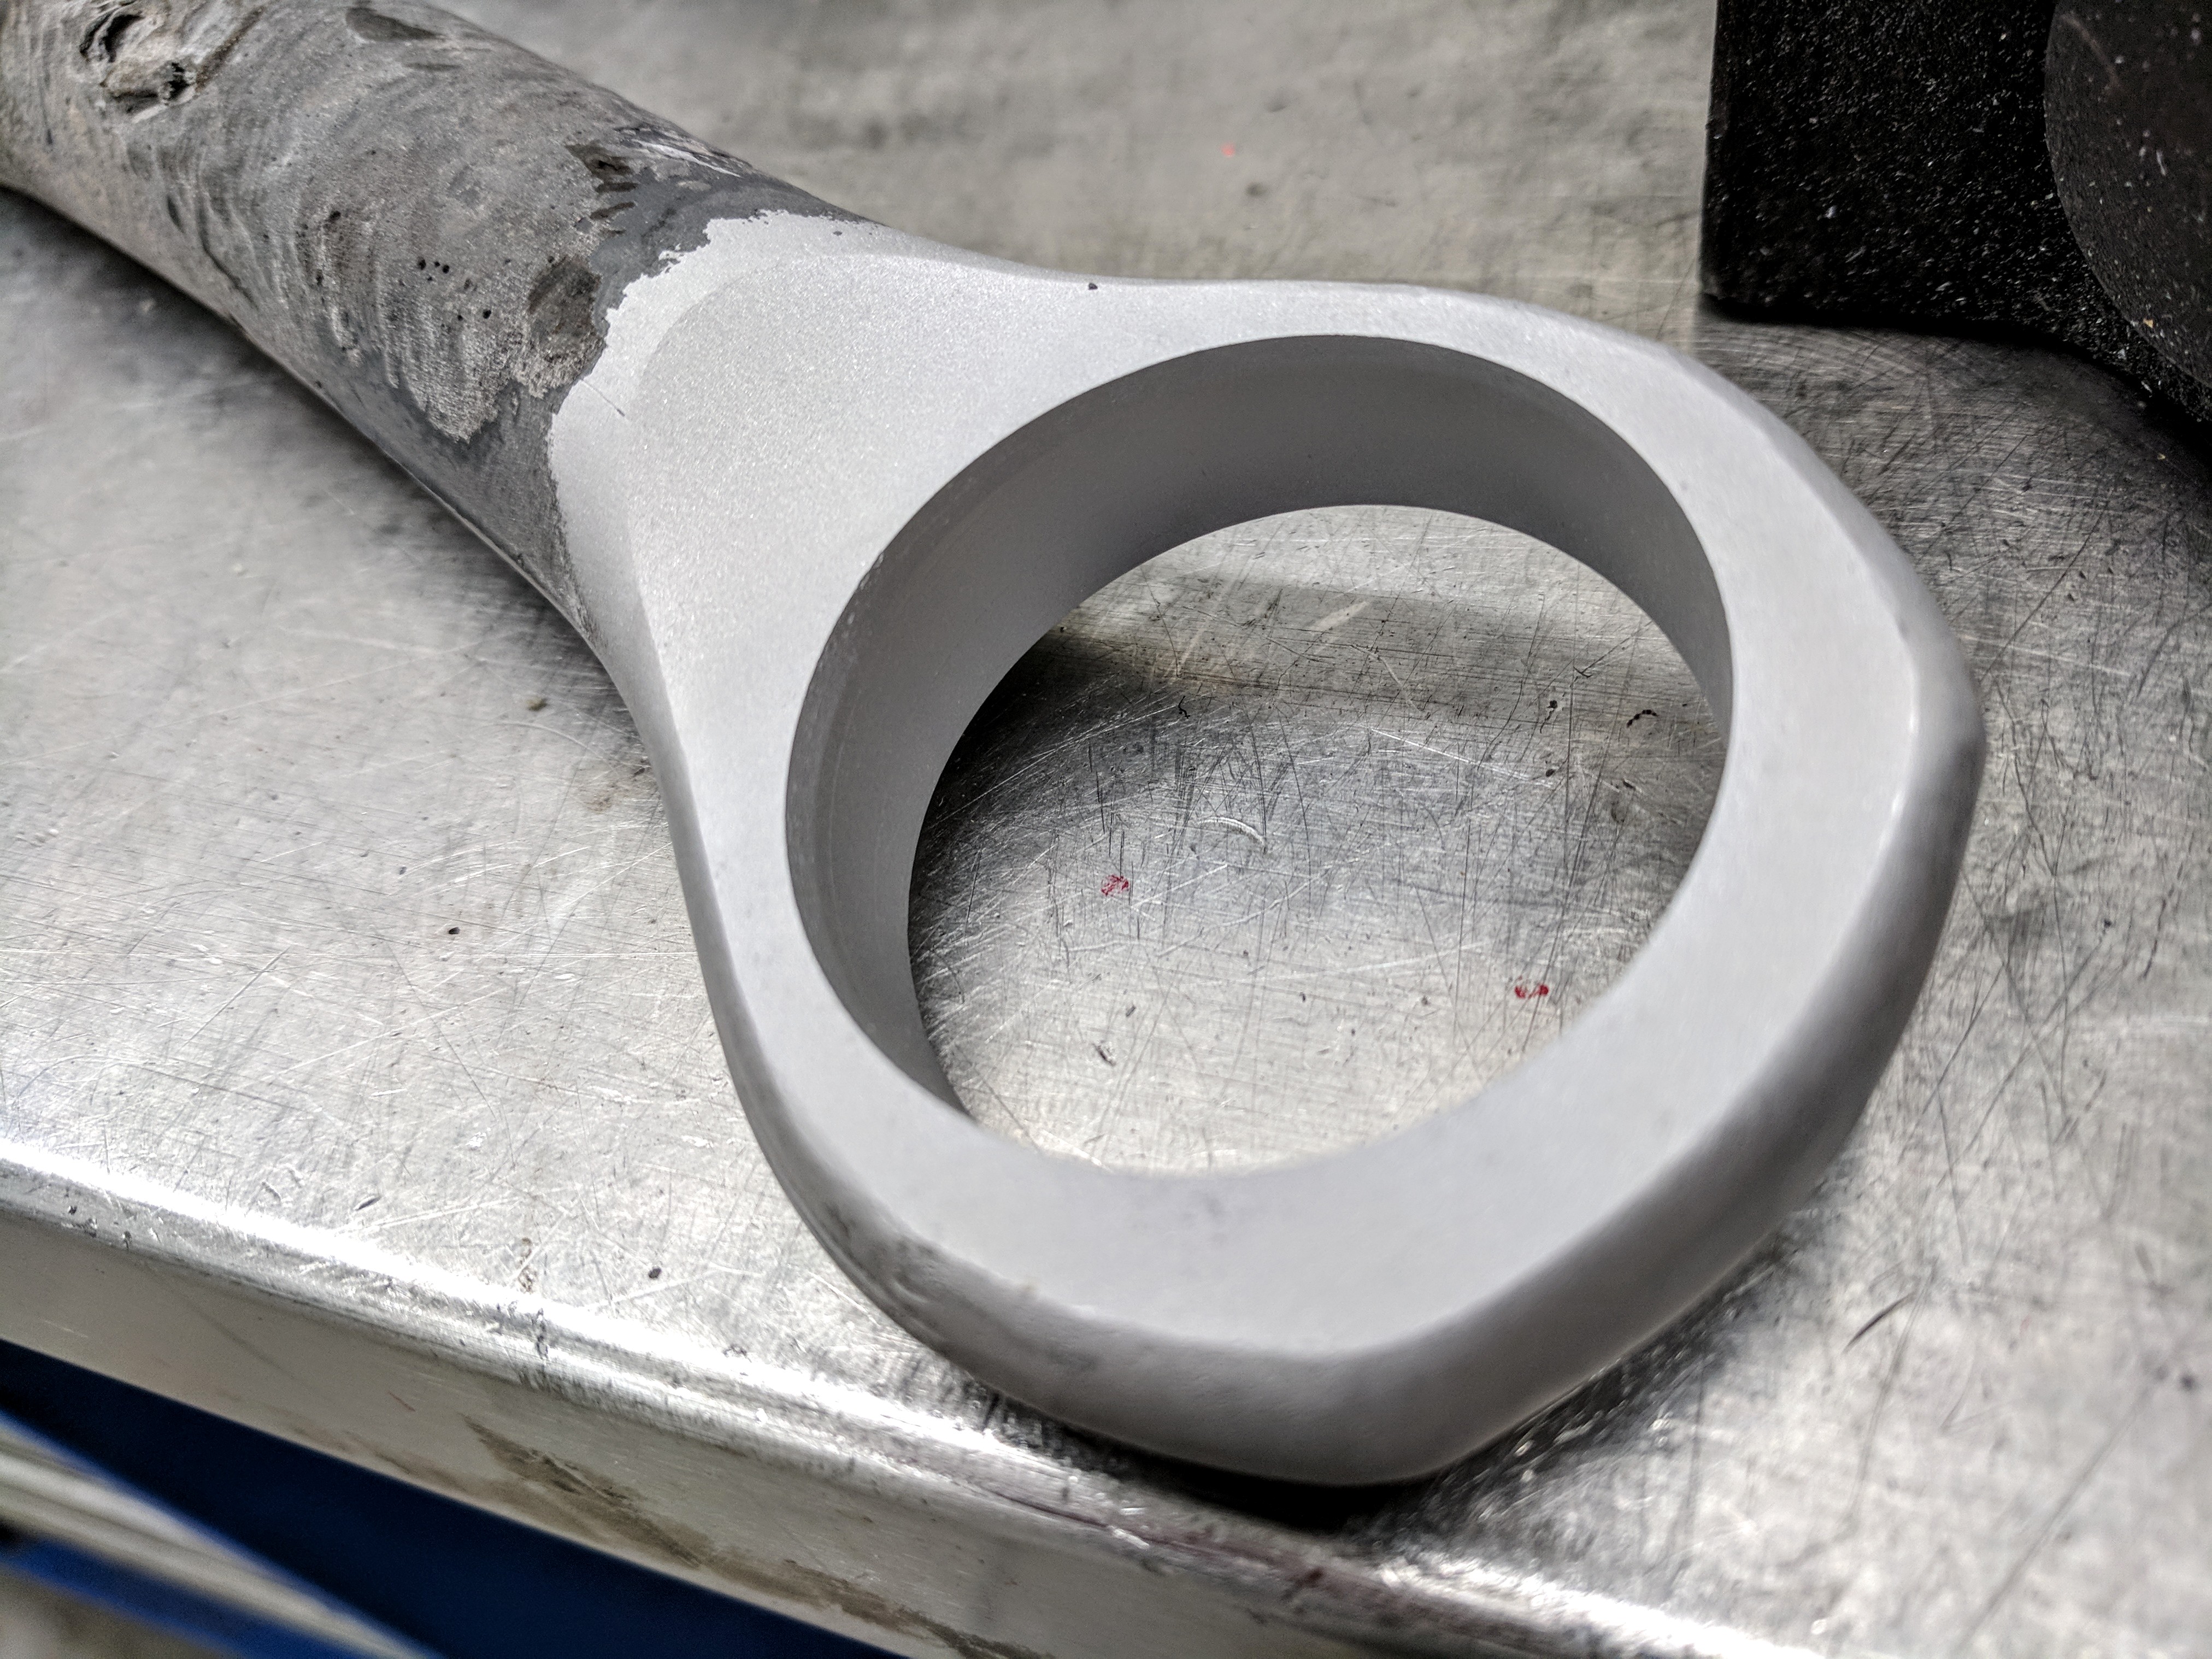
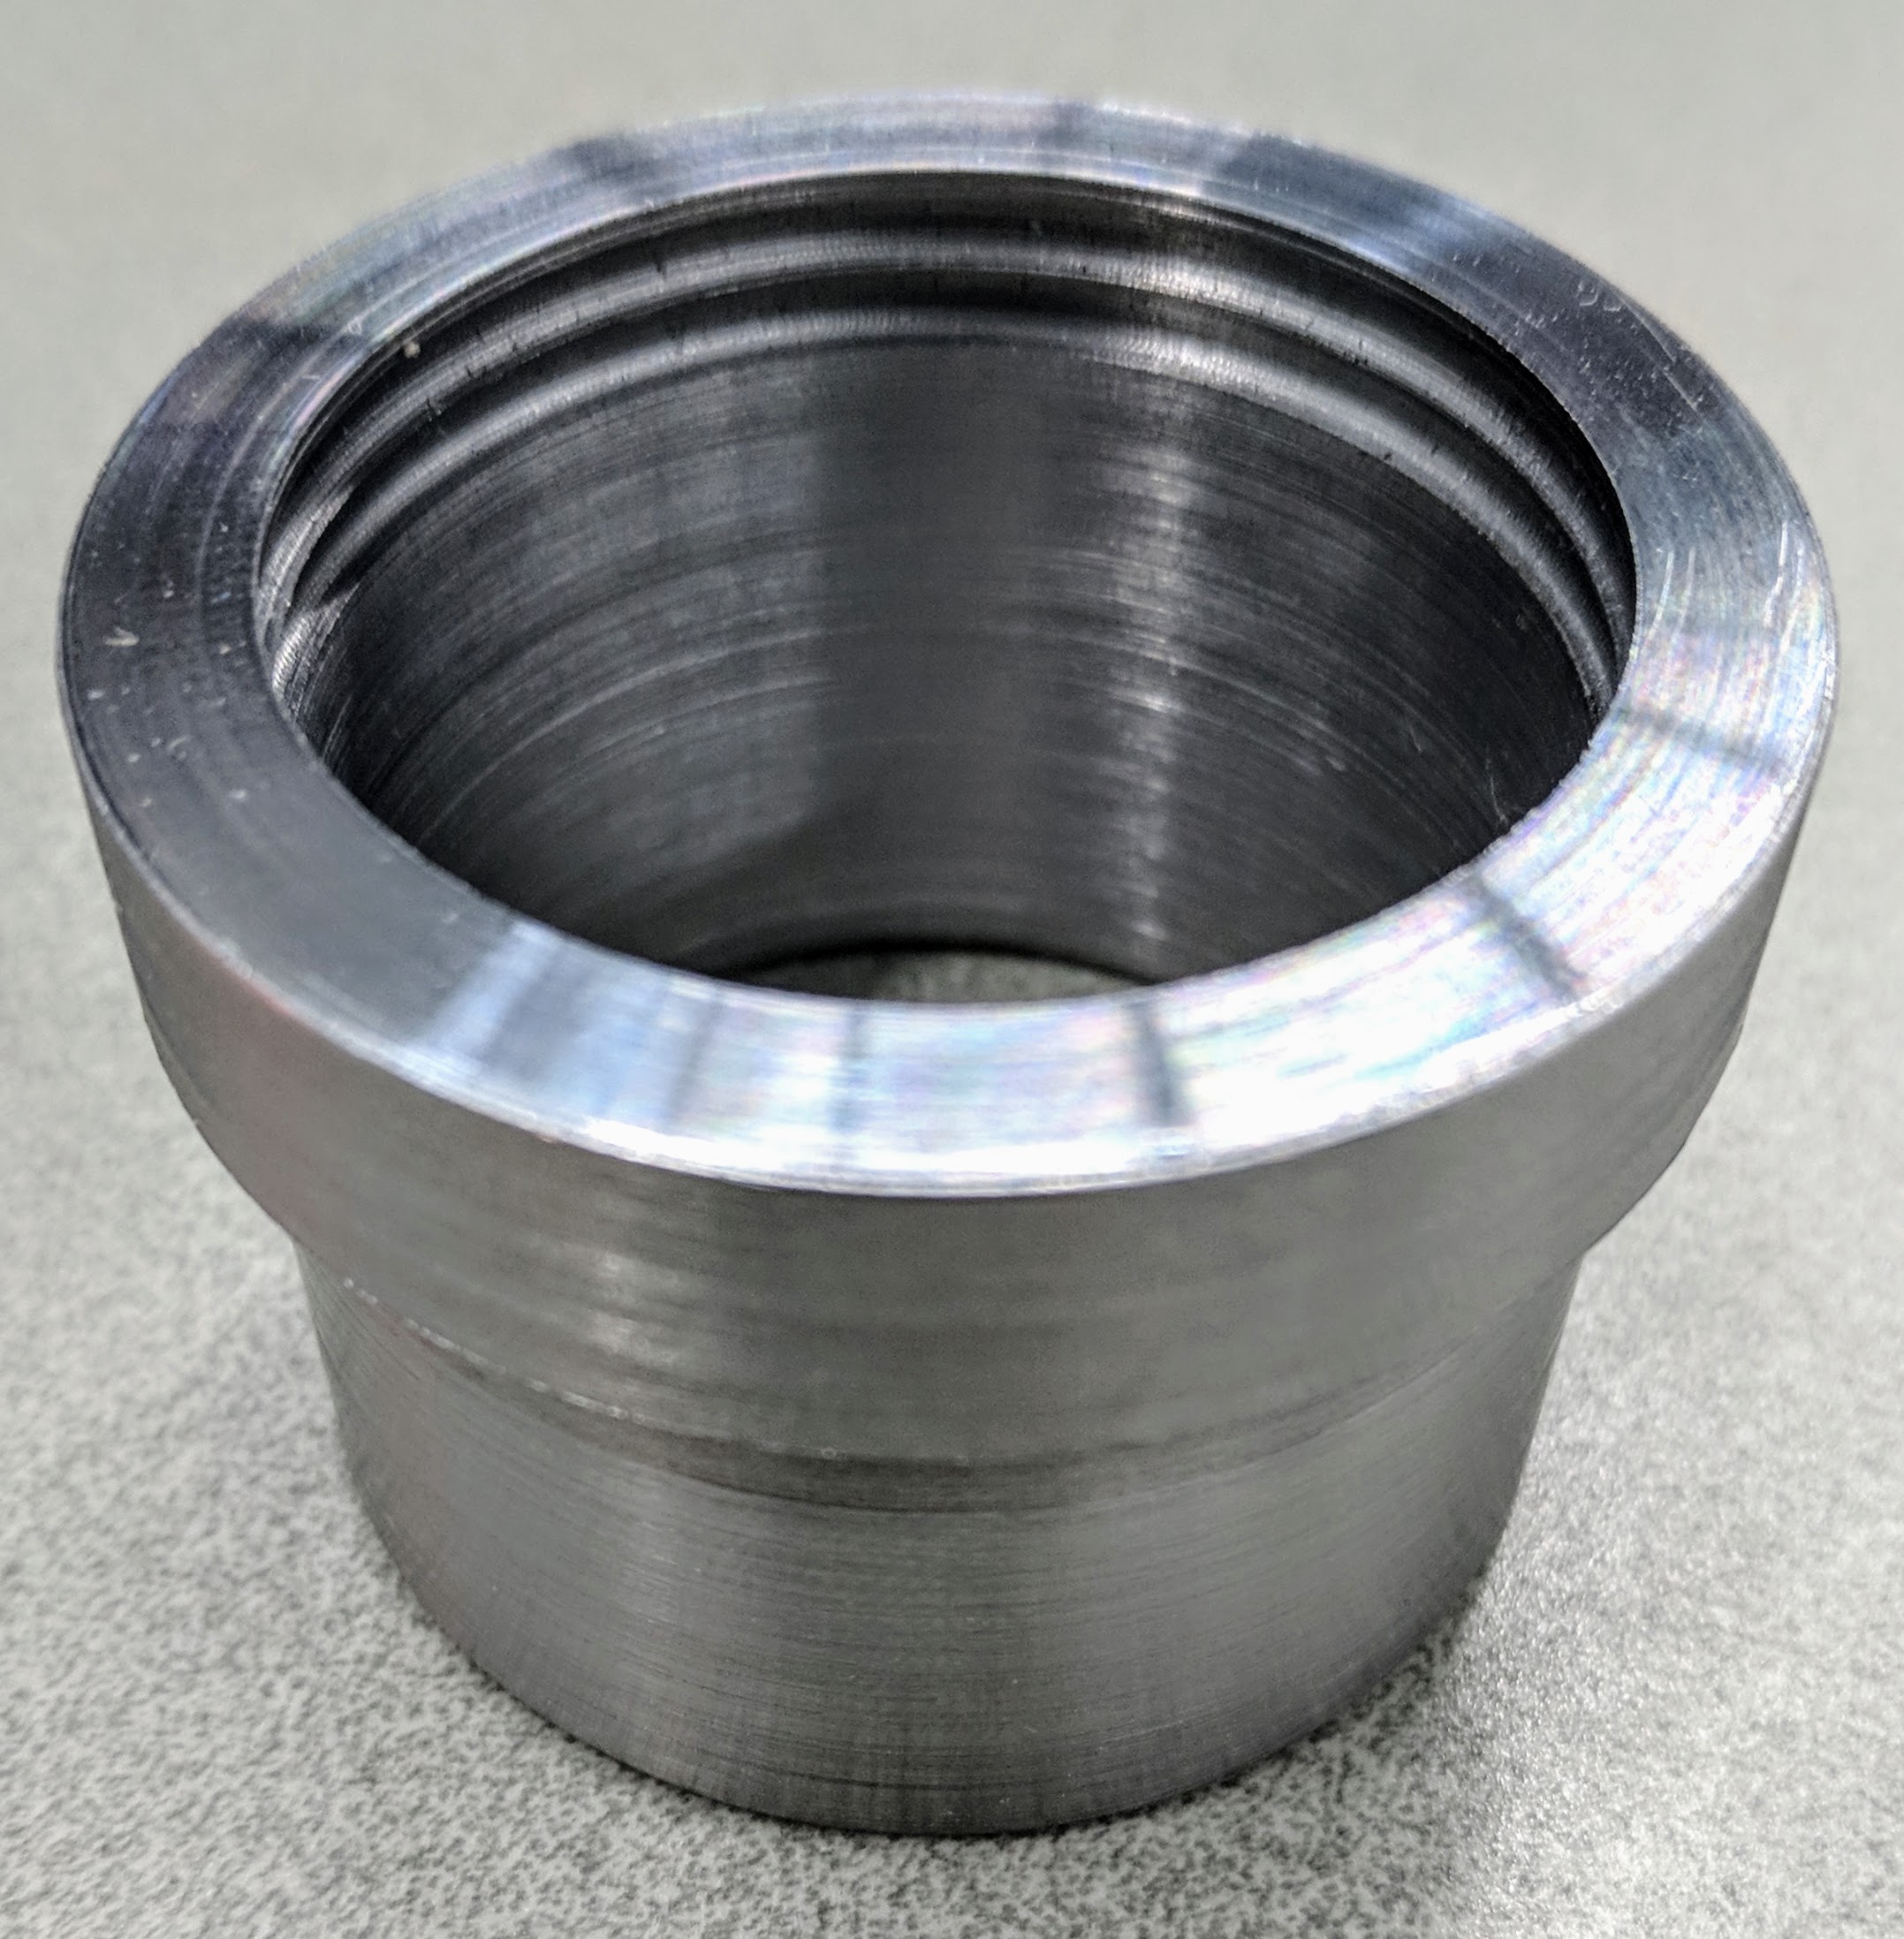
I made some progress at lunch. I turned one of the outer bushings. I didn’t have a 2” tube w/ ¼” wall thickness like I designed these for, so I went with 2” bar stock… Took a while to eat out that inner material. It came out pretty good though.
I also added a couple of barb features to encourage my bushing material not to walk after being pressed in.
__________________
Corey - BSME '21 Tesla Model 3 Perf
'22 DMax AT4 2500
|
|
|
|
 Posting Rules
|
You may not post new threads
You may not post replies
You may not post attachments
You may not edit your posts
HTML code is Off
|
|
|
All times are GMT -5. The time now is 10:07 PM.
|


