Advertisement
If this is your first visit, be sure to check out the FAQ by clicking the link above. You may have to register before you can post: click the register link above to proceed. To start viewing messages, select the forum that you want to visit from the selection below.

Home Who's Online Today's Posts HP Calculator CompD Gift Shop Mark Forums Read
Go Back   Competition Diesel.Com - Bringing The BEST Together > Tech Area-Ford > Ford Articles
Register Members List Timeslips EFI Live Library Invite Your Friends FAQ Calendar Mark Forums Read

Ford Articles Write your own Ford Articles

Closed Article
 
Article Tools
Installing DJ's Fuel + pressure Intensifier Installing DJ's Fuel + pressure Intensifier
Dalpilot
03-06-2007
I purchased DJ's fuel system pressure intensifier, and recently installed it. The following is the procedures I used for the installation. The total install can be done in less than 2 hours, however, it is a messy job, and you WILL get diesel fuel on you.

1. Remove the intake or Cold air intake and the cold side CAC tube to get more room to work. Removing the drivers side battery tray will make it easier, or you can work under the support for the intake that is attached to the battery tray.
I worked around it.

2. Remove the top cover of the fuel filter housing, and remove the fuel filter. Great time to change the filter, and to install DJ's fuel filter housing cover to replace the cheap plastic one it comes with. Once the cover is removed, drain the fuel out of the fuel bowl. I used a large turkey baster to suck it out.
Click the image to open in full size.
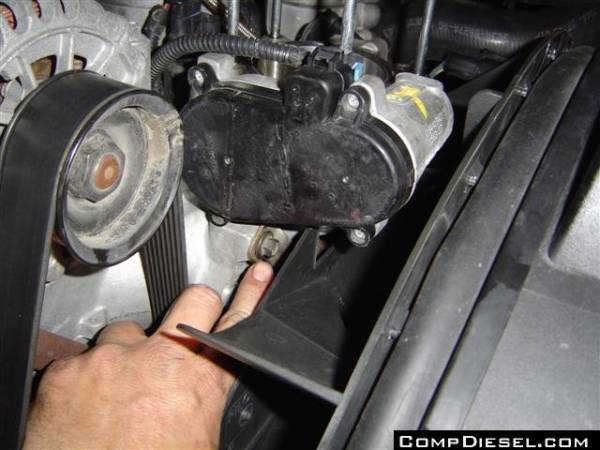
3. Remove the 4 bolts on the regulator cover. They are a Torx bit (star pattern) T-25, and remove the regulator cover. It will look like this:
Click the image to open in full size.


4. Remove and discard the regulator, (brass top hat looking thing with the spring hanging out of it), and the spring.
Click the image to open in full size.

5. Reinstall regulator cover using the 4 torx bolts. Be careful not to strip it out. (this comes from experience). Just past snug works perfect.

6. Remove the existing fitting in the fuel regulator outlet, and install the # 2 fitting supplied with the Fuel + intensifier. Its the one connected to the regulator housing with the 4 bolts you removed earlier.

Click the image to open in full size.

Look at the size difference, DJ's on the right:
Click the image to open in full size.

7. Remove the two fittings on the sides of the fuel regulator housings that connect the fuel lines to the heads, and install 2 of the #3 fittings

Click the image to open in full size.where you took out the existing fittings. To get to the one on the top rear side of the housing, you will have to remove the inlet fuel line.
Click the image to open in full size.

Click the image to open in full size.

8. Remove the Banjo bolts from the front of the heads. They are a little difficult to get to:

Click the image to open in full size.

Here is what they look like removed:
Click the image to open in full size.

VS the new fittings DJ's on the right:
Click the image to open in full size.

9. Install 2 #3 fittings, (just like the 2 in step 7), in the heads where you removed the banjo bolts. The drivers side is a little more difficult to get to since there is a cooling hose in the way. Be sure to plan at this step how you want to run your hoses, and place the fitting accordingly. I had mine at about the 2 oclock position.

Click the image to open in full size.

10. The most difficult part I found was removing the old lines. The passendger side is harder, and I would up cutting it in 2 places to get it out. You also have to remove this bolt:

Click the image to open in full size.

11. Run your 22.5" hose from the passenger side to the fitting you installed on the left side of the regulator.

12. Run your 21" hose from the drivers side head to the right side of the regulator.

Click the image to open in full size.


13. Now install your 34" line from the #2 fitting you installed in the regulator earlier in step 6 to the Fuel + intensifier's top fitting. NOTE*** Be sure to put some thread sealer on the fittings and the blue plugs in the intensifier****

Click the image to open in full size.

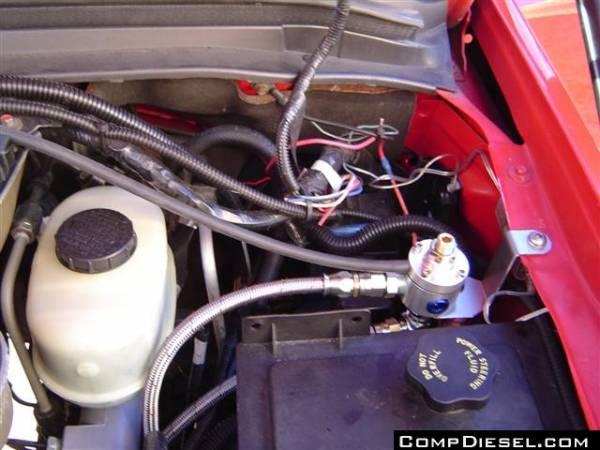
14 Now install the fuel + intensifier to the drivers side fender just aft of the brake fluid resevoir. I drilled a hole and used a bolt. Its a good idea to test fit the hose to the fuel pump to make sure its long enough where you want to mount before drilling the hole.

Click the image to open in full size.

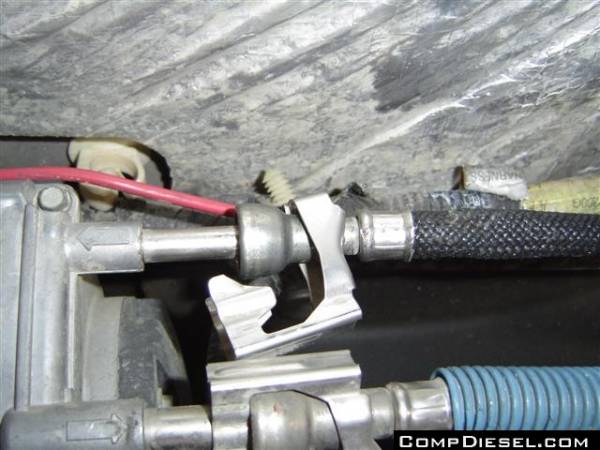
15. Install the 48" hose from the Fuel + intensifiers bottom fitting, (again, make sure its tight) to the upper fitting, (return line, has an arrow pointing to the rear of the truck) where the gray return fuel line is on the fuel pump on the drivers side frame rail. You will need a fuel line removal tool from any auto parts store. Remove the old line and slip on the new.

Click the image to open in full size.

Click the image to open in full size.

16. Tap the Map sensor line on the passenger side by cutting into the line and placing the T fitting supplied with the Fuel + intensifier.

Click the image to open in full size.

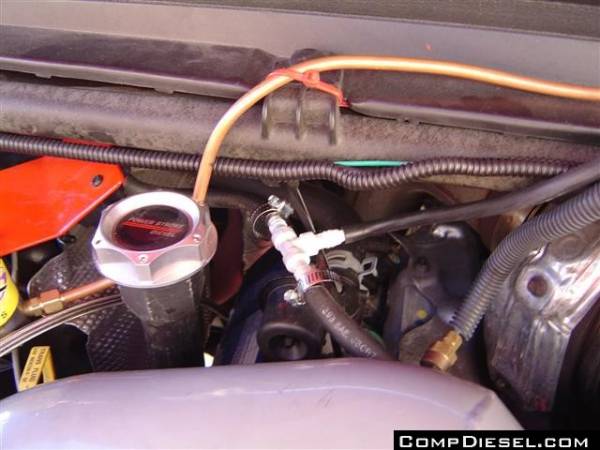
17. Attach the vacuum line from the T you just installed to the brass fitting on side at the top of the Fuel + intensifier.

Click the image to open in full size.

18. At this point the install is complete, but turn on the key and check good for leaks. At this point you need to set the Fuel pressure to 55 pounds in warm weather, and 45 pounds if its cold. To do this loosen the nut on the top fitting, and adjust the pressure by turning the allan head clockwise to incresase pressure and counter to decrease. Once its set, tighten the nut, and your done.

19. If no leaks turn off the key and re-install the CAC tube and the intake. Your done, congrats and enjoy the new fuel system.  
Article Tools
Show Printable Version Show Printable Version
Email this Page Email this Page

Featured Articles

Test Article

Test Article
  #1  
nummit on 03-06-2007, 01:37 PM
Excellent job Tim!
This will help with my install
  #2  
UNBROKEN on 03-06-2007, 02:34 PM
Nice write up Tim...excellent looking product DJ.
  #3  
SINNER on 03-06-2007, 05:09 PM
Wow super job on the photos! Looks like a really well made set-up. Whats the copper line running across the cowl trim? just curious

Don
  #4  
Dalpilot on 03-06-2007, 05:10 PM
Temporary Nitrous purge line. I am getting a stainless steel braided one made.

This kit looks killer under the hood too with the stainless lines. DJ and Viv. Now hurry up on those injectors.
  #5  
SINNER on 03-06-2007, 05:16 PM
That sweet looking regulator sitting up there looks nice too! any seat of the pants report?
  #6  
Dalpilot on 03-06-2007, 05:18 PM
It definetly woke up the new looney tune even more. Low end is awesome, and it just keeps pulling.
  #7  
SINNER on 03-06-2007, 05:19 PM
should really shine with the nitrous huh. are you running stock pump and pick up?
  #8  
Robts on 03-06-2007, 05:23 PM
I talk to DJ today...Got too busy at work to order this. I'll call tomorrow and get it ordered.I was saying on my home from work, I wish some one would write an article about installing this.

thanks ..great right up.

We now need one for

1. injector replacement
2.arp head stud install
3.and lets not forget......DJ famous wet kit install
  #9  
Robts on 04-03-2007, 07:15 PM
Just got mine in the mail today and cant wait to install it
  #10  
6.0kingranch on 04-05-2007, 09:55 AM
I have my fuel system and love it. Next step is trying to get my egts lower.
  #11  
TANKS 250 on 05-30-2007, 07:24 PM
How did you know what your fuel pressure was, in order to set it?

Can you put a gauge in one of the blue plugs?
  #12  
Dalpilot on 05-30-2007, 09:28 PM
You can, I bought a gauge and plugged it into the port on the old regulator bowl. Anywhere works.
  #13  
MOMBENZ on 06-01-2007, 08:53 AM
Hey Jayson,

Tim is correct. The best place would be the bowl but you can plug it anywhere.

Sorry about the late reply. Don't know if you already installed it but feel free to call us with any questions.

Thanks,
Vivian
  #14  
Domi on 06-30-2008, 01:48 PM
Pressure 45PSI vs 55PSI

Why would you want 55psi in warm weather and 45psi in cold?
  #15  
joshgilvin34 on 11-24-2009, 10:31 PM
with this fuel system upgrade can you tell a big differnce in performance?
  #16  
MOMBENZ on 01-06-2010, 01:43 PM
Hi,

I'm sorry I had not noticed your post sooner.

We had a gentleman tell us he saw an increase of 10hp at the dyno. Another gentleman saw an increase of 5mph at an 1/8th mile track, on a 2004 F350 dually 4x2. In 2007, I think it was 2007, at the Bash on the Bayou, Shaun dynoed 442hp, on the fuel system and looney tune only. I think it was 442, if not, somewhere around there. There's a thread on compdiesel about it. It's just that I'm getting older and my memory is beginning to fail me.

Thanks,
Vivian
  #17  
Timbeaux on 11-30-2010, 04:57 PM
Bump.
Closed Article

Article Tools

Posting Rules
You may not post new threads
You may not post replies
You may not post attachments
You may not edit your posts

BB code is On
Smilies are On
[IMG] code is On
HTML code is Off

Forum Jump


All times are GMT -5. The time now is 08:59 PM.


Powered by vBulletin
Copyright ©2000 - 2024, Jelsoft Enterprises Ltd.
Copyright ©2006 - 2024, CompetitionDiesel.com
all information found on this site is property of www.competitiondiesel.comArticle powered by GARS 1.01 ©2005-2006