You are using an out of date browser. It may not display this or other websites correctly.
You should upgrade or use an alternative browser.
You should upgrade or use an alternative browser.
Changing my injectors this weekend
- Thread starter smoken02
- Start date
Timbeaux
Administrator and Head Thread Derailer
- Joined
- Apr 3, 2006
- Messages
- 17,239
My best advice is to use your valve cover to keep parts seperate.
You can put your hold-downs in there, in order along with other misc parts.
Also, be careful cranking the lines back down...dont wanna screw up a crossover tube. Other than that, it is pretty easy. Billysgoat had a pretty good install artice at one point. Maybe he can post it up
You can put your hold-downs in there, in order along with other misc parts.
Also, be careful cranking the lines back down...dont wanna screw up a crossover tube. Other than that, it is pretty easy. Billysgoat had a pretty good install artice at one point. Maybe he can post it up
Timbeaux
Administrator and Head Thread Derailer
- Joined
- Apr 3, 2006
- Messages
- 17,239
Found it.. here ya go:
billysgoat said:Tools needed;
1/4 drive rachet and exstension (3-6 inch)
3/8 drive rachet and exstension (3-6 inch)
1/4 or 3/8 drive Torque wrench, must have a range of 18-216 inch pounds, the most important # is 89 inch pounds
15, 8, and 10mm sockets
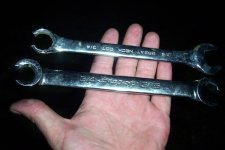
3/4 or 19mm line wrench or equivelant (see photo)
8mm wrench
Needlenose pliers
Small flatbladed screwdriver
Latex or Nitrile gloves
Something to stand on to gain easy access to engine compartment
Shop towels
However much beer you will drink in 2 hours time
To get started, make certain that you can reach the entire engine as comfortably as possible, either stand on something, sit on the radiator (difficult for us fatboys) or let the air out of your front tires.
Disconnect the battery cables (or not, I do for safety) and the charge air inlet tube.
Using a shop rag clean the underside of the body where it hangs over the motor, you can remove the insulation if you want, it is a CS to get back on. Do this to keep dirt and trash out of the motor with the valve cover removed.
Drink a beer and congragulate yourself on a job well done to this point.
Using the 10mm socket loosen all the valve cover bolts to the point they will move freely. Pick it up as high as you can and work it out towards the passenger side bending the heater hose out of the way. Make certain the gasket either stays on the head or comes with it.
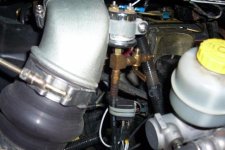
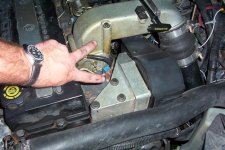
Remove the charge air inlet and APPS housing (Where the inlet pipe goes in and where the throttle cables go to, see picture). Take the APPS and move it out of the way, do not unplug it unless needed (you shouldn't). When removing the charge air inlet be careful of how the intake air heater wires come off and the gaskets on the inlet, you will reuse them all. Use a 15mm for this.
Loosen all injector line clamps and either remove them from the vehicle OR just get them all loose enough that they are not holding anything. 8mm socket and wrench will be used for this.
Drink a beer, cuss engineer who put the clamps where they did
Once all line clamps are loose, loosen all injector tubes at the head using the line wrench. Once they are loosened you should be able to turn them with your hand if you keep the pressure off of them.
Remove one (1) bolt from the valve cover, just push on it from the bottom side and it will pop out. Remove and install injectors one at a time to keep from getting crossed up unless you are confident of no interuptions and keeping everything straight.
Drink a glass of water, no beer until you are buttoning up
Don gloves or keep wads of shop towels handy, you are about to get VERY oil covered hands. Start removal of an injector by removing the forward clamp bolt, YOU WILL ONLY REMOVE ONE BOLT, it is the "easy to get to one" towards the front. Remove this bolt and pull/pick up on the clamp block to get it out. Thread the bolt removed from the valve cover into the top of the injector, using the small screwdriver, pry the injector tube nut outwards from the head by catching the threads and prying out wards. Not much, about 1/8 of an inch or so. Use the needlenose pliers to grab the valve cover bolt and pry off of a rocker arm to pop the injector out of its hole. If the injector will not come out easily remove the injector tube from the head or pry it out further to clear the injector. Make certain the copper sealing washer comes out with the old injector, if it does not take a screwdriver that will fit into the washer and use it to remove said washer from the head. Once the old injector is out reverse order for reinstall. Make sure to line up the fuel inlet on the injector with the injector tube, if the injector tube retaining nut does not start easily you do not have then lined up properly. It is sometimes possible to wiggle the injector from side to side with pliers to get it to seat. Reinstall clamp block and bolt, tighten bolt to 89 Inch Pounds (NOT FOOT POUNDS!!!!! YOU WILL BREAK THE BOLT). Repeat this 5 more times and you are done. It will work on all of them, #5&6 are a stone cold one to get to, use a short screwdriver, be careful not to damage the threads.
Couple of notes, change gloves or wipe hands often, makes it a lot easier, keep the dirt out of the motor, be careful what you grab from where.
Drink a beer, you just by gump earned it with #'s 5 & 6
Reassemble in reverse order, go ahead and tighten down all injector tube nuts to 28ftlbs, once you have everything back together you will loosen a couple of them again, but only a couple.
The valve cover bolts are tightened to 18 INCH pounds
When reinstalling the APPS assembly tighten the bolts to 105 INCH pounds
The Charge air inlet bolts are torqued to 18 Foot punds (216 inch pounds)
The charge air clamps are torqued to 100 INCH pounds
Once everything is put back together you are ready to bleed lines and fire up, loosen the easy to get to lines, two are enough, three is much preferable. Crank the motor until you have fuel at the lines pretty good, if you have a buddy helping tell him to keep fingers away form there to "feel" for the fuel, he/she could loose them, VERY high pressure. Once you have the injector lines bled retighten them. When you crank the truck again it will run like snot, let the oil pressure come up and GENTLY rev the engine to around 1500 RPM and hold it there until it smooths out, then gently decrease back to idle. Let the truck idle for a bit to make certain there are no leaks or problems.
Finish your beer, there are sober kids in India
On the pics below, in one I am pointing to the APPS (bottom of pic) and the charge air inlet (top of pic).
The two wrenches in my hand serve the same purpose, one is made from a 12 point el cheapo, you guess on the other. On the homemade one, I like it better than the Snap-on for the following reasons, it will grab in more places (12 point vs 6 point), and thinner. I dislike it for the following reasons, more likely to slip from spreading out, be careful with it if you make one, and it is more likely to slip in general (12 point vs 6 point).
Enjoy ya'll, and PM me with any questions you might have, I will endeavor to answer them is possible. I DO NOT know everything about these trucks by a long shot, but like the song goes "I know a little bout it"
DirtyBlonde
The Pink & Black Attack
- Joined
- Sep 24, 2006
- Messages
- 714
Billy's step by step is a guide to greatness.
If I could bust mine out in under 2 hours...You, too should have no problems. However, on the re-start I did need to crack 3 lines and bleed them completely before the truck'd fire again.
Good luck!
If I could bust mine out in under 2 hours...You, too should have no problems. However, on the re-start I did need to crack 3 lines and bleed them completely before the truck'd fire again.
Good luck!
getblown5.9
Ceritified Kleenex Dealer
- Joined
- Aug 3, 2006
- Messages
- 7,259
some sizes in his article seem to be wrong...
intake horn/grid heater, valve cover, and intake manifold cover (injector lines are bolted to this) are all 10mm
APPS sensor bolts are 13mm
injector hold downs are 8mm
air intake hose clamp is 11mm or 7/16"
rear engine lifting lug 15mm i think, i took mine off and never put it back on.
intake horn/grid heater, valve cover, and intake manifold cover (injector lines are bolted to this) are all 10mm
APPS sensor bolts are 13mm
injector hold downs are 8mm
air intake hose clamp is 11mm or 7/16"
rear engine lifting lug 15mm i think, i took mine off and never put it back on.
getblown5.9
Ceritified Kleenex Dealer
- Joined
- Aug 3, 2006
- Messages
- 7,259
3- 13mm on my truck...no sense in removing the APPS without removing the whole bracket to get it out of the way.
Billysgoat
The ANTI-BLING!
- Joined
- Apr 21, 2006
- Messages
- 10,694
Buy a stubby 19m or 3/4 instead, it's handier to use, a 6 inch Crescent works GREAT to turn the nuts loose once you have them broken loose. Also, if you do not have a handy dandy work platform such as a Ranchhand on the front of your truck go ahead and lay across the valve cover and break #5 and #6 injector line nuts loose before removing the valve cover. They are much easier to get to and get some oomph on that way. Once they are broken from initial torque carry on with the rest of the procedure as written.
TJ> I never removed the rear lift shackle since it didn't really pose any problems. You are very likely correct on the sizes, it was about 3 weeks between me changing injectors and doing the writeup, I can barely remember my name from one day to the next, let alone bolt sizes LOL
I attached the pics here, soon as I get a few free moments I'll put it all together and do some rewriting to the article since there is room for improvement :thankyou2:
Attachments
getblown5.9
Ceritified Kleenex Dealer
- Joined
- Aug 3, 2006
- Messages
- 7,259
Billysgoat said:TJ> I never removed the rear lift shackle since it didn't really pose any problems. You are very likely correct on the sizes, it was about 3 weeks between me changing injectors and doing the writeup, I can barely remember my name from one day to the next, let alone bolt sizes LOL
I have really fat arms...I can do a set of injectors in under an hour (1:30 is the motor is scorching hot LOL) yet I still come out with my arms completely cut to hell from jamming them back in there to get 5 & 6 as well as I drop enough foul phrases that it could make a sailor blush.
Here is the best injector line wrench I ever made with a band saw and a bench grinder from a cheapo 3/4....
Cut the handle off so its no longer than the width of your palm, and grind down the sides.

Crawler
Press the BIG RED button.
- Joined
- Apr 30, 2006
- Messages
- 837
I can almost always use a regular length 19mm. But I have a shorty in the box. I think I've used it once for #6
I can do a set in 35-40 minutes if I want to. An hour is a breeze.
But being your first time plan on 1 1/2 to 2 1/2. You'll be looking at instructions then working, then instructions, then working. Takes a little while. Main thing is to not get frustrated with it. If you do, then walk away for a minute.
Being the first time. I would do it one injector at a time from first step to the end. Then move on.
After a few times you can do all of them at the smae time. This aloows you to move faster by not changing from tool to tool 6 times. But, that is for later.
highersmoke24v
New member
- Joined
- Oct 14, 2007
- Messages
- 39
Make sure you tighten the injector lines before you tighten the injector holds or they won't seat properly and your fuel will leak down overnight causing you to have to prime it every morning. Then you'll have to tear it all apart again. Trust me!
Thats what the beer is for.then walk away for a minute.


