Head stud questions

seeker1056

gear head
Joined
Aug 3, 2006
Messages
1,001
Ok so I bottom tapped all of the holes in the block - gained 1 thread only

time to install studs into the head - installed all of them till just barely touching the bottom of the holes

installed the head

lo and behold all of the short exhaust side studs only show like three threads out of the head , put the washer on and no threads showing - so obviously the nut aint goin on

middle studs show enough thread for both washer and nut

long rocker studs have enough thread to allow just the nut to go on and show one thread - if i back the rocker studs out to allow a washer, then they hit the valve covers

short studs needed to be backed out 6 threads to allow both a washer and a nut and have stud just flush with the top of the nut - and looking at the stud there is only like 8 threads on it and looking into the block hole, there is a 1/8" recess before the threads even start

so how much thread needs to be engaged into the block and be safe?


I have run into many wierd things with my VE 12v - so is this another one? different thread depths etc

can I run the short and long studs without washers if I use lots of moly and a smooth torque sequence

also cant seem to find the correct bolt tightening sequence - so is it very specific or do I just work my way out clockwise from the centre bolts/studs like i would any other motor

suggestions - help???

thanx
Ken
 
Last edited:
they are ARPS yes

for the studs I think I answerd my own question as they are the same length exactly as the old bolts, so thread engagement shouldnt be an issue.

however that doesnt resolve the issue of hitting the rocker covers with both the washer and nut in place on the rocker stands

that brings to mind the question as to why one would bother bottom tapping the holes when the threads dont come close to reaching the bottom of the holes in most of the holes
 
thread class? - I bought the tap that matched the studs as stated here on this forum, and by using a thread gauge at the suppliers - however I have no idea what that has to do with the length of the studs, thread engagement and the valve cover clearance issue??????
thanx
 
Thread class (there are 5 of them) has a lot to do with thread engagement... bottom tap with a class too big and too much material is removed from the head, which compromises pull-out strength. :Cheer:
 
nope - tap went in very well, and only material removed was some varnish, and the last thread i cut to the bottom - checked with a used head bolt in every hole - went from not bein able to finger tighten into the block to comfortably being able to finger tighten

I chased every hole because thats what was recommended, both here in every thread on the subject and in the instructions, not to mention I have chased every hole in every motor I have ever built over the years - makes life so much easier.
 
Are they new studs? The new ARP 12v studs require .200" taken off the rocker pedestal so you don't have to trim the ribbing out of the valve cover.
 
Hey Ken,

It's been my experience that . . .

"lo and behold all of the short exhaust side studs only show like three threads out of the head , put the washer on and no threads showing - so obviously the nut aint goin on

middle studs show enough thread for both washer and nut

long rocker studs have enough thread to allow just the nut to go on and show one thread - if i back the rocker studs out to allow a washer, then they hit the valve covers

short studs needed to be backed out 6 threads to allow both a washer and a nut and have stud just flush with the top of the nut - and looking at the stud there is only like 8 threads on it and looking into the block hole, there is a 1/8" recess before the threads even start

so how much thread needs to be engaged into the block and be safe?"


Enough that all the threads of the stud are fully engaged with that of the block (getting deep enough in the block so as to be past any initial tapering of the bore), the deeper the better assuming more meat of the block ahead of the point of engagement provides more ultimate strength with minimal mass deflection.

> The stud doesn't necessarily need to be bottomed in the block. See note below.

"can I run the short and long studs without washers if I use lots of moly and a smooth torque sequence"

No. The washers provide a means of better distributing the clamping forces. Further, it acts as a bearing in that it allows one to torque to full value without a bunch of galling and mess occurring.


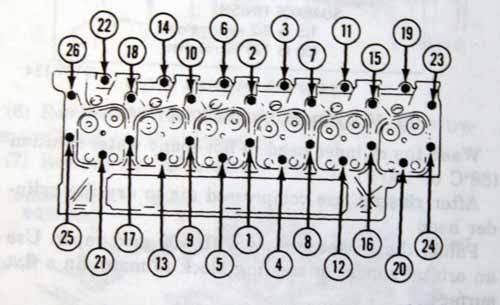
"also cant seem to find the correct bolt tightening sequence - so is it very specific or do I just work my way out clockwise from the centre bolts/studs like i would any other motor".

HeadBoltSequence.jpg


"however that doesnt resolve the issue of hitting the rocker covers with both the washer and nut in place on the rocker stands

that brings to mind the question as to why one would bother bottom tapping the holes when the threads dont come close to reaching the bottom of the holes in most of the holes"


That's why one needs to remove that little bit of webbing that's in the valve cover. ;) Plan B might be to mill some of the rocker pedestal so as to provide room for the nuts and washers with a shorter stud. See note below.


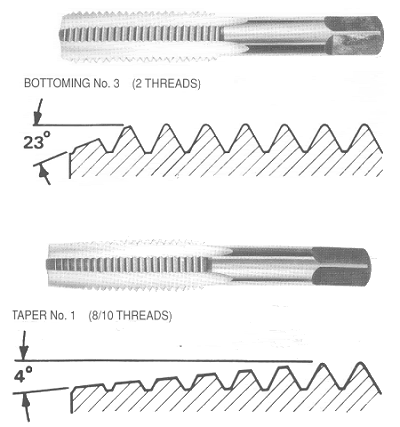
"Thread class (there are 5 of them) has a lot to do with thread engagement... bottom tap with a class too big and too much material is removed from the head, which compromises pull-out strength."

As I understand things, the difference in our application is to remove enough material from the existing bore so as to simply accommodate a stud that's too long without modding something. I'm sure you've seen the side-by-side comparison.

taps.gif


The engine maker uses the standard tap as it has the longer taper allowing less loading/wear of the tap equaling longer tap life. It's an economic thing. In our application, we need to clear the material that the standard tap doesn't get in those first six or so threads. Again, see note below.


"I chased every hole because thats what was recommended, both here in every thread on the subject and in the instructions, not to mention I have chased every hole in every motor I have ever built over the years - makes life so much easier."

Good on ya. ;)


NOTE: While all vendors of such have them "custom made", I believe it's more of a "custom selection" from a makers existing offering. By that I mean, if they were truly made for a 5.96BTA, they'd fit perfectly every time.


So, you've got a group here made of the material you want with the strength afforded by such. They come in 2", 3", 4", etc, whatever.

In our application, the exhaust side needs a stud long enough to fully/properly engage the block as well as the nut and washer. Any more stud length is a waste.

Same for the middle two rows.

Same for the rocker pedestals.

-> There typically needs to be at least one FULL thread shining above the nut so as to get past any initial tapering of the stud for full engagement.


The dagum rockers though . . .

They fall right between two common stud lengths. One vendor chooses the shorter that may require milling the pedestals so as to ensure full nut engagement. Another vendor chooses the longer stud ensuring full nut engagement, but requires removing a little of the valve-cover's internal webbing (bummer).


That's my take on it. I'm no enginear nor do I play one on TV. But I will say, . . .

THIS WAS BROUGHT TO YOU BY THE LETTER ~ G :D


Flame On?
 
thanx - specially for the tightening pic

well if the studs are screwed in as far as the bolts would only go (same length by comparison) the thread engagement is what it is and cant change it without milling something

I went today to an industrial suppy house and got a slightly thinner washer, and a slightly thinner nut for the six rocker stands in lieu of milling the stands. Grade eight hardware so should be lots hard/strong enough
 
Are using the longer ones supplied in the kit for the exhaust side? IIRC that's where they're supposed to go. Make sure they have ARP stamped on them too.
 
I went today to an industrial suppy house and got a slightly thinner washer, and a slightly thinner nut for the six rocker stands in lieu of milling the stands. Grade eight hardware so should be lots hard/strong enough
I dunno . ..

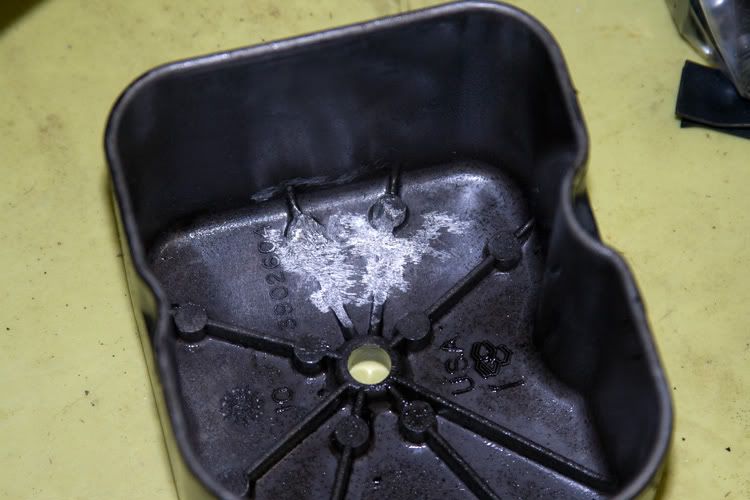
Are you sure you can't take a little out of the valve-cover's internal webbing to get the room you need? I think it'd be unusual if you couldn't. :confused:


VCReleaf.jpg
 
Last edited:
Are they new studs? The new ARP 12v studs require .200" taken off the rocker pedestal so you don't have to trim the ribbing out of the valve cover.

The new ARP 2000's require this. The older ARPs and A1's require the webbing in the valve cover to be removed.

Have your rockers machined and use ARP washers. $.02
 
thanx - specially for the tightening pic

well if the studs are screwed in as far as the bolts would only go (same length by comparison) the thread engagement is what it is and cant change it without milling something

I went today to an industrial suppy house and got a slightly thinner washer, and a slightly thinner nut for the six rocker stands in lieu of milling the stands. Grade eight hardware so should be lots hard/strong enough

IIRC, ARP stuff is good for 220ksi tensile stress, grade 8 stuff is 150 or 180 ksi. That, and the washers are flat and hardened to prevent galling (as was mentioned), grade 8 stuff isn't. Not to mention, might have a hard time finding thinner high grade fine thread metric hardware. Just use the proper hardware.
 
Back
Top