
You are using an out of date browser. It may not display this or other websites correctly.
You should upgrade or use an alternative browser.
You should upgrade or use an alternative browser.
VE 6.7 conversion
- Thread starter jodo1132
- Start date
YoungDiesel27
Never Enough Time
- Joined
- Jul 25, 2010
- Messages
- 825
Great job! Cant wait to see the rest of this project. What are you putting it in?
TheSilverBullet
All the correction factor
- Joined
- Jan 30, 2012
- Messages
- 1,598
I'm just thinking of all the oil leaks my 30k 12v already has and the painting it yellow :lolly: great build can't wait to see it done and a video of it running.
I did cut off a boss ,or a protrusion at the front upper edge of the block,took about 2 seconds,that was not really interferring with the pump,I just wanted the room,I also had to grind down an edge for the timing lock pin for the cam,Because I will be Using the 6.7 harmonic ballancer I will have to do some grinding at the bottom front of gear case I will get to that and post pics when I get to that. This engine will be going into a 2005 ,3500 backed with a 68RFE tranny. I had already converted the truck to a 68RFE tranny about a year and a half ago,it currently has one of my VE pumped 24 valves in it
TheSilverBullet
All the correction factor
- Joined
- Jan 30, 2012
- Messages
- 1,598
Are you using ECM and factory gauges? I put a p pump 12v in an 03 and cannot get a tach signal.
Mark Nixon
No Savior among the flesh
- Joined
- Feb 26, 2009
- Messages
- 8,677
John, It'll be interesting to hear this one run.
Your VE 24 valve 5.9s have a sound all their own, I can only imagine the difference in tone with more stroke and a larger bore.
Mark.
Your VE 24 valve 5.9s have a sound all their own, I can only imagine the difference in tone with more stroke and a larger bore.
Mark.
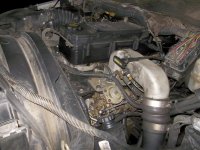
Its dark out,so the pics are not that great. This is the truck the 6.7 will be going into,The engine that is in it is the first VE 24 valve engine I did,so it never got painted up,I didnt know how well it was going to turn out,I have put alot of miles on it,done alot of pulling. Gets 23 miles empty and 14.5 loaded,sounds good. I have done several of these since for other customers,no complaints
Attachments

Mark Nixon
No Savior among the flesh
- Joined
- Feb 26, 2009
- Messages
- 8,677
First time John pulled up in that truck I did a double-take, because it was LOUD and in a Commonrail truck, then I remembered he was trying to build one.
I can attest to some of his ingenuity and his trial and error on that particular truck, it wasn't an overnight sensation. :hehe:
They definitely have their own sound.
Mark.
I can attest to some of his ingenuity and his trial and error on that particular truck, it wasn't an overnight sensation. :hehe:
They definitely have their own sound.
Mark.
If you installed a 12 valve in the 03 you have to mount the tone ring from the common-rail onto the front of the harmonic balancer, you need the ECM and wiring.As long as you have that the truck will function like it should. Use the 03 oil,water temp sensors
TheSilverBullet
All the correction factor
- Joined
- Jan 30, 2012
- Messages
- 1,598
Yup got all that tone ring bolted on balancer,tach sensor mounted and gapped at .20. Tone ring runs dead center of sensor anything else I'm missing?
oldestof11
Drag racer
- Joined
- Jul 17, 2007
- Messages
- 9,084
Welcome!
I'm liking this.
Sent via USPS 2 weeks ago
I'm liking this.
Sent via USPS 2 weeks ago
TheSilverBullet
All the correction factor
- Joined
- Jan 30, 2012
- Messages
- 1,598
Are you keeping these stock like turbo and injectors? I would kill to get 23 mpg out of a ton truck! My 90 is about the best on fuel 18-20 with a lot of stop and go. The worst is the vp44 it gets like 9 down a hill with the key off lol.
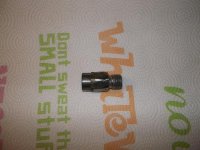
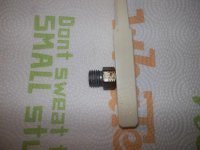
This adaptor is the first one I experimented with,it is rough but will give you a idea of how it looksThis here is the adaptor I have been using for the past year and a half. It screws onto the VE delivery valve and the VP44 line screws onto it.No special tools are needed to make this but it requires alot of material. To make this style you need 3 VE injector lines and 6 VP44 delivery valves.I have never had any problems with this adaptor,its just they take so much time to build.I will try and explain how to make this style.
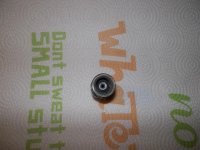
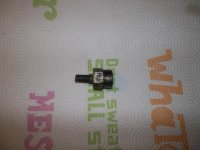
#1 Take injector lines,slide nuts out away from tips,make nice clean cuts. cut 1- 1/8th " off. You want to end up with 6 tips and 6 nuts( as seen in pic #4)
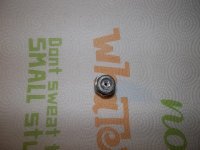
#2 Take VP44 delivery valve,you want the end that the VP44 line screws onto,so cut it off just beside where you would put a wrench,you need 6 of these, ( as seen in pic #5)
#3 Take a 1/4" drill bit ,drill a hole in center all the way threw the VP44 end
#4 Take a 7/32" drill bit ,drill a 3/8 " deep hole on the cut side on the VP44 end,basicaly you are redrilling the same hole is in step 3 ,but only a shallow hole
#5 Take your VE stem,with nut in place,(as seen in pic 4),and pess into the VP44 cut end,the wrench ends will be flat against each other now.
#6 Weld a bead around the seem, Take 7/32 drillbit and smooth out the VP44 end that the injector line will screw onto
I will post Instructions on the new style of adaptor tomorrow,it is easyer
#1 Take injector lines,slide nuts out away from tips,make nice clean cuts. cut 1- 1/8th " off. You want to end up with 6 tips and 6 nuts( as seen in pic #4)
#2 Take VP44 delivery valve,you want the end that the VP44 line screws onto,so cut it off just beside where you would put a wrench,you need 6 of these, ( as seen in pic #5)
#3 Take a 1/4" drill bit ,drill a hole in center all the way threw the VP44 end
#4 Take a 7/32" drill bit ,drill a 3/8 " deep hole on the cut side on the VP44 end,basicaly you are redrilling the same hole is in step 3 ,but only a shallow hole
#5 Take your VE stem,with nut in place,(as seen in pic 4),and pess into the VP44 cut end,the wrench ends will be flat against each other now.
#6 Weld a bead around the seem, Take 7/32 drillbit and smooth out the VP44 end that the injector line will screw onto
I will post Instructions on the new style of adaptor tomorrow,it is easyer
Attachments
Last edited: