
Whippit96
New member
Ok guys I am doing a "How-To" on how to host, resize, and post your pictures. And since the forum software here automatically scales down large pictures you will need to click on the yellow bar at the top of my pictures to enlarge them to get a better view.
The first thing you want to do is go to Image hosting, free photo sharing & video sharing at Photobucket and make an account there. Once your account is setup you need to login and go to your "Album" page.
Album Page- this is where you are going to begin to upload your picture/s.
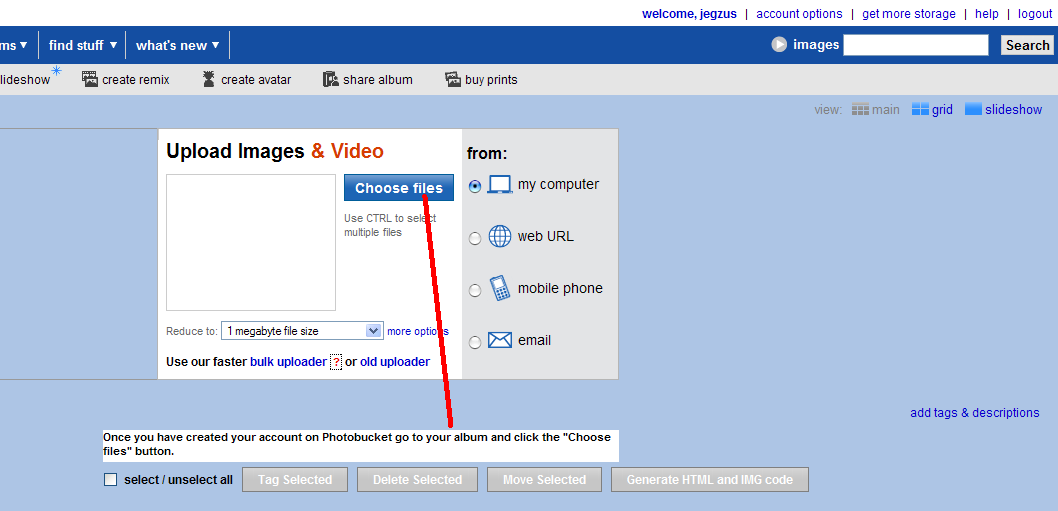
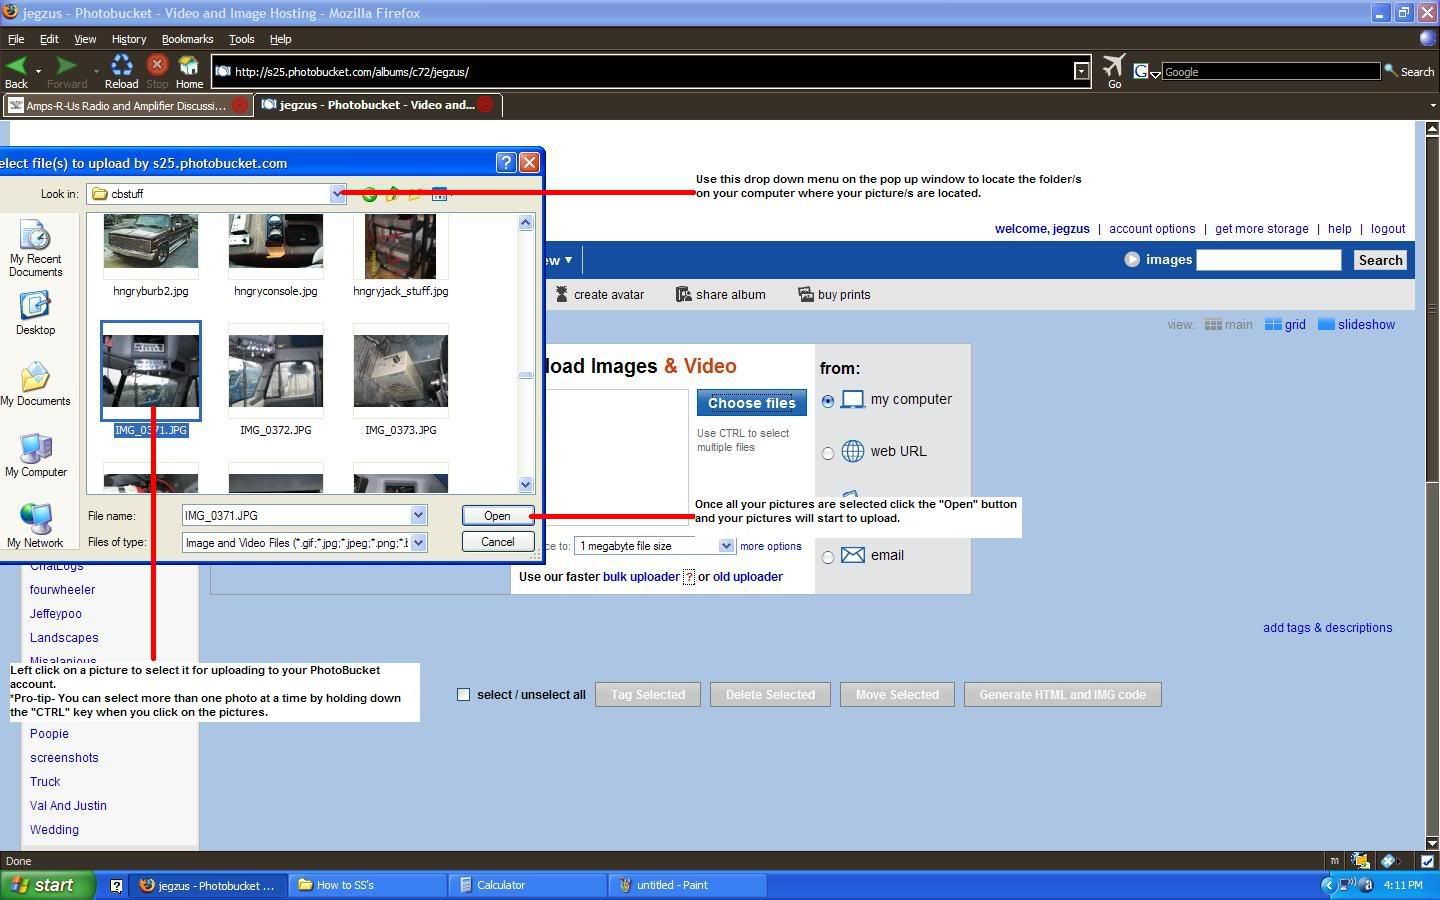
Once you click on the "Choose Files" button a pop-up window will come up and you can select your pictures from your PC. Once you select the picture/s you want to upload click the "open" button on the pop up window. Your files will then begin to up load.
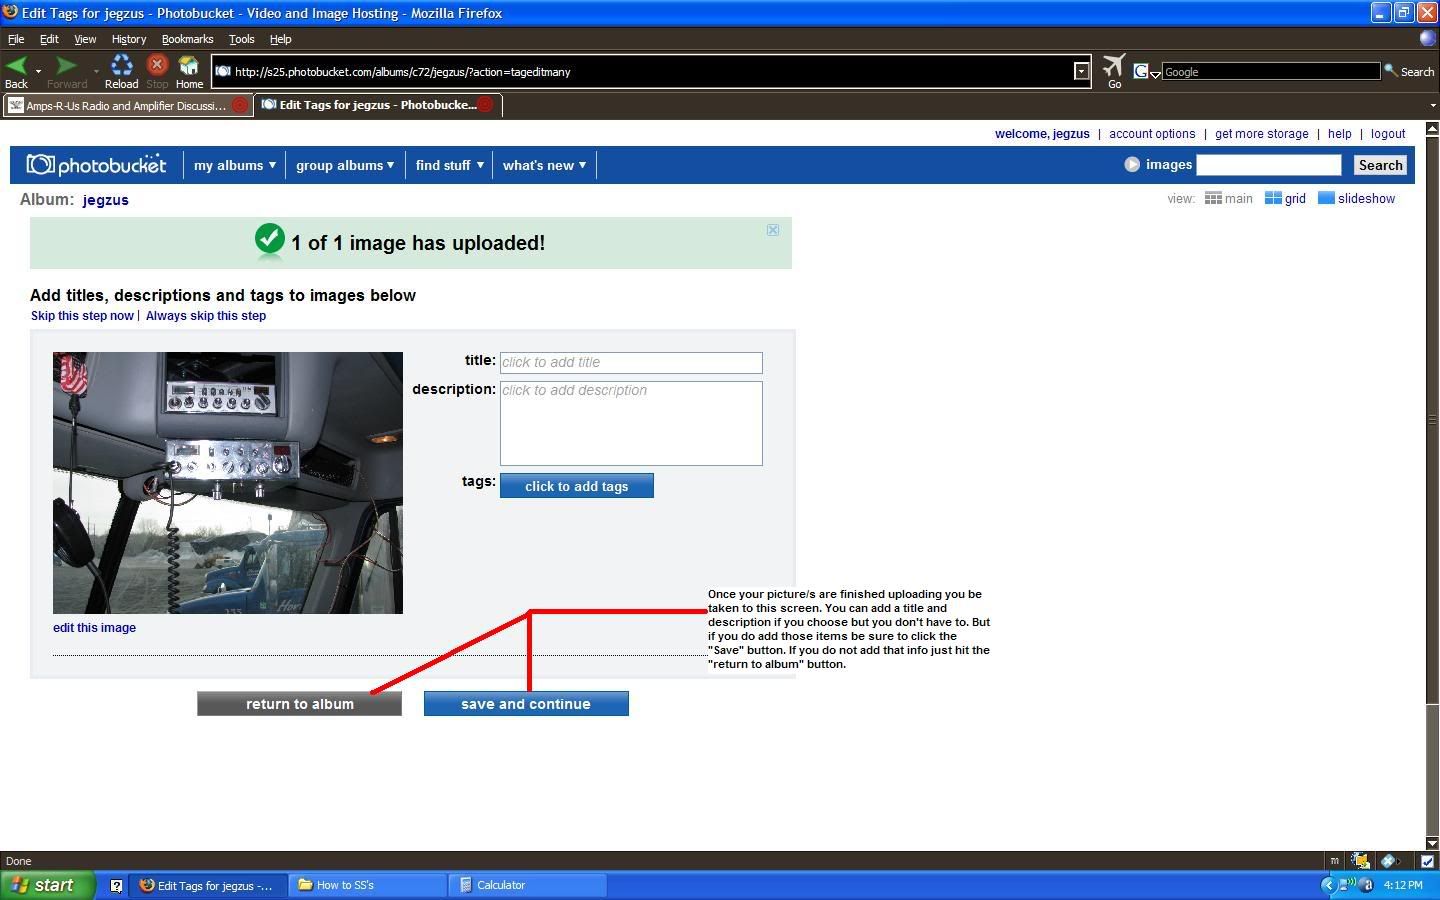
Once all of your images have uploaded you will taken to a screen where you can add a title and description to the image/s if you wish. This is not mandatory to do so. Which ever button you choose to use "Return to album" or "save and continue" it will take you back to your album with you picture/s that you uploaded.
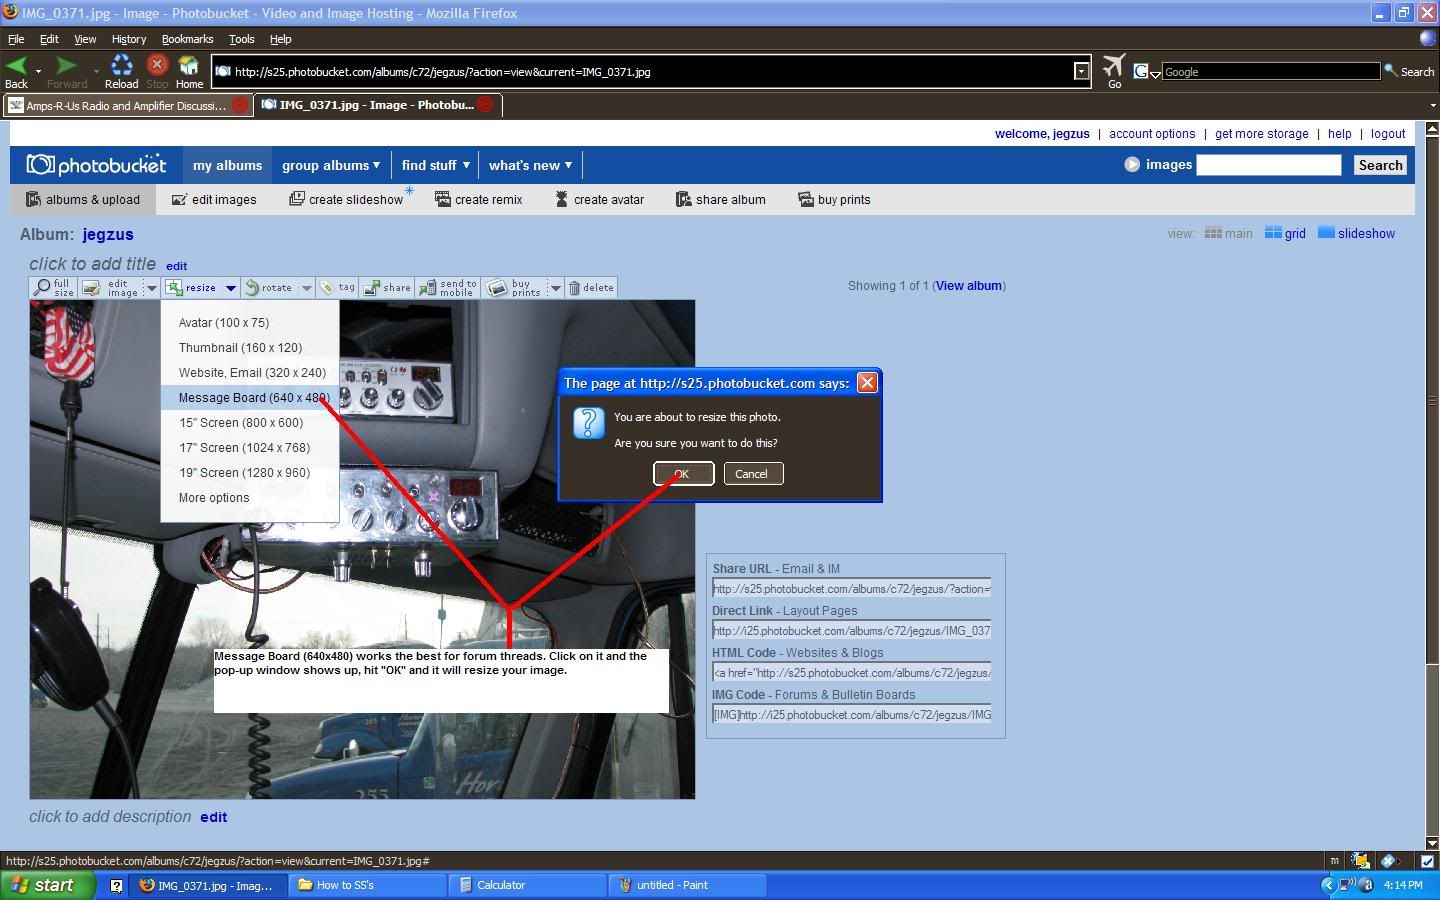
Now in order to resize your image/s you must click on an image. Once you do that it will enlarge the image slightly on the next page and give you options above the picture. To resize an image click on the "resize" tab and a drop down menu will appear.

It gives you several options such as "Avatar" which you would use to make an image small enough to be used as your avatar on most forums. The other main setting we will use is the "Message Board (640x480) setting. This is a good size to use on the forum because it is not too big and but still big enough to maintain high detail. Once you click on a setting to resize a pop up box asking if you want to resize your image will appear. Click ok and it will be resized.
Congratulations, you have made your picture smaller and can post in on the forum! But wait how do you do that?
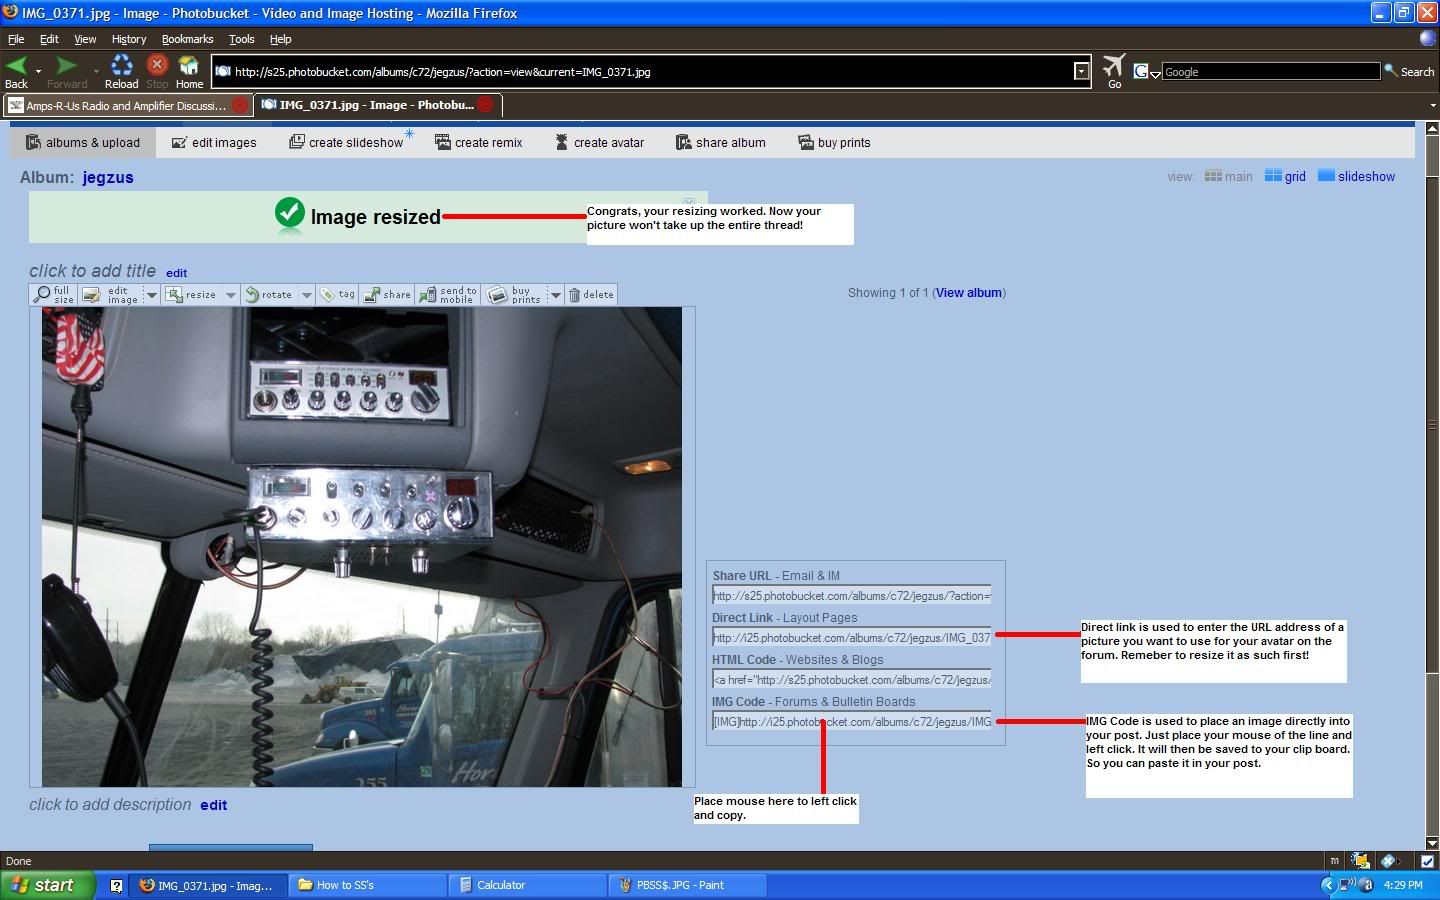
It's simple really, we will start with taking your image from photobucket that you wish to use as an avatar and place it in your user control panel here at AmpsRus.Org. First find your avatar picture you wish to use on photobucket after it has been resized as an avatar. Then like in the picture above left click in the code box under "Direct Link" so it saves it to your clipboard. Then go into your "User CP" here on the forums and click on the Edit Avatar link on the upper left side of your screen.
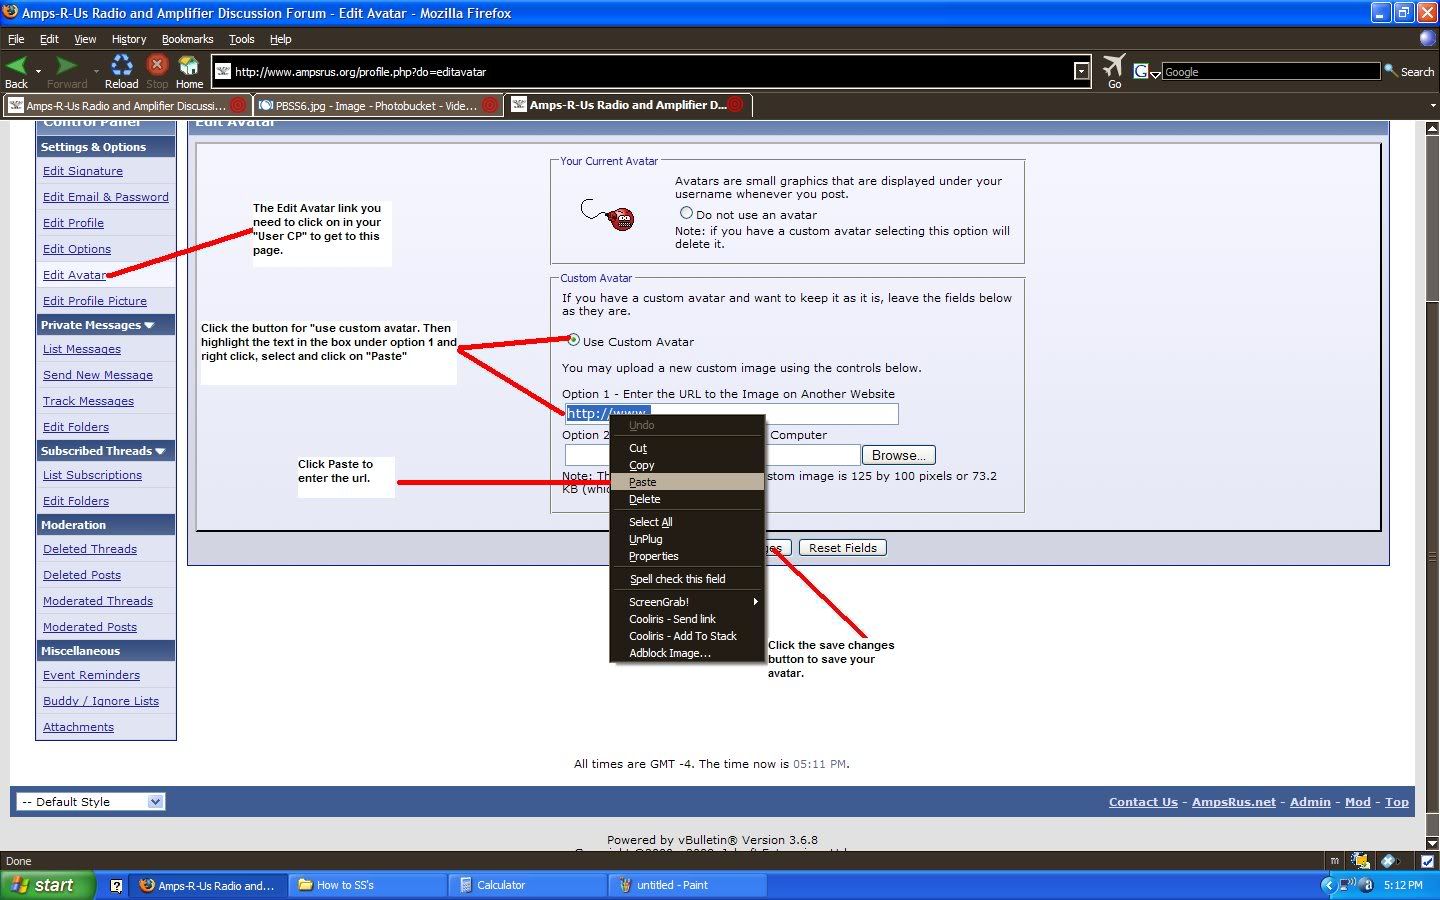
Once you are in the avatar screen click the "use custom avatar" button. Then highlight the text in the Option one box. After the text is highlighted right click and select paste from the menu. Your URL from photobucket should have been pasted in the box. Then simply click on the "Save Changes" button. And that's it, your new avatar should show up in your posts.
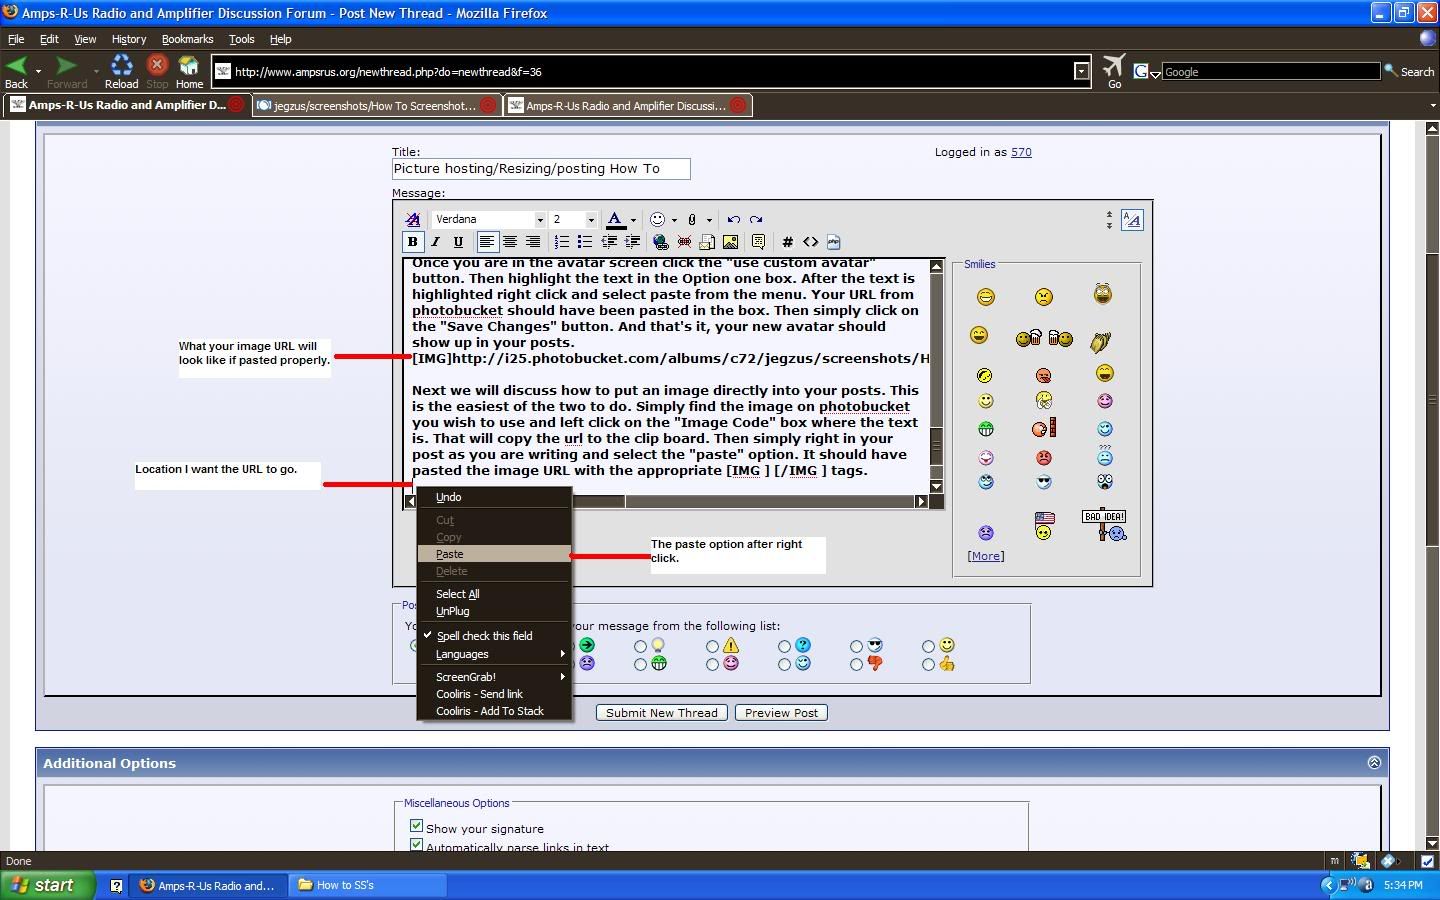
Next we will discuss how to put an image directly into your posts. This is the easiest of the two to do. Simply find the image on photobucket you wish to use and left click on the "Image Code" box where the text is. That will copy the url to the clip board. Then simply right in your post as you are writing and select the "paste" option. It should have pasted the image URL with the appropriate tags.
And that is it, hopefully this guide was clear enough to help those of you who are not familiar with the internet yet.
And some of you might be saying, Dang Whippit those pictures are huge!! I know that, but in order to post screenshots and still be able to read the writing in them you can not make them as small as you would like.
Thanks for reading and hope you enjoyed.
Whippit96
P.S Guys this thread was originally made for the CB forum I am a moderator at, everything works the same on this forum though.:thumbsup:
The first thing you want to do is go to Image hosting, free photo sharing & video sharing at Photobucket and make an account there. Once your account is setup you need to login and go to your "Album" page.
Album Page- this is where you are going to begin to upload your picture/s.
Once you click on the "Choose Files" button a pop-up window will come up and you can select your pictures from your PC. Once you select the picture/s you want to upload click the "open" button on the pop up window. Your files will then begin to up load.
Once all of your images have uploaded you will taken to a screen where you can add a title and description to the image/s if you wish. This is not mandatory to do so. Which ever button you choose to use "Return to album" or "save and continue" it will take you back to your album with you picture/s that you uploaded.
Now in order to resize your image/s you must click on an image. Once you do that it will enlarge the image slightly on the next page and give you options above the picture. To resize an image click on the "resize" tab and a drop down menu will appear.
It gives you several options such as "Avatar" which you would use to make an image small enough to be used as your avatar on most forums. The other main setting we will use is the "Message Board (640x480) setting. This is a good size to use on the forum because it is not too big and but still big enough to maintain high detail. Once you click on a setting to resize a pop up box asking if you want to resize your image will appear. Click ok and it will be resized.
Congratulations, you have made your picture smaller and can post in on the forum! But wait how do you do that?
It's simple really, we will start with taking your image from photobucket that you wish to use as an avatar and place it in your user control panel here at AmpsRus.Org. First find your avatar picture you wish to use on photobucket after it has been resized as an avatar. Then like in the picture above left click in the code box under "Direct Link" so it saves it to your clipboard. Then go into your "User CP" here on the forums and click on the Edit Avatar link on the upper left side of your screen.
Once you are in the avatar screen click the "use custom avatar" button. Then highlight the text in the Option one box. After the text is highlighted right click and select paste from the menu. Your URL from photobucket should have been pasted in the box. Then simply click on the "Save Changes" button. And that's it, your new avatar should show up in your posts.
Next we will discuss how to put an image directly into your posts. This is the easiest of the two to do. Simply find the image on photobucket you wish to use and left click on the "Image Code" box where the text is. That will copy the url to the clip board. Then simply right in your post as you are writing and select the "paste" option. It should have pasted the image URL with the appropriate tags.
And that is it, hopefully this guide was clear enough to help those of you who are not familiar with the internet yet.
And some of you might be saying, Dang Whippit those pictures are huge!! I know that, but in order to post screenshots and still be able to read the writing in them you can not make them as small as you would like.
Thanks for reading and hope you enjoyed.
Whippit96
P.S Guys this thread was originally made for the CB forum I am a moderator at, everything works the same on this forum though.:thumbsup: