
You are using an out of date browser. It may not display this or other websites correctly.
You should upgrade or use an alternative browser.
You should upgrade or use an alternative browser.
Dicking Around . .
- Thread starter BC847
- Start date
BC847
New member
- Joined
- May 14, 2006
- Messages
- 851
It's been 11 months since the original block cracked. Sourcing and obtaining a donor-engine, fitting it in the only local shop's scheduled, all the Covert19 shit, . . . . :bangJust read everything since october and wow if I did half of what you did it would take me till middle of next year! lol
TheBac
UPS guy
- Joined
- Oct 31, 2009
- Messages
- 2,344
Cleanest triple build Ive ever seen. Very, very nice.
BTW, I was brought up that you needed zinc when breaking in an engine, but again, thats when flat tappet cams were the norm. When I rebuilt my Dmax, I just used regular old 15w-40 Rotella and made sure to prelube everything first.
BTW, I was brought up that you needed zinc when breaking in an engine, but again, thats when flat tappet cams were the norm. When I rebuilt my Dmax, I just used regular old 15w-40 Rotella and made sure to prelube everything first.
Last edited:
RMJ_LB7
New member
- Joined
- Jan 31, 2019
- Messages
- 503
It's been 11 months since the original block cracked. Sourcing and obtaining a donor-engine, fitting it in the only local shop's scheduled, all the Covert19 shit, . . . . :bang
Oh man I could only imagine! I am curious to see how well the triples clean up the smoke. Seems like a very fun setup.
BC847
New member
- Joined
- May 14, 2006
- Messages
- 851
They seem to do well with 5x.018" @3.7ltr/min (liquid).I am curious to see how well the triples clean up the smoke.
This is from a couple of years ago running the former very low stall non-lockup converter transmission. (this new build includes better optimized pistons that sport a wider bowl yet, a slightly smaller volume).
Reduced WOT smoke - YouTube
Last edited:
BC847
New member
- Joined
- May 14, 2006
- Messages
- 851
Happy new year folks!
While keeping an ear out for falling projectiles from the surrounding country-side celebrations, I was dicking-around with the truck.
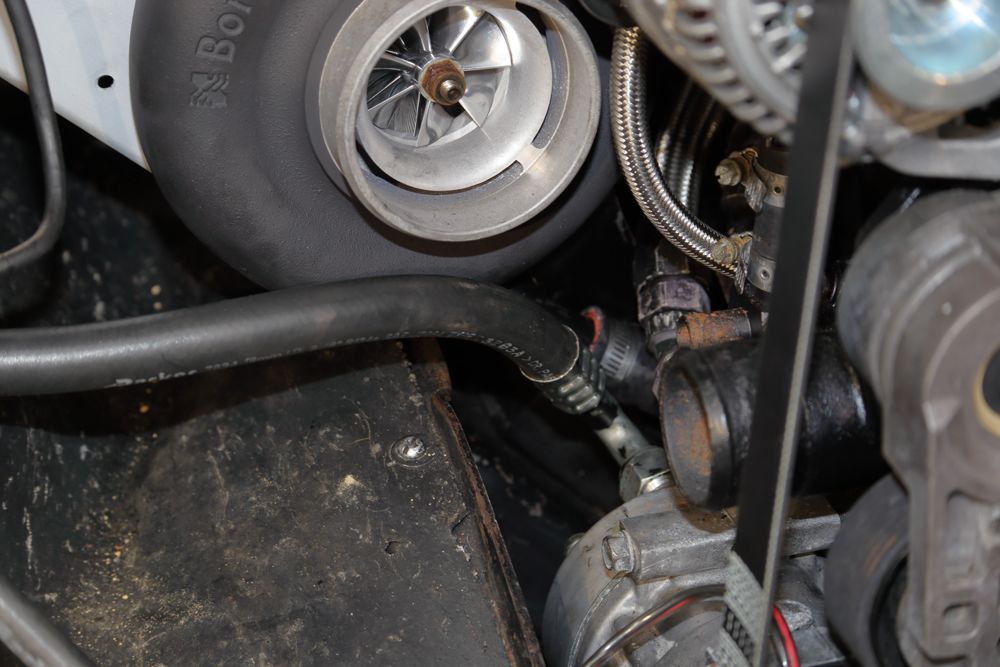
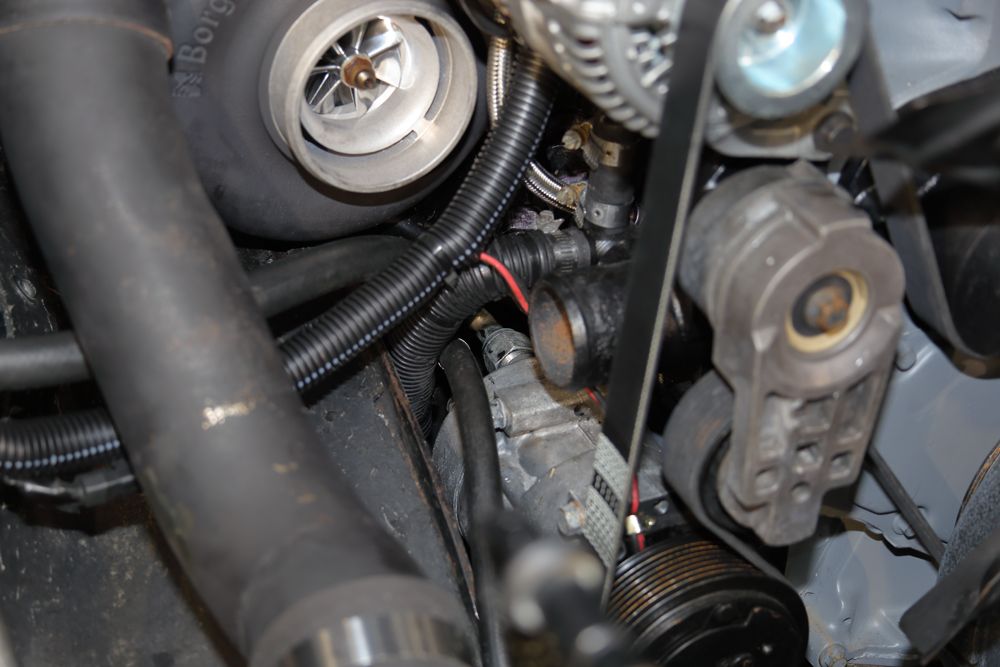
My original build of the HVAC refrigerant line-set had the suction-line's, compressor fitting point the hose close to that compressor-housing:
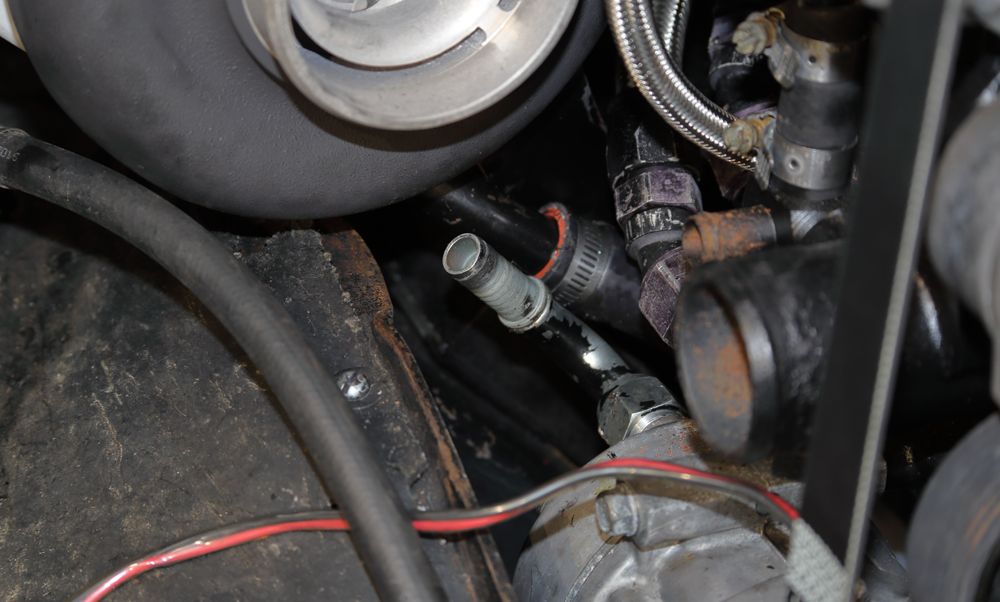
That ultimately led to the two getting together and worrying a hole in the suction-line:
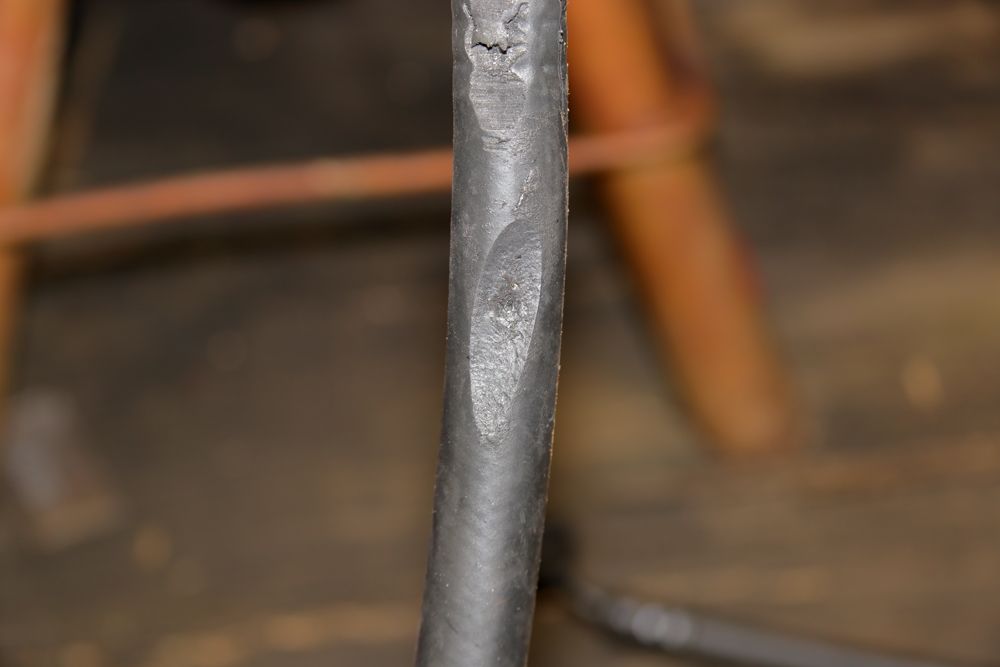
Folks, I like my air conditioning.")
So, I tweaked that fitting to have the hose approach with a greater angle to the compressor and put on a new ferrule.
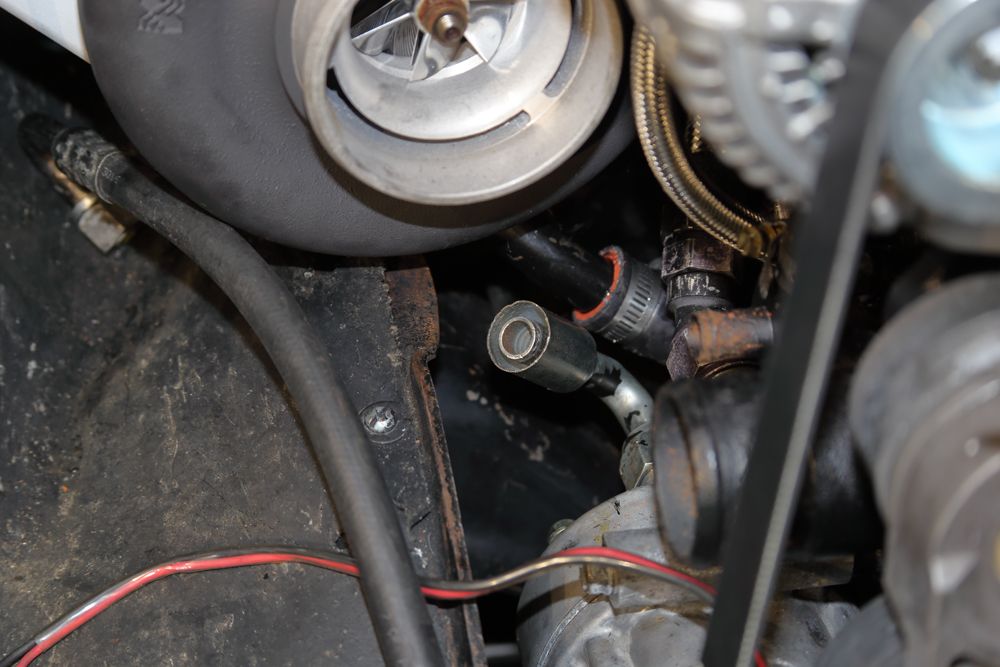
I added four inches in length to the hose to better provide some arch to the line as it approaches the compressor. In my head, it reduces the amplitude of the vibrations as seen by that fitting and puts more of said to be absorbed by the flexible hose.
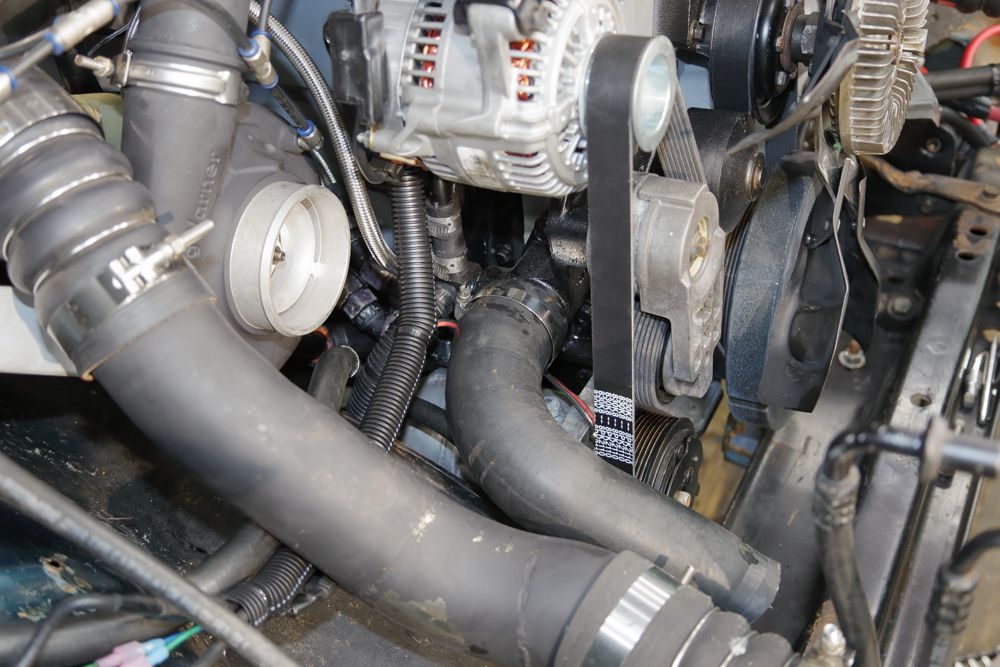
New is the top one:
With that, the suction-line is further away from that compressor-housing and can still comfortably duck under the neighboring hot charge-air tube going to the IC and air-filter ducting:
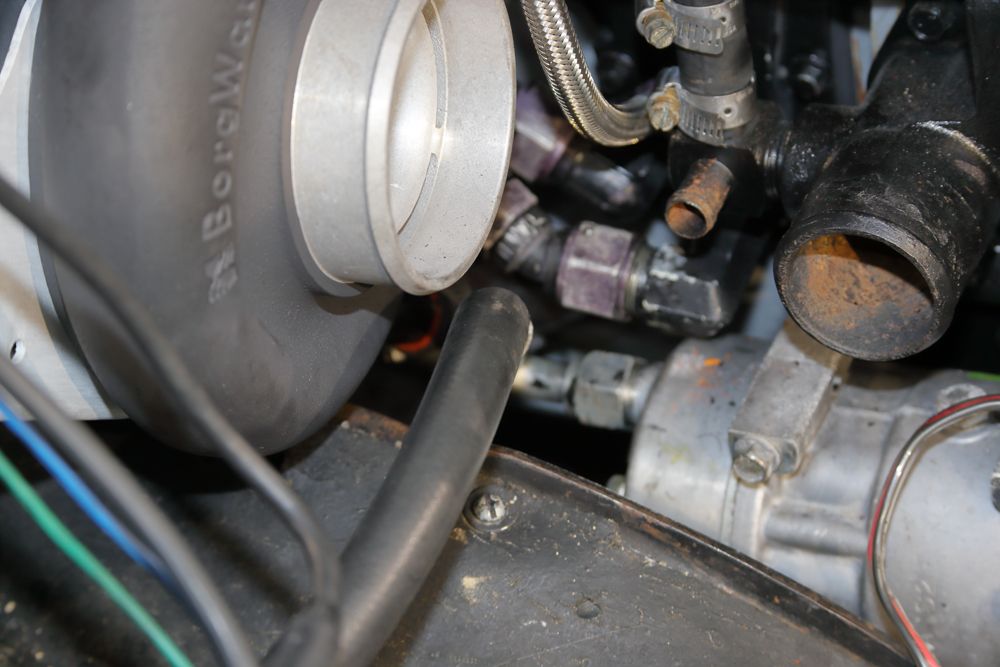
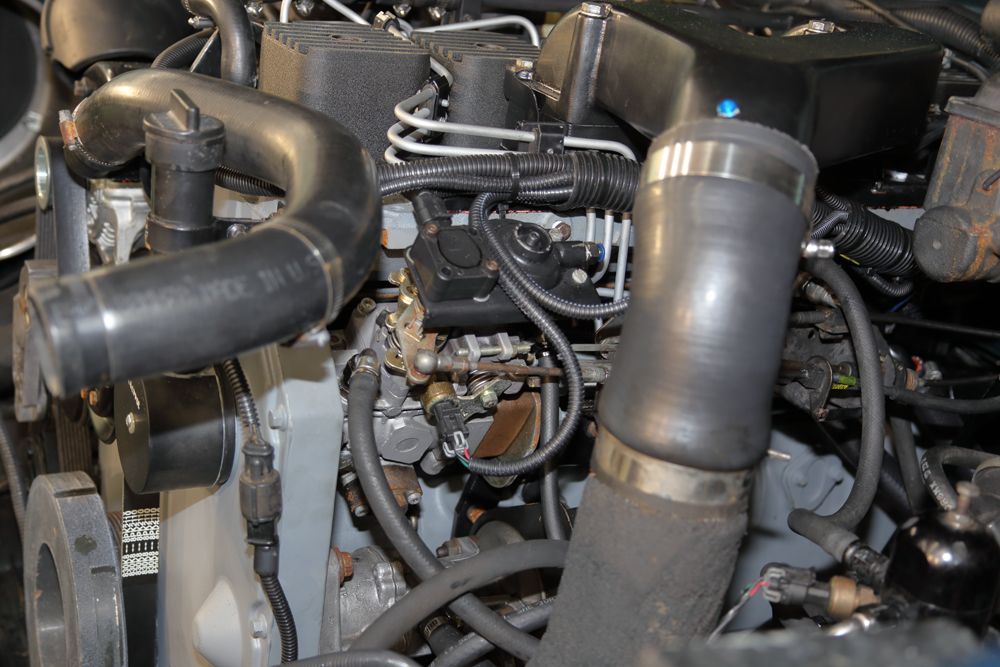
To complete the refrigerant line-set to the compressor, I've got to first connect the hot, high-pressure refrigerant line that goes to the condenser-coil. It connects further down the rear of the compressor. Then connect this suction line above the former.
Then I can finish connecting the other stuff that's piled on top of that.
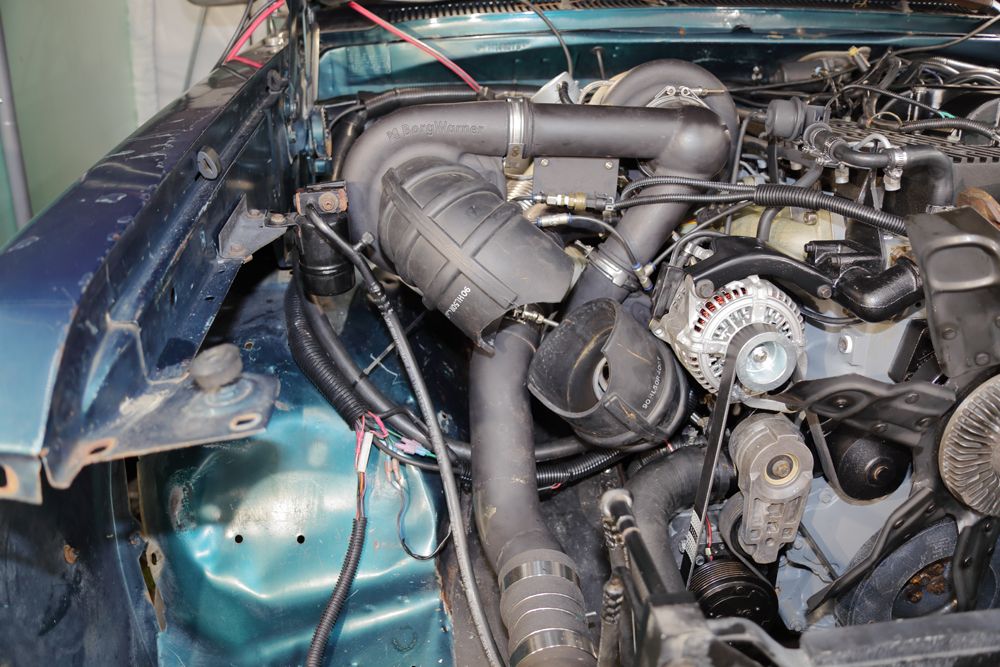
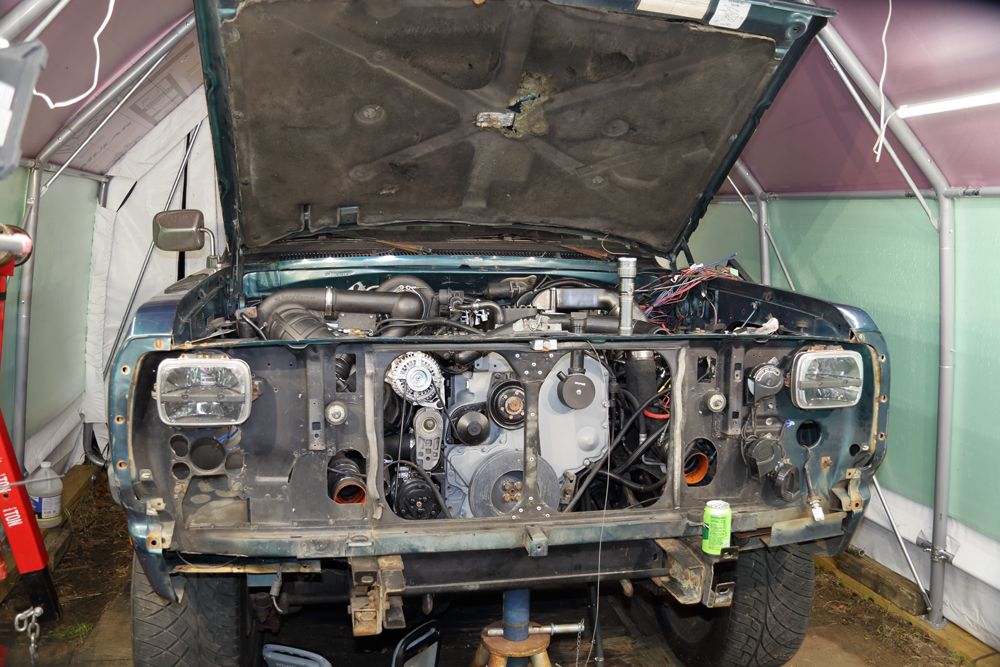
Getting close to needing to install the radiator support.
Crap, still need to finish the engine wiring harness mess.
We'll see, huh?
While keeping an ear out for falling projectiles from the surrounding country-side celebrations, I was dicking-around with the truck.
My original build of the HVAC refrigerant line-set had the suction-line's, compressor fitting point the hose close to that compressor-housing:
That ultimately led to the two getting together and worrying a hole in the suction-line:
Folks, I like my air conditioning.
So, I tweaked that fitting to have the hose approach with a greater angle to the compressor and put on a new ferrule.
I added four inches in length to the hose to better provide some arch to the line as it approaches the compressor. In my head, it reduces the amplitude of the vibrations as seen by that fitting and puts more of said to be absorbed by the flexible hose.
New is the top one:
With that, the suction-line is further away from that compressor-housing and can still comfortably duck under the neighboring hot charge-air tube going to the IC and air-filter ducting:
To complete the refrigerant line-set to the compressor, I've got to first connect the hot, high-pressure refrigerant line that goes to the condenser-coil. It connects further down the rear of the compressor. Then connect this suction line above the former.
Then I can finish connecting the other stuff that's piled on top of that.
Getting close to needing to install the radiator support.
Crap, still need to finish the engine wiring harness mess.
We'll see, huh?
Last edited:
Red Sleeper
Active member
- Joined
- Aug 11, 2009
- Messages
- 4,613
How long has the AC system been open? I know you’ll replace the dryer, but something about moisture induced refrigerant oil was something I read a while back. The system in my 05 was open for about a year while I was “dicking around” and the original compressor bit the dust 2 years later.
Of course you have a spare line set where it connects to the TV at your firewall. 1st gen goals.
Of course you have a spare line set where it connects to the TV at your firewall. 1st gen goals.
If the a/c system is open for a long time, I'll make sure to disconnect everything and flush each individual component with a/c system solvent and forced air. Ditto on having a/c too! I could never do without a/c myself. Even on my beater 5.0 foxbody DD; it's literally falling apart and burns a couple quarts a week but I make sure the a/c system is always in tip top condition! LOL
BC847
New member
- Joined
- May 14, 2006
- Messages
- 851
For the most part, the major refrigerant-circuit component openings were shielded with plastic sandwich bags. As is standard practice, upon reassembly of the refrigerant circuit including a new refrigerant filter/drier, I'll:
- Pressure-test the refrigerant circuit with 150psig of dry Nitrogen gas for an hour or so. If the circuit fails to hold the pressure, the test must stop and corrective action must be taken. Then pressure-test the circuit again.
- With successfully passing the pressure-test, I'll evacuate/dehydrate the refrigerant circuit by applying a vacuum such that the refrigerant-circuit pressure drops and holds at approximately 350 microns. With reaching that target, the refrigerant circuit will be isolated and it's pressure monitored. If the pressure rises to around 1500 ~ 1600 microns and stops rising, the vacuum-pump will be reapplied as such readings indicate the continued presents of moisture. If the pressure were to continue rising past 1600 microns, this would indicate a leak in the refrigerant circuit exists and must be corrected before continuing further. Ultimately, the evacuation/dehydration process will continue till such time that with isolating the refrigerant circuit, its pressure target of 350 microns will rise no more than approximately 100 microns over the course of an hour.
Then and only then can the refrigerant be charged into the circuit.
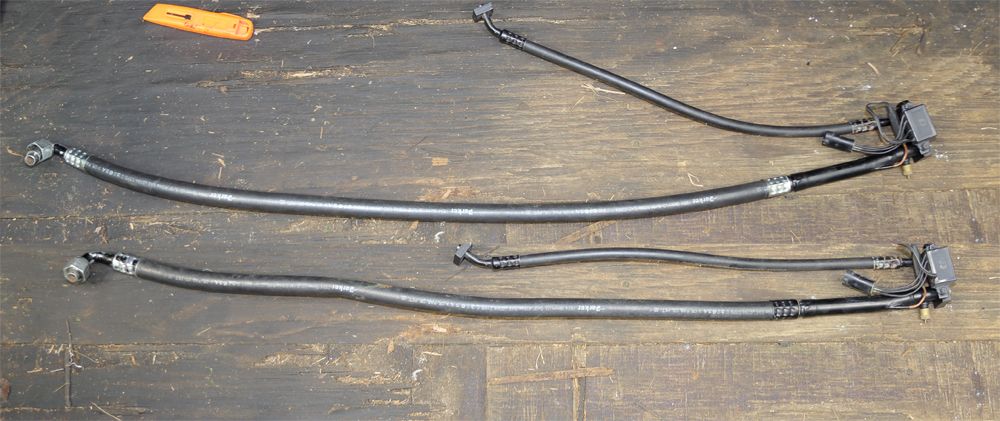
@ Red Sleeper: The two refrigerant line-sets are brought to you by the powers of PhotoShop. The bottom of the two in that image is the original article I made a while back. That shown at the top of the image are those original fittings and TXV manifold, but with a new suction hose.
- Pressure-test the refrigerant circuit with 150psig of dry Nitrogen gas for an hour or so. If the circuit fails to hold the pressure, the test must stop and corrective action must be taken. Then pressure-test the circuit again.
- With successfully passing the pressure-test, I'll evacuate/dehydrate the refrigerant circuit by applying a vacuum such that the refrigerant-circuit pressure drops and holds at approximately 350 microns. With reaching that target, the refrigerant circuit will be isolated and it's pressure monitored. If the pressure rises to around 1500 ~ 1600 microns and stops rising, the vacuum-pump will be reapplied as such readings indicate the continued presents of moisture. If the pressure were to continue rising past 1600 microns, this would indicate a leak in the refrigerant circuit exists and must be corrected before continuing further. Ultimately, the evacuation/dehydration process will continue till such time that with isolating the refrigerant circuit, its pressure target of 350 microns will rise no more than approximately 100 microns over the course of an hour.
Then and only then can the refrigerant be charged into the circuit.
@ Red Sleeper: The two refrigerant line-sets are brought to you by the powers of PhotoShop. The bottom of the two in that image is the original article I made a while back. That shown at the top of the image are those original fittings and TXV manifold, but with a new suction hose.
BC847
New member
- Joined
- May 14, 2006
- Messages
- 851
Last edited:
BC847
New member
- Joined
- May 14, 2006
- Messages
- 851
It's the standard I've used across the board for years.350 with only a 100 micron rise in an automotive application is a happy/dry system.
- POE oil can be a PITA exception. Might have to call it good at 500 microns. People are walking by, checking their watches and making phone-calls.
It's the standard I've used across the board for years.
- POE oil can be a PITA exception. Might have to call it good at 500 microns. People are walking by, checking their watches and making phone-calls.
That’s what the desiccant is for; you’re good.LOL I can’t even get that technical about it at home since all of my hvac stuff is ancient. I found the key is being patient and giving each step more time than you think is needed. I’ll leak check something all afternoon if my gut tells me to.
Red Sleeper
Active member
- Joined
- Aug 11, 2009
- Messages
- 4,613
I found the key is being patient and giving each step more time than you think is needed. I’ll leak check something all afternoon if my gut tells me to.
Glad to know I’m not the only one who’s overly picky about HVAC. A 35 year master tech gave me a good ol’ school of hard knocks teaching.
Back to it.
BC847
New member
- Joined
- May 14, 2006
- Messages
- 851
I don't bother getting the gauges out of the truck until I'm confident the heat-source, heat-sink and related blowers/fans/pumps are clean and clear.Glad to know I’m not the only one who’s overly picky about HVAC.
Anyhoo . . .
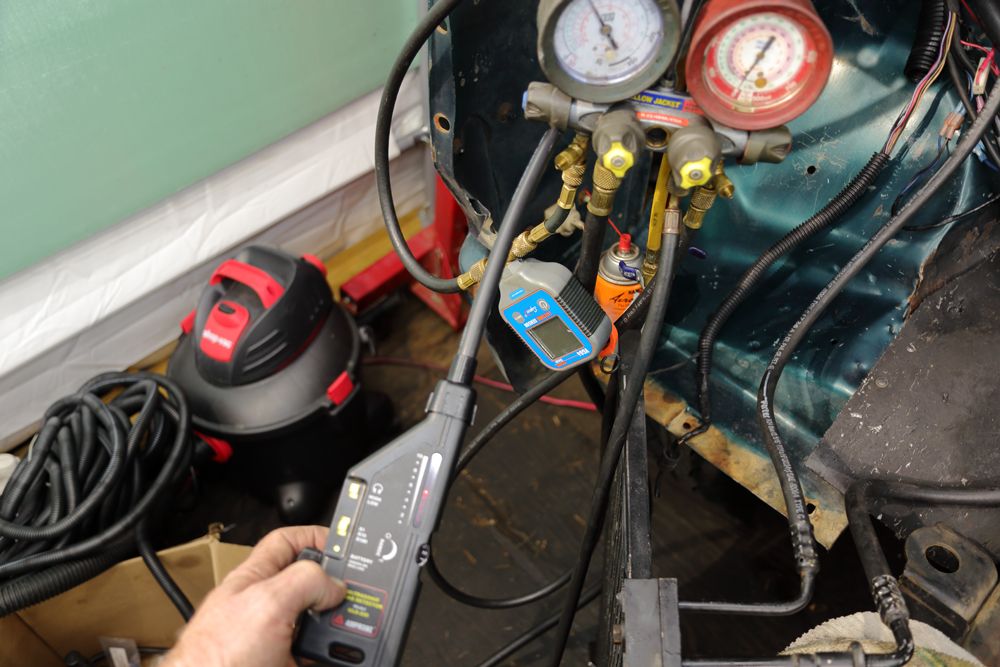
Since those refrigerant lines are buried under a lot of stuff, it only made sense to temporarily complete the refrigerant circuit by using the one bolt to connect the condenser coil and pressure-test the circuit with 125psig of dry Nitrogen gas.
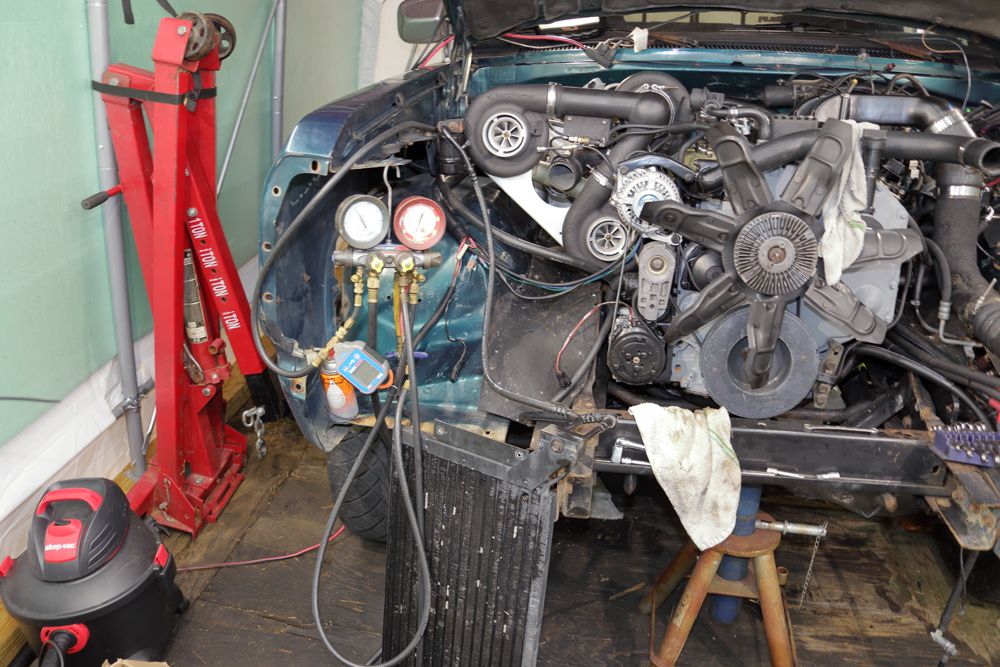
After an hour's time and seeing a very small drop in gauge-pressure, I swept the refrigerant circuit with an ultrasonic leak-detector. The only leak found was that of the service-manifold's suction valve-stem.
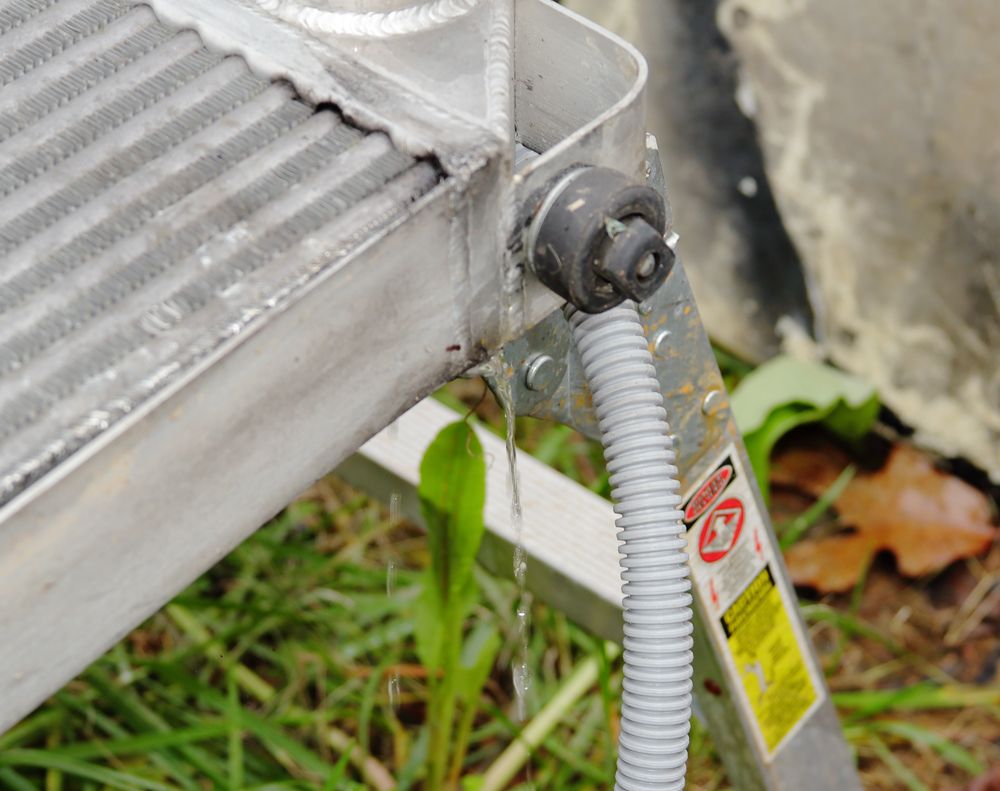
OK. With passing the initial pressure-test, I went to burying the refrigerant lines . . . .
Transmission heat-exchanger's return coolant line and alternator wiring-harness . . .
The radiator's coolant return-line . . .
And then the start of the air-filter ducting. . . .
Moving on, before I can install the IC, I need to clean out the oil-residue from the leaking turbocharger compressors.
IC inlet (as found):
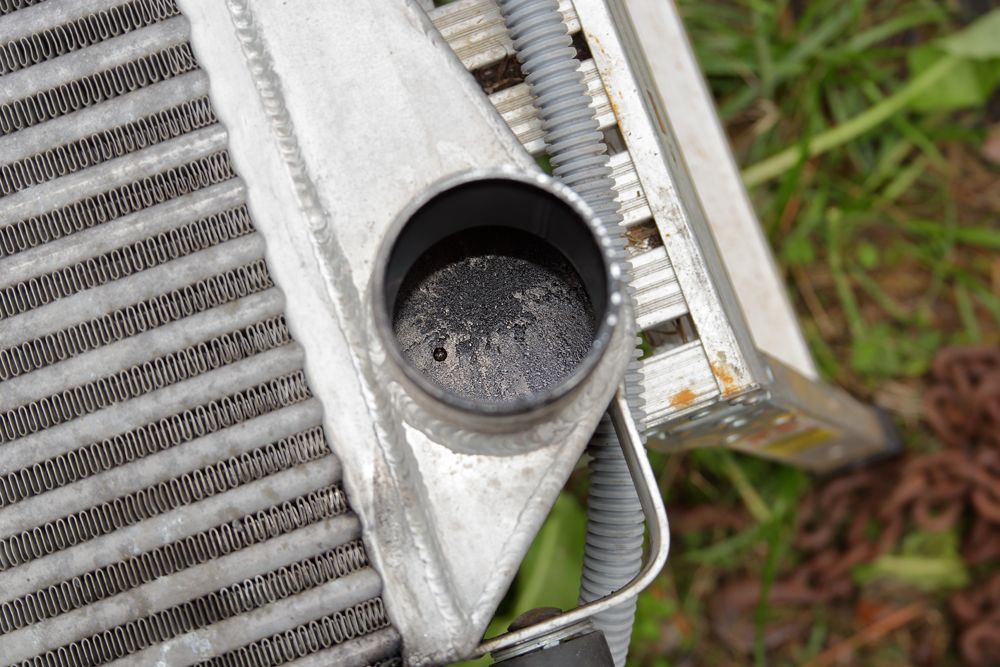
IC outlet (as found):
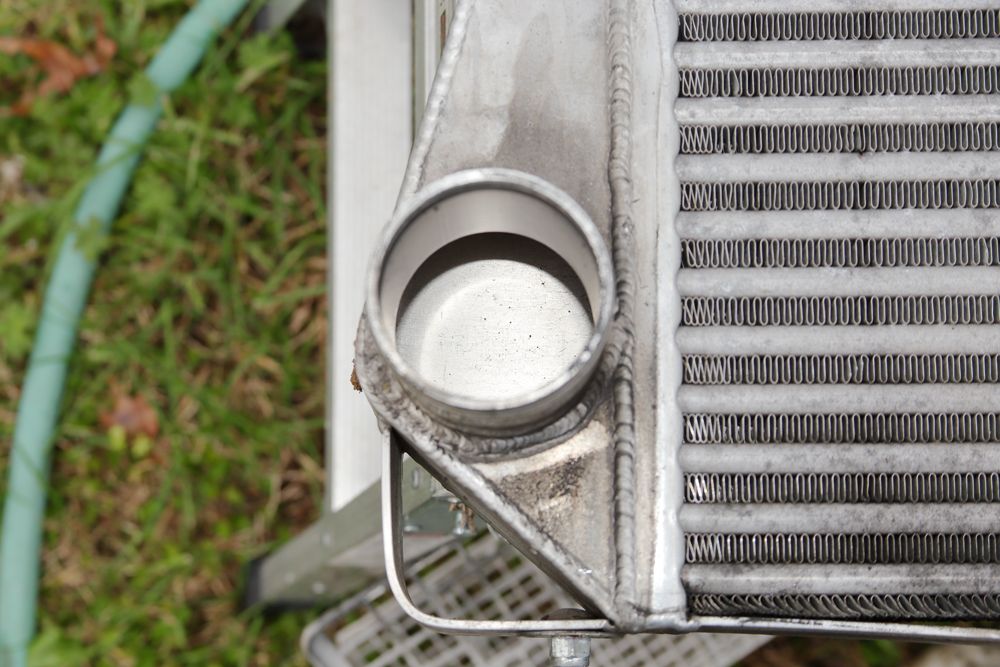
So, I laid down the IC and filled it with a metal-safe de-greasing solution. Then I got my feelings hurt:
(cleaning-fluid leaking from the inlet area of the IC)
One can see where the oil-residue has been blown/leaking out from the crack(s) where those lower core-tubes connect to the tank.
- Crap.
Stupid torque twisting-up the truck's frame. :doh:
BC847
New member
- Joined
- May 14, 2006
- Messages
- 851
- I got the stupid torque-convert to flex-plate bolts in. And no, you still can't install and tighten the first bolt and have those following take thread. :doh:
- Got all the other loose ends under the truck addressed: converter inspection-plate, exhaust down-pipe to intermediate-pipe connection, the remaining bell-housing bolts and the third starter bolt I couldn't get to while the engine was on the stand.
- Integrated the OEM engine wiring harness with the data-logging sensor harness making one harness assembly.
- Set the radiator support in place.
It won't be as long as it has been I reckon. :blahblah1: