F250/Cummins Swap

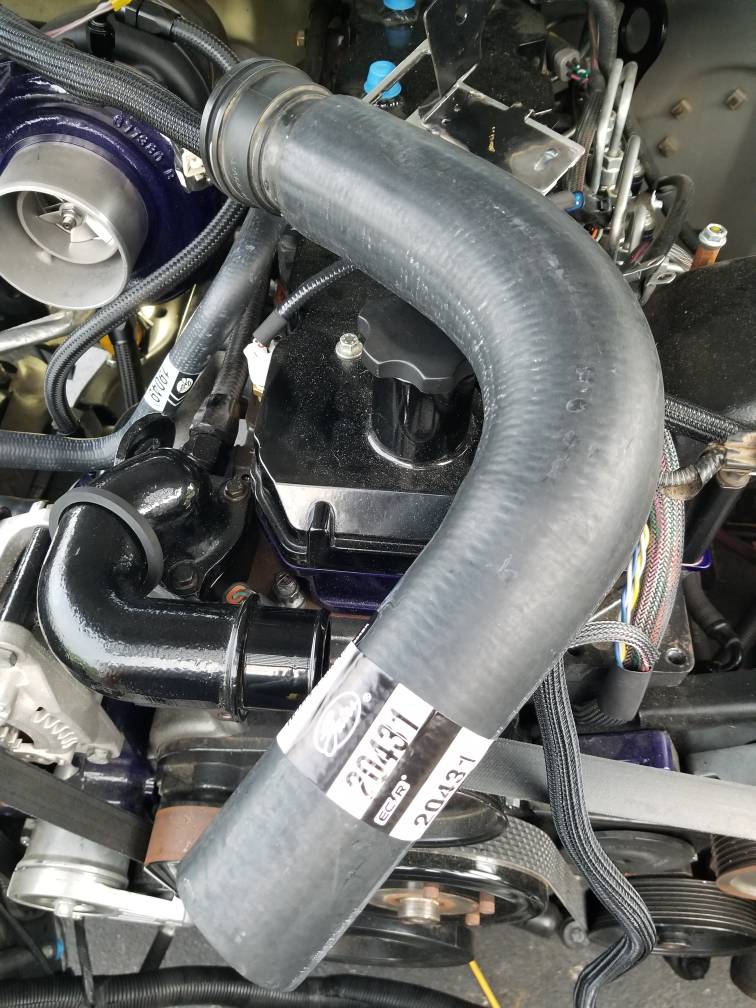
Found some gates hoses at oriely's to finish up the passenger side hose connections. That lower radiator hose is just over 2.1" which is perfect for the Ford quick connect. The other end is 2" to mate to the 3rd Gen inlet. It has an internal spring to prevent collapse. The 2" side needs between 1.5 to 1.75 inches cut off to clear the frame with the DCS engine mounts. The destroked mounts put the engine to the driver side. I'm going to use a gates shrink band at the radiator end.

The heater hose is a 90° quick connect into a gates hose with two 90's turned out of phase. I'm mating this to the Ford heater hose and clamping it with oetiker clamps like OEM. This puts both heater hoses coming to the rear of the alternator before they diverge.

Has anyone had trouble with the Ford radiator hoses not wanting to clip on to an aftermarket radiator?
625c10618eb4caf1b23e5c1b51a07a85.jpg
acf42e7eb5724b5cb7daa6a5b35b5362.jpg
0fb1e2b976f75d958cd9c86794b194bb.jpg
7241e72555c93a3f16e97683e8ed0ae5.jpg


Sent from my SM-G950U using Tapatalk
 
Barely. I got the wiring harness bracket made up and attached to the frame. It mounts the engine to chassis connector to the modified Ford location.
I found some sweet isolator blocks for the trans lines, and I'm having some brackets to mount the lines to the pan rails made up. I'm also having a log manifold made to mount the coolant resevoir line to the engine.

I beta tested a device to change the 47RE range into a signal the Ford can use. This let's the ford's ignition system crank the Cummins engine, as well as display the position on the dash as it should. I'm also working on replacing the pressure line for the power steering with AN line to resolve a clearance issue at the PS pump
7ddbb45876a64bb3ccc6f50ad9c06bc8.jpg
b10bc4b0f61f962a7083d1499146195c.jpg
91b2c9c8b8382223dfd16eb47bf41810.jpg
bee489ddee1c147c5d1bfbc2f3588b68.jpg
70ffb20855887ecd6a7cd441b25067be.jpg
711fb490544890df8fffde993758ddae.jpg
5b7ab8a989e4275fa020d1ab5a5f40f5.jpg
145853f91ea37a79b201d5cc4cc302f4.jpg
74cb20bc19a2ac0234c341d93388f39f.jpg
60ee7ffa8e1a8aff95df00d821d8bfe4.jpg


Sent from my SM-G950U using Tapatalk
 
Got to play with the throttle valve last weekend. Hoping to have something to convert the TV into a useful throttle input for the cummins
c5f531ed0ab2252c3277bab2a9477992.jpg


Also checked out the tach converter from swap helper. Com

Sent from my motorola one vision using Tapatalk
 
Last edited:
Got more done.
Picture are really out of order.
Replacing the 8 pole oem connector for the AC Clutch and sensor. I evidently sold the wiring harness and related AC parts still on the 5.4 engine, so now I get to build the harness.

Wired the bussman-cooper relay. This provides the fuse holder for the ecm constant power, and the relay side will supply the air dog. The air dog V+ supply is 12ga and passes through the cam-lock connector along with everything else engine related.

Got my water manifold in to get the coolant from the reservoir to the tubing around the back of the engine. Couple of holes to drill and then I think black ano finish.

Trying to decide if I should send It out or do it myself.

66415db3efdffdead1e1fe1d9b37296c.jpg
688ac0d13d836a23c3ab190e6dc4ad4a.jpg
2350f3345d22e08b64ebf92eecea9c1c.jpg
6c686e4d255fbdb6160ad4cbc5c9f315.jpg
4398a4a72b50f87991568c3fbddd9e89.jpg
4cfe0da597ab22eec3cfc38416bfa9d0.jpg
493632529eb50736497a91c451f8478f.jpg

79391d7527a0a1962e2b23c49c681b8a.jpg
 
Last edited:
Installed the AC Clutch wiring and pressure switch wiring. Installed a shield on the 60 pin ecm connector. Realized that with the gas engine AC high pressure switch, there is no control over the engine fan. I added the wiring for the fan switch since the repair connector has 4 wires, but the switch is only a two pole, and the switch from a 6.4 is a rectangular connector body. I will sort all that out later.
Installed the log manifold so I could see what type of molded hose I'm searching for. I think I'm going to try and anodize that thing purple some time in the near future.
31bed2ca8623fc413aab6c3c7796d1a0.jpg
33511730f012e4135f5802252b91e528.jpg
3007d8d2142a6db3af0d2fcdf83affcb.jpg
5eb7cdddbef183baef109160c977d6aa.jpg
9277528551dc37f6b37baf7a4a3645c1.jpg
29cf45142f25d9eddeb67d0471af3fbb.jpg


Sent from my motorola one vision using Tapatalk
 
Last edited:
Ano attempt #1 was a fail. Too much current and not enough time. It has just enough purple on it to know it was dipped.
38247e78bd36b956a85e2cb730b9a440.jpg


Sent from my motorola one vision using Tapatalk
 
Ano attempt #1 was a fail. Too much current and not enough time. It has just enough purple on it to know it was dipped.
38247e78bd36b956a85e2cb730b9a440.jpg


Sent from my motorola one vision using Tapatalk

How do you anodize aluminum?

You’re sure doing a great job on the wiring, and it’s a reminder to me why I’ll probably never Cummins swap anything this new! LOL Keep up the good work, and keep posting progress pictures please.
 
How do you anodize aluminum?


You’re sure doing a great job on the wiring, and it’s a reminder to me why I’ll probably never Cummins swap anything this new! LOL Keep up the good work, and keep posting progress pictures please.
That camlock connector was a "oOoOOOooo, I like that kind of thing. I had two goals there:
Make it so the wiring would let the cab come up
Make it so I can run the engine independatly of the chassis.
Even the power supply to the airdog passes through it.
I was just having a conversation about what bulkhead connector to use to pass into the cab.
I think I'm going to use the TE HDP

b964984d5ed20e59cdd252e49ade1027.jpg


Sent from my motorola one vision using Tapatalk
 
Installed the transmission line brackets. I'm going to end up building some steel transmission lines. I finished everything down the sides of the engine that I intend to do, so I put the cooling pack back in.
OH yeah. I anodized the coolant manifold purple. Well, supposed to be purple.
f83e382fb7e679d4f01ff95cea3f5059.jpg
6e266887ab9e72f76d6ee2442d42baae.jpg
169bf8ee6a89d0e5ef85c614596fa097.jpg
3adc49b5677f7eb5842f274d28555fa5.jpg
df34b35e49eb69c250a9be5c066df685.jpg
b0f3b7333838fbc8cc813ae0a6f21dbe.jpg


Sent from my motorola one vision using Tapatalk
 
Looking good. Stuff like those trans line brackets are so time consuming, but so worth it.
I like that raspberry colored coolant manifold. :lolly:
 
Don't wrench wrench when you're tired kids. Hoses get cut too short, plans get shat on......

Sent from my motorola one vision using Tapatalk
 
Well. I finally, after like 4 months, got a set of oeticker clamps for the heater hose. I clamped everything together, wrapped it in heat shielding, and sealed it with speed tape.
Tig welders are the devil BTW. I welded all of one weld on that charge air tube, and then a piece the size of a dime decided to evaporate.
e2f14b8c1bd3728533bb37bb46e755fb.jpg
0547d76f2fd5adc61ba2df3032f42e9c.jpg
c8279dbb8b8255c510082156e28db74d.jpg
260568e6814dba577824fb3c3a2fc3ba.jpg


Sent from my motorola one vision using Tapatalk
 
Anyone know who offers the swaged hoses that are in this photo?
dc290d6084b3e5f918a5fe5e8b6ff894.jpg


Sent from my motorola one vision using Tapatalk
 
OK, next challenge,

7/8" coolant hose with a 60° bend.
I looked at the hps parts but never saw a 60 degree elbow.

Sent from my motorola one vision using Tapatalk
 
Back
Top