
You are using an out of date browser. It may not display this or other websites correctly.
You should upgrade or use an alternative browser.
You should upgrade or use an alternative browser.
Build - 9 second drag truck #racegreen
- Thread starter bgreen776
- Start date
AHall
Hobbyist
- Joined
- Apr 2, 2007
- Messages
- 4,603
Glad someone else gets to experience the floor bar pain as well. My nhra inspector mentioned the bars don't need to go in if the factory floor is welded back in or a thicker flooring is done. My 18ga floor met this requirement. He also mentioned mine was massively overkill structurely. Just the idea I was going for. Heads up if you're looking to save some weight.
bgreen776
White Collar Fabricator
- Joined
- Jul 12, 2012
- Messages
- 578
Glad someone else gets to experience the floor bar pain as well. My nhra inspector mentioned the bars don't need to go in if the factory floor is welded back in or a thicker flooring is done. My 18ga floor met this requirement. He also mentioned mine was massively overkill structurely. Just the idea I was going for. Heads up if you're looking to save some weight.
Thank you for the input!
I remember reading in your thread about the struggle around these bars. That is one reason I have been looking forward to their construction. I'm not quite sure how I will construct the floor at this point, but I look forward to it in a sick and twisted glutton for punishment way.
If I was going to have your guy cert my truck I would go with that your above statement about a thicker floor, but the sfi spec does not agree. If the floor, firewall, AND door jamb are not factory, the floor bars are required, if following the letter of the "law" as published in the 25.5 C spec. I wish I could read the inspectors technical notes as they may account for exactly what you mention, but unfortunately, they are not published to the general population.
That said... The OEM frame of most fairly modern trucks are so stout, (especially when all the other tubes are added), that the x-brace is not, in my opinion, critical to the driver's safety. However... I do believe that the x-brace will add structure to the chassis that will benefit, in some small way, to the strength and consistency of the chassis. Therefore, I will construct them from a slightly larger and thicker tubing than required by the spec.
Last edited:
AHall
Hobbyist
- Joined
- Apr 2, 2007
- Messages
- 4,603
Can you not box the frame rails (2a and 2b) and the rear crossmember (1) and meet the requirement?
#2 bars were boxed. The #1 bar had to be boxed from the factory to apply. Even though sfi agreed my factory member is much stronger than my 1 3/4" bar. Just had to double up right there. My 4 and 6 bars were an extra pain because of how low I mounted the engine/trans. Seems to be all give and take. They fell in the middle rather than yours being above a little. Yours shouldn't be too terrible. I really had to utilize the 16" back rule along with the max bend spec.
Make sure your feet are protected. Mine had factory components to prevent the drivers tire from entering the cab. I'm going to add another bar today for extra precaution. Also added a few 1" bars to my funny car cage, as I was a little close on the helmet through rule in a spot.
I like your "Flying V" that connects the dash bar. Reminds me of off-road racing and sideXside cages. I was going to add one but never liked the loss of visibility. I made this suggestion to be added into the 25.6 proposal previously to help with the added weight. I opted for just a single bar there on mine.
If you have any questions feel free to ask.
bgreen776
White Collar Fabricator
- Joined
- Jul 12, 2012
- Messages
- 578
Thank you!
Had a half day to get some work done today.
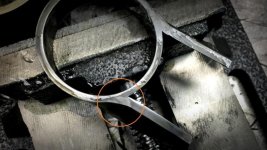
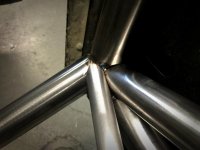
As I get closer to welding out all the joints on the chassis I am taking a little time to practice and verify tube prep and welding technique. This piece of 1.75x.095 wasn't beveled to a point like I would normally do, which was fine for most of the joint, but at the point in the attached picture you can see clearly that I did not get full penetration. Torch angle and lowering travel speed would probably help, but I will continue to bevel to a point for all tubes to ensure this does not happen on the chassis.

Had a half day to get some work done today.
As I get closer to welding out all the joints on the chassis I am taking a little time to practice and verify tube prep and welding technique. This piece of 1.75x.095 wasn't beveled to a point like I would normally do, which was fine for most of the joint, but at the point in the attached picture you can see clearly that I did not get full penetration. Torch angle and lowering travel speed would probably help, but I will continue to bevel to a point for all tubes to ensure this does not happen on the chassis.
Attachments
bgreen776
White Collar Fabricator
- Joined
- Jul 12, 2012
- Messages
- 578
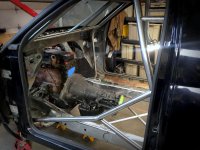
Welded a bunch of tabs between the cage and cab then cut out the rest of the floor and most of the firewall. I estimate at this point a 50 lb weight savings once I install a fabricated floor. Now I will either weld a temporary sub frame to the body and lift it off for final chassis welding, or do as originally planned, grind out a bunch of tack welds and drop the cage. Lifting the cab seems like a much better idea at this time.
I also cut out the inner rocker panel, this truck had a three piece rocker box, so I'll leave the outer two and install the SFI required rocker bar, then weld the body to the bar.
Nice rust eh! :doh:


I also cut out the inner rocker panel, this truck had a three piece rocker box, so I'll leave the outer two and install the SFI required rocker bar, then weld the body to the bar.
Nice rust eh! :doh:
Attachments
bgreen776
White Collar Fabricator
- Joined
- Jul 12, 2012
- Messages
- 578
That's the plan. That and other miscellaneous things that won't look nearly as cool as that. I'll have to re-read the spec, but I believe that because I cut away so much of the floor I will be required to replace the floor with .035 steel and weld it to the chassis and body
Sent from my iPhone using Tapatalk
Sent from my iPhone using Tapatalk
bgreen776
White Collar Fabricator
- Joined
- Jul 12, 2012
- Messages
- 578
Thank you.
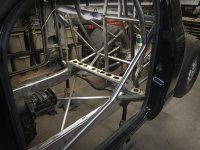
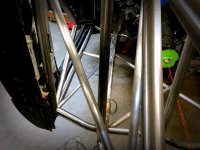
That's a pretty big con rod, I wear a 7-7/8" pro fit if that helps at all. It's out of one of the small, 3 cylinder (10" bore) two stage, reciprocating compressors at the refinery I work at. Our big one has a 23" bore.") Nothing too special, I just thought it would make a fun picture and maybe get a laugh out of a couple people. Sometimes people wonder why fuel costs so much... this is why. I just ordered one piston for one of our 18" compressors... $28,000. A new set of rings is about 10k and 3-5 in labor, and another 20-40k in lost profit opportunity, and they only last 2-4 years. Sorry for the derail, a chassis picture to get back on topic. I know, I know, it looks an awful lot like the last picture I posted, but it represents about 8 hours of planning and fabrication. It's the details like this that make a build like this cost so much, and take so long, yet make me proud enough to share.
Nothing too special, I just thought it would make a fun picture and maybe get a laugh out of a couple people. Sometimes people wonder why fuel costs so much... this is why. I just ordered one piston for one of our 18" compressors... $28,000. A new set of rings is about 10k and 3-5 in labor, and another 20-40k in lost profit opportunity, and they only last 2-4 years. Sorry for the derail, a chassis picture to get back on topic. I know, I know, it looks an awful lot like the last picture I posted, but it represents about 8 hours of planning and fabrication. It's the details like this that make a build like this cost so much, and take so long, yet make me proud enough to share.
Quite the pain in the you know what to get it level and parallel with the tiny little bit of floor that remains. Should make fabricating the new floor a lot easier though.

That's a pretty big con rod, I wear a 7-7/8" pro fit if that helps at all. It's out of one of the small, 3 cylinder (10" bore) two stage, reciprocating compressors at the refinery I work at. Our big one has a 23" bore.
Nothing too special, I just thought it would make a fun picture and maybe get a laugh out of a couple people. Sometimes people wonder why fuel costs so much... this is why. I just ordered one piston for one of our 18" compressors... $28,000. A new set of rings is about 10k and 3-5 in labor, and another 20-40k in lost profit opportunity, and they only last 2-4 years. Sorry for the derail, a chassis picture to get back on topic. I know, I know, it looks an awful lot like the last picture I posted, but it represents about 8 hours of planning and fabrication. It's the details like this that make a build like this cost so much, and take so long, yet make me proud enough to share. Quite the pain in the you know what to get it level and parallel with the tiny little bit of floor that remains. Should make fabricating the new floor a lot easier though.
Attachments

Last edited:

SmokeShow
New member
- Joined
- Apr 28, 2006
- Messages
- 4,715
Been a little bit, any progress?
I've thoroughly enjoyed following the build even if I didn't post as such with each update. Thanks for all you've shared up to this point, it really is fascinating and lets me live vicariously through you all that share your builds in such detail.
I've thoroughly enjoyed following the build even if I didn't post as such with each update. Thanks for all you've shared up to this point, it really is fascinating and lets me live vicariously through you all that share your builds in such detail.
jlibert
New member
- Joined
- Jun 28, 2007
- Messages
- 3,454
Been a little bit, any progress?
I've thoroughly enjoyed following the build even if I didn't post as such with each update. Thanks for all you've shared up to this point, it really is fascinating and lets me live vicariously through you all that share your builds in such detail.
Yeah, what he said
RATTLE N HUM
New member
- Joined
- Sep 16, 2007
- Messages
- 341
VERY nice work here!! Depending on who certifies the chassis and not sure if your done yet but the bar that comes down along the seat some will say needs to be when your sitting in the seat on your left side the bar needs to be between your shoulder and elbow...we have had two different guys cert our chassis one never mentioned it and the other failed it because it was to low. Definetly a nice looking build just a scenario that we had to deal with may or may not effect you.
Last edited:
bgreen776
White Collar Fabricator
- Joined
- Jul 12, 2012
- Messages
- 578
Been a little bit, any progress?
I've thoroughly enjoyed following the build even if I didn't post as such with each update. Thanks for all you've shared up to this point, it really is fascinating and lets me live vicariously through you all that share your builds in such detail.
Yeah, what he said
Thank you! I too live vicariously through all the various build threads across this site and others. I've made zero progress since the last update, life got in the way, but this weekend I'll finally be back to work on the chassis. No fun updates though, just more bracing and tack welding.
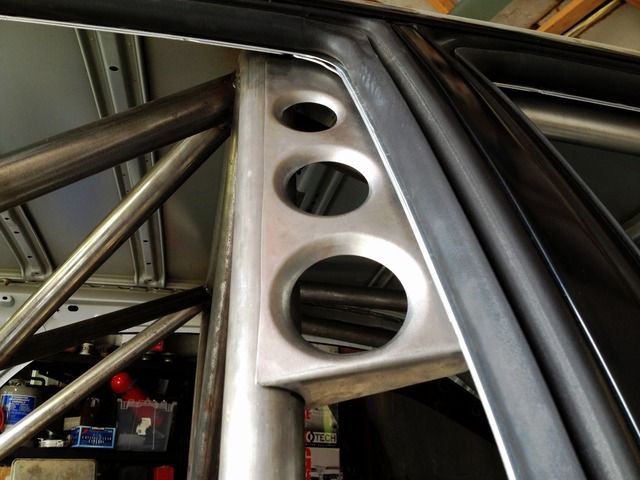
My second order of 4130 came in a week ago, I bought some lighter tubing for gussets and the bars that go from the A pillar down to the front suspension, so thats kinda exciting for me. Im also looking into buying a decent box and pan brake and a bead roller for building the floor and firewall. Any input on those tools would be greatly appreciated.
VERY nice work here!! Depending on who certifies the chassis and not sure if your done yet but the bar that comes down along the seat some will say needs to be when your sitting in the seat on your left side the bar needs to be between your shoulder and elbow...we have had two different guys cert our chassis one never mentioned it and the other failed it because it was to low. Definitely a nice looking build just a scenario that we had to deal with may or may not effect you.
Thank you! I hope I'm good to go on the door bar in relation to my elbow and shoulder. I damn sure don't want to re-work that bar! I've moved the seating location way back so the pictures probably don't look quite right.
How are you getting the tubing so shiny clean? I didn't see any flapper wheel marks on the tubing itself.
I use one of these on the German tube that has a little heavier mill scale...
https://www.amazon.com/Norton-Abrasives-7660704015-Non-Woven-Grinding/dp/B01EOEKLF6
Otherwise I just use the brown coarse Scotch Brite pads or Emery Cloth and some elbow grease.
RATTLE N HUM
New member
- Joined
- Sep 16, 2007
- Messages
- 341
YOu wouldn't have to cut anything out, just add a bar running parallel to ground and then 90 down to meet up with that other bar.