
You are using an out of date browser. It may not display this or other websites correctly.
You should upgrade or use an alternative browser.
You should upgrade or use an alternative browser.
converting 99 24 valve to 12 valve problem
- Thread starter slrrls
- Start date
kleann
VP44 pwr
- Joined
- Aug 23, 2008
- Messages
- 4,388
That's it. I just bent my strap over so I didn't have to use the long stud.
Did Destroked send you that bracket? slrrls didn't get one if I understood correctly.
What damper are you running? Looks a lot bigger around than mine. 24V?
I was just thinking about the balancer comment. The stock 12v balancers I've seen are the same size as the 24v. Maybe destroked is making the tone rings smaller now?
BigPapa
Truckless
- Joined
- Jan 25, 2008
- Messages
- 5,106
Possible. I can measure mine tomorrow.
Sorry, I don't understand why it would be at an angle?
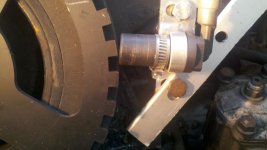
Problem I'm having is when I hold it like in Scott's picture the sensor does not put a flat surface on the tone ring but it is off angle.
Sorry, I don't understand why it would be at an angle?
Last edited:
jeffsqartan
New member
- Joined
- Aug 11, 2012
- Messages
- 3
I'm working on putting a 12 valve into a 2001 gasser, we have the motor in, but now we are worried about the harness issues that may arise. From what I've read on this thread, I have three options: option one is find a 98 12 valve and use the harness from that (I'm talking to a guy right now about trading harnesses since he is selling the motor out of his) option two is finding a 24 valve harness and modifying it and the sensors on the motor to work with that harness, and option three would be find a compan who makes custom harnesses and pay an arm and a leg to have them make one that will work.
Since I have someone who has the 98 12 valve that he is willing to trade me, would that be the best route to take? Or should I try to find the 24 valve harness and modify it?
Since I have someone who has the 98 12 valve that he is willing to trade me, would that be the best route to take? Or should I try to find the 24 valve harness and modify it?
ninerqb8
New member
- Joined
- Jun 12, 2009
- Messages
- 632
I'm working on putting a 12 valve into a 2001 gasser, we have the motor in, but now we are worried about the harness issues that may arise. From what I've read on this thread, I have three options: option one is find a 98 12 valve and use the harness from that (I'm talking to a guy right now about trading harnesses since he is selling the motor out of his) option two is finding a 24 valve harness and modifying it and the sensors on the motor to work with that harness, and option three would be find a compan who makes custom harnesses and pay an arm and a leg to have them make one that will work.
Since I have someone who has the 98 12 valve that he is willing to trade me, would that be the best route to take? Or should I try to find the 24 valve harness and modify it?
The 98 12 valve harness would be the easiest route.
slrrls
Water fuel 1st diesel 2nd
- Joined
- Jun 30, 2012
- Messages
- 135
Big papa,
Are you sure the gap you used was .02 and not .20?
When I get this mounted I'll double check the angle I mentioned if it is then I;ll post a pic.
The guy that needs the harness.
I have a complete harness with cluster and engine fuse bos from the 97 cummins truck I may part with if the swap does not work for you. Basically everything up to the fuse block in the cab. Except I'll be clipping one plug for the shut off.
BigPapa
Truckless
- Joined
- Jan 25, 2008
- Messages
- 5,106
It's just over the thickness of a credit card. My feeler gauges arent here. I think that's a lot closer to .020 than .200. 3/16" is .1875.
My tone ring is right at or just over 9" diameter. If you want an exact measurement it'll have to wait till tomorrow. I was trying to use my boys school ruler. All my tools happen to be at work this weekend.
My tone ring is right at or just over 9" diameter. If you want an exact measurement it'll have to wait till tomorrow. I was trying to use my boys school ruler. All my tools happen to be at work this weekend.
BigPapa
Truckless
- Joined
- Jan 25, 2008
- Messages
- 5,106
I see now. It may not create an issue, but I'd think with a little hole slotting you could get it a little straighter.
As to the gap, We started at .050 and it didn't work, so we decreased the gap until it worked properly. We ended up where it is. I would suggest the same kind of trial-and-error for you. Yours may not need to be that close. Really no way to actually check the gap on the 24V unless you had the oil pan off.
As to the gap, We started at .050 and it didn't work, so we decreased the gap until it worked properly. We ended up where it is. I would suggest the same kind of trial-and-error for you. Yours may not need to be that close. Really no way to actually check the gap on the 24V unless you had the oil pan off.
slrrls
Water fuel 1st diesel 2nd
- Joined
- Jun 30, 2012
- Messages
- 135
will this sensor prevent the motor from starting with the electronics?
Or is it just going to cause problems with the dash and transmission until I get it correctly gaped?
I also Have the oil pan off of the 24 valve now would it be wise to lift it up insert the sensor and have a look? or is it visible from underneath with out removing any other parts?
I would only care to look if I didn't have to dissemble anything else.
BigPapa
Truckless
- Joined
- Jan 25, 2008
- Messages
- 5,106
Nothing's going to keep the 12V from starting but the shut-off solenoid and the starter cranking if you're running the stock lift pump. If you're running an electric fuel pump, it will need to be on obviously.
I have not unplugged my crank sensor and tried it, but I would imagine that the tranny will be in limp mode, the alternator will not charge, the A/C may not work, and obviously the tach will not work or the cruise. There again, haven't tried it, just guessing.
I have not had access to a 24V with the oil pan off to check. You'll just have to look in there and see if you can see the tone wheel where the sensor is. I'd suggest looking in the bottom while someone shines a light in the sensor hole just to see where you'd need to check the gap. Then if it looks easily accessible you could put the sensor in and check the gap.
Last edited:
jeffsqartan
New member
- Joined
- Aug 11, 2012
- Messages
- 3
Thanks Secret, from what I've read that's what it sounds like. I'm betting I'll have to wire up the key to start and shut off the motor via the solenoid, but how much wiring should I expect? I'd send a PM, but I have to have 10 posts, and this is only my second :banghead: :new:
Also, slrrls, if this doesn't work out too well, I'll hit you up on that harness. Thanks all for the info!
Also, slrrls, if this doesn't work out too well, I'll hit you up on that harness. Thanks all for the info!
slrrls
Water fuel 1st diesel 2nd
- Joined
- Jun 30, 2012
- Messages
- 135
I'm trying to get this bell crank mounted.
Should I connect the cables then pull the bell crank taught to see where to mount the bell crank?
Are there no electrical connections operating off of the 24v tps in this swap?
_________________________________________
I bought this kit. 24 Valve P-Pump APPS Kit
If I did it over I would have made one myself. You take off the aluminum chunk that the 24v apps connects to and make a bracket to bolt on the p-pump and the 24v apps bracket bolts to that.
__________________________________________
Yep. I bought a kit from TURBOLVR, too.
Like I've said before, there are guys running the 12V linkage and TPS successfully with autos but I don't think the cruise will work. You're also looking at more rewiring for the TPS. I wanted the cruise so I went with the 24V bellcrank and APPS.
Scott
______________________________________________
I bought this kit. 24 Valve P-Pump APPS Kit
If I did it over I would have made one myself. You take off the aluminum chunk that the 24v apps connects to and make a bracket to bolt on the p-pump and the 24v apps bracket bolts to that.
_______________________________________________
Throttle cable - I'm running the 24V APPS bellcrank so I'm running a 24V cable, TV cable, and cruise cable.
I'm not using the fuel heater or the water-in-fuel sensor. Only electrical I'm using for fuel is for the shut-off solenoid.
Scott
__________________
Last edited:
kleann
VP44 pwr
- Joined
- Aug 23, 2008
- Messages
- 4,388
No. Use the 24v "bellcrank" and make an L shaped bracket in between the pump and 24v bellcrank to attach it to the pump. Then make a bracket to attach the governor(where back rod attaches) and make an adjustable rod to connect the 24v bellcrank and governor. This way you use the 24v apps sensor, less wiring.
kleann
VP44 pwr
- Joined
- Aug 23, 2008
- Messages
- 4,388
Bolt the aluminum piece with the spring back onto the 24v bracket. The big aluminum chunk I was talking about is the one that it mounts to the 24v head.
I guess that could be made to work if you needed it to. then you use the 12v tps sensor.
I guess that could be made to work if you needed it to. then you use the 12v tps sensor.
Last edited:
BigPapa
Truckless
- Joined
- Jan 25, 2008
- Messages
- 5,106
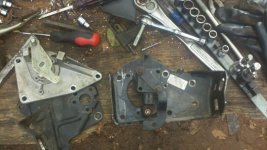
This is where the 24V bellcrank bolts up to the bracket:

Like kleann said, bolt the aluminum piece back onto the steel bracket. The assembly will bolt up where I showed you above. As kleann said, you will need to get a bracket to bolt or weld (the bellcrank is VERY hard and hard to drill) to the bellcrank where I drew the yellow box, with a hole where the green dot is for the heim joint to connect to for the linkage rod to connect to the governor lever on the P-pump. You will also need a similar bracket to bolt to the existing lever on the governor lever.
Like kleann said, bolt the aluminum piece back onto the steel bracket. The assembly will bolt up where I showed you above. As kleann said, you will need to get a bracket to bolt or weld (the bellcrank is VERY hard and hard to drill) to the bellcrank where I drew the yellow box, with a hole where the green dot is for the heim joint to connect to for the linkage rod to connect to the governor lever on the P-pump. You will also need a similar bracket to bolt to the existing lever on the governor lever.
BigPapa
Truckless
- Joined
- Jan 25, 2008
- Messages
- 5,106
Should there be zero slack in the cables when the 24v bracket is mounted?
So I do plug the 24v electrical cable back into the 24v tps sensor, what all does this sensor do?
Throttle cables should not be tight, but they shouldn't be sloppy loose either. TV cable should be no slack. Final adjustment on it will probably be bending the bracket on the tranny.
The APPS will control TC lock-up, shift points, and cruise. It basically tells the ECM what you are asking the engine to do, full throttle, mid throttle, idle, accellerating, steady cruise, etc.