
You are using an out of date browser. It may not display this or other websites correctly.
You should upgrade or use an alternative browser.
You should upgrade or use an alternative browser.
8.3L Cummins Transplant
- Thread starter 4x4dually
- Start date
Scooter's Roofing
New member
- Joined
- Oct 16, 2006
- Messages
- 17,007
Enough for a scoop and a good stack. Lol
From dumb phone.
boo to the scoop
I'll allow the stack
")
Scooter's Roofing
New member
- Joined
- Oct 16, 2006
- Messages
- 17,007
I'll allow the scoop as long as it is a b1tchin one made out of aluminum diamond plate and just bolted to the hood...
Like this
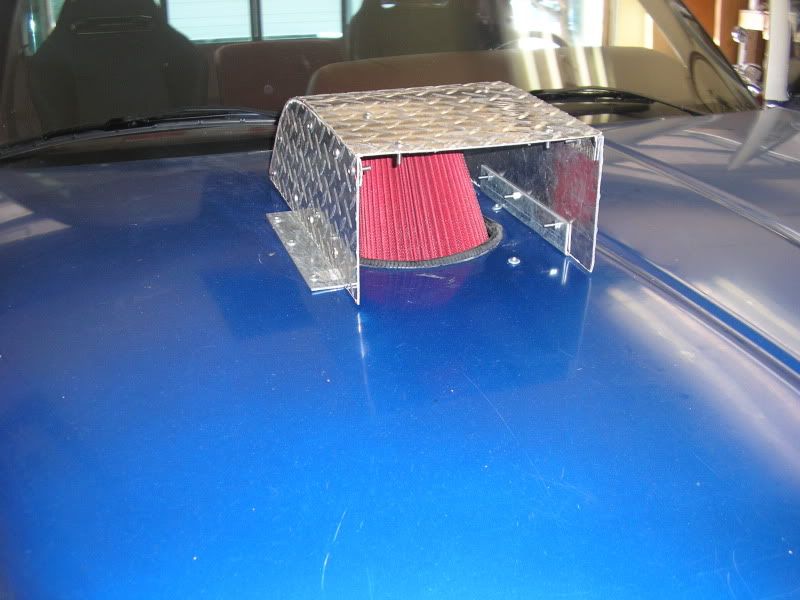
that's pretty much what any scoop, cowl induction, etc. will look like on that truck IMO

Signature600
THA MAN!
- Joined
- Aug 5, 2006
- Messages
- 12,015
LOL
You kids need to know that the more I get **** about my flip phone, the longer I resist the Ismartdroidpad thing.
GTFOML
I'm just jealous....I can't go back, wish I could, but it's been too long. That, and looking up service bulletins and parts manuals on a flip phone would be a PITA!
Chris
gorilla550
New member
- Joined
- Nov 3, 2013
- Messages
- 198
I think the 7100mumauespecial is gonna have some low end.
http://www.youtube.com/watch?v=2Hs4f89iXKc
From dumb phone.
Sounds good now to install it.
Big Swole
MegaInterceptor
- Joined
- Jun 28, 2007
- Messages
- 16,950
Not to Derail the thread but since this is about a re-power with a Big engine, (I know most hate CF) but check out this guys thread on Cummins Forum.
He's custom fitting an 8.9L into a 2011 Ram 3500.... LOTS of custom stuff and great work.
http://www.cumminsforum.com/forum/4th-gen-performance-parts-discussion/1894538-big-block-8-9l-2011-ram-build.html
Here are a couple of pics / post from there.... Nice build and can't wait to see it runs also like Jorys....
Being the gluten's for punishment that we are, CPS has decided to test the old 'There's no replacement for displacement' adage on this 2011 Ram.
The truck is a 170K mile 2011 Cab and Chassis that we've used to develop our emissions equipped tuning. After reaching 505rwhp and putting the Aisin just about to its useful end we've decided to retire the 6.7L powerplant in favor of its big block counterpart.
Here she is before we initiate our shenanigans.
The Donor: A freightliner M2106 Businessclass will offer its heart for transplant.
The build will retain common rail fuel injection and hopefully a decent amount of driveability. Our goal is to build a very high horsepower truck that spools quickly and is somewhat more reliable than a very high horsepower ISB.
Facts about the 8.9L Cummins
1. It's heavier than the 6.7~500lbs (per cummins)
2. It's 3 inches longer than the 6.7
3. It's taller and wider as well
4. Forged crank, big rods, and 2 piece monotherm style pistons (stock)
5. 540 cubic inches!
6. The control and fuel system isn't that much different than a 6.7
7. Needs an adapter plate unless using SAE #2 compatible trans
8. 14mm head bolts... stock
9. Wet sleeve engine, potential to go 47/8ths bore (640 cubic inch!)
First thing- Get our Freightliner running and see where it's at.
Guess we have a good reason to tear it down now... hah. .
More to come.
Nick


Mid mounts are shaping up nicely.
You can see how we built mid mount and how it looks in it's final configuration before powder coat. The engine is fit chassis now with the rocker box at it's running height. It's tight! I'm hoping not to run a body lift, but we may have to add an inch or two just allow access to the back of the rocker box - considering we'll probably be in there more than we plan
Front shot:
Poly Mounts:
Passenger side mid-mount complete:
Drivers side Bolted in and ready to install:
Tight like a tiger
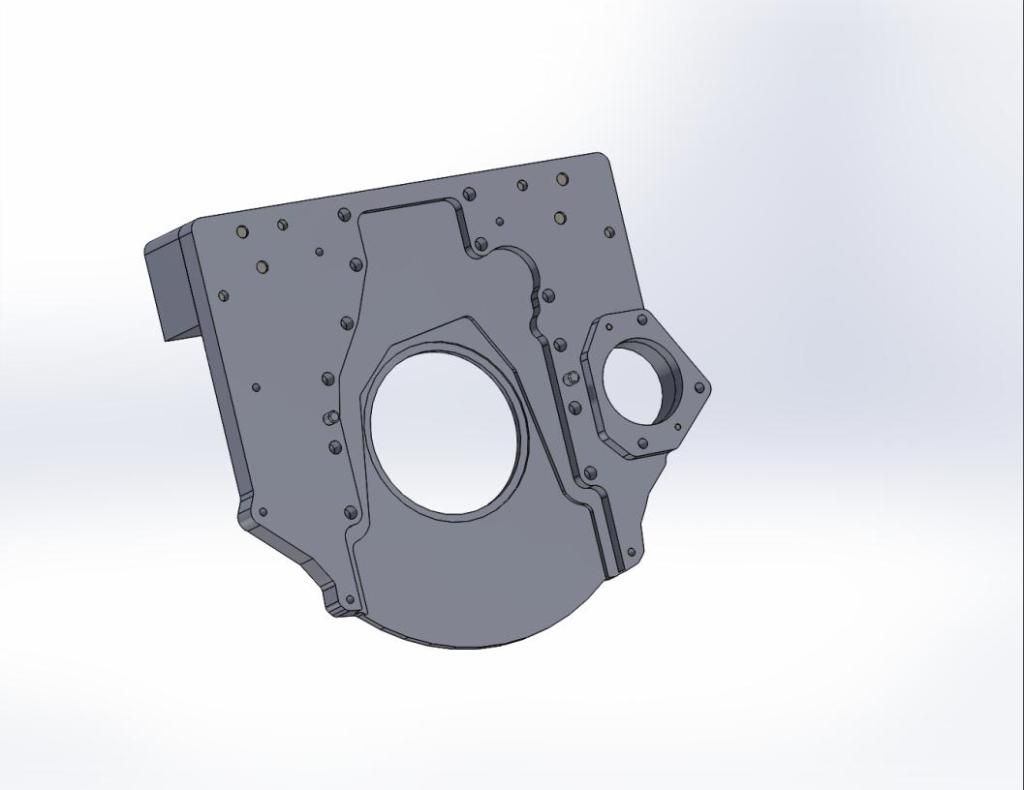
Meanwhile in adapterplate land. Drawing is nearly done, ready for test fit. Notice the big ears we added just in case we need a rear mount surface to bite on.


Big Swole
MegaInterceptor
- Joined
- Jun 28, 2007
- Messages
- 16,950
Hopefully you don't mind me sharing this Jory....Figured you like it since you're doing a re-power.
.
.
Have a few more updates for you guys - this time on the truck side of the project. This engine mounting thing is taking a lot of time and energy, but Hopefully once we finish these mounts we'll have something that can be reproduced buy one of our vendors.
In order to setup the mounts like we wanted, we needed to build a pedestal out of the factory mounts. We added considerable gusseting and tied up the factory welds.
Shot partway through the gusseting process
Making progress
Finished pedestal before paint
Shot of the passenger side engine-side mount. More holes/fasteners to come. Also were going to add a gusset to the step above the double gusset.
Painted Truck side mount:
Factory shocktower crossmember before removal. We need to remove this to clear the oil pan. We plan to rebuild a lower mount version.
Temporary front crossmember installed
Shocktower crossmember torched out and cleaned up.
As it sits today for engine fitment. We have some big polyurethane strips to build bushings out of. Once we finish the mid mount we'll rough in the ching mount. Then onto less boring fab work
Nick


Making progress on the oil pan and PCV/Valve cover the last couple days.
Chopped Oil pan:
Took the capacity down from ~28 quarts to ~15. Hope it's enough to keep this pig lubed.
Oil pan clearance after trim job, but before leveling kit:
Cleaned up Valve cover with factory CCV removed. We're going to tap the valve cover for a couple of -12 lines to vent to the atmosphere.
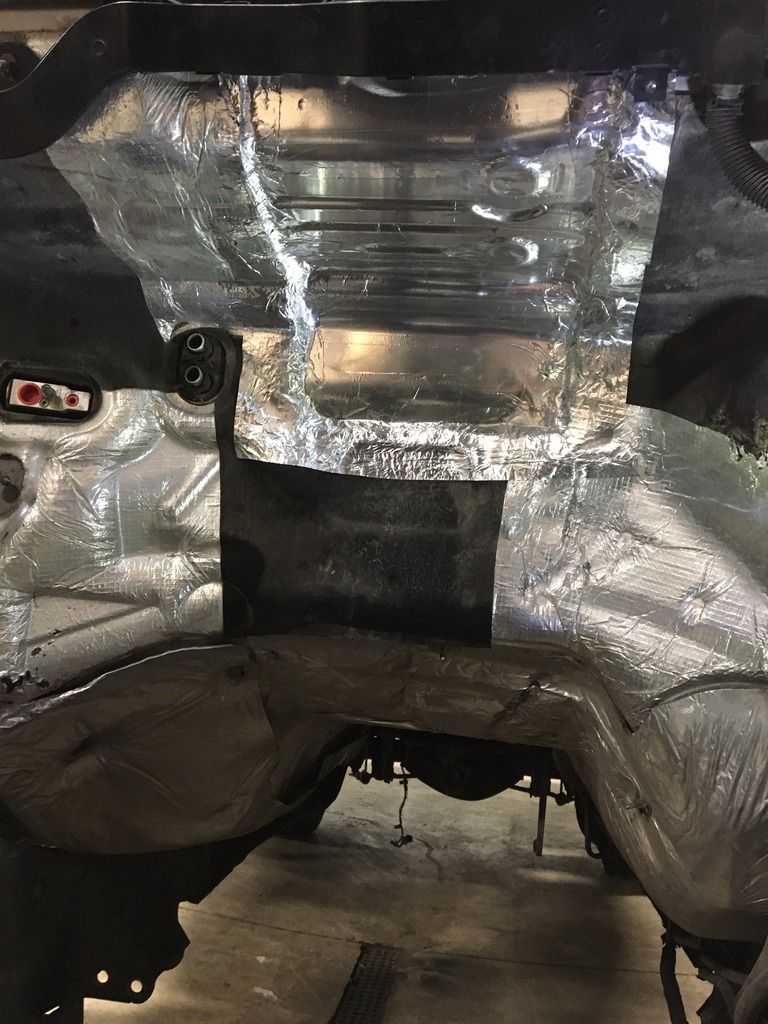
While we had the engine back out, we made more clearance at the firewall as well. Removing a little bit of insulation and cleaning it up with reflective tape.


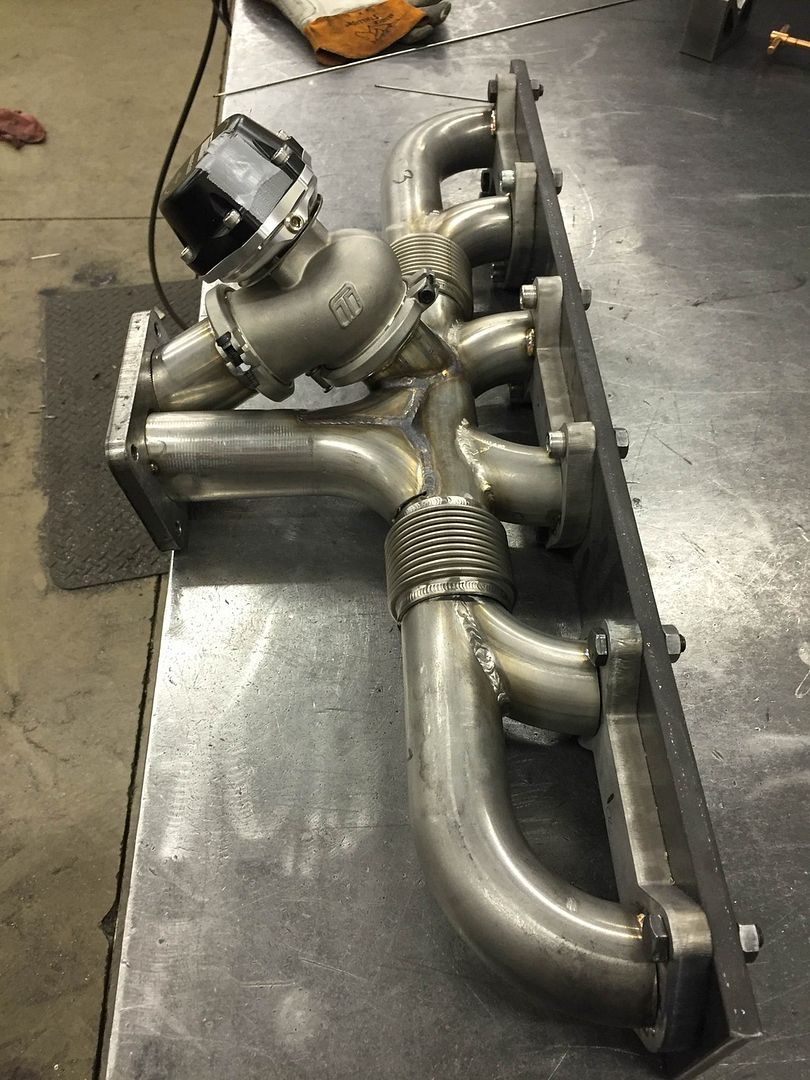
We're making a little progress here and there on this thing. Here are some more pics of a manifold I'm having built for it. I chose this design to aid with spool-up at the higher altitude. The manifold turbocharger will be an S500 with a 91mm compressor and big divided exhaust housing.
The plan is to get it spooled up on one scroll and then open the gate to feed both scrolls. There will be no wastegates in the traditional sense.


jimbo486
New member
- Joined
- Jan 24, 2010
- Messages
- 1,617
I'm going to guess next spring, 36 pages.
Well, lookie there, Jory! Getting pretty close.
Cool build. Glad the motor came together without too many headaches.
rockytopcummins
New member
- Joined
- Jul 27, 2008
- Messages
- 900
It's a torquy mofo I can tell you that.
http://www.youtube.com/watch?v=2Hs4f89iXKc
I got scared of dropping it and added some steel.

Edit: These self rotating pictures are really starting to piss me off.

Rebuild first fire? Did I miss something along the way? Did you end up doing an in frame?
- Joined
- Jan 22, 2007
- Messages
- 32,086
Looks and sounds good Jory! Now get the biatch mounted between the frame rails already!
I'm started....until I smashed the F out of my thumb last night and my left hand is pretty much useless for a few days. I guess I'll have to pause and do taxes. It's been 12 hours and I can still feel every heartbeat in it.
Hopefully you don't mind me sharing this Jory....Figured you like it since you're doing a re-power.
Not at all. I read through that thread last week. However, a simple link would have sufficed instead of making me scroll through page after page of the thread copy.
Rebuild first fire? Did I miss something along the way? Did you end up doing an in frame?
Not sure what anyone considers a rebuild or not. I was just saying that it was the first time that I started the new motor since I bought it and after a liner and piston replacement, all seals, head job, new IP, oil sump change, turbo move, yada yada yada. I consider it a rebuild but hell, what do I know. LOL
Last edited:
- Joined
- Jan 22, 2007
- Messages
- 32,086
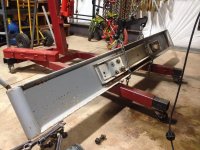
I can't wait for all these wires to be GONE. Someone did an exceptional hack job on everything. What a freakin' mess.
Commencing the fun:

I feel for the puke that ever pulls out in front of me. That bumper is one heavy SOB.

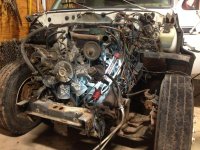
About as far as I got before injury. LOL A person simply doesn't realize how important a thumb is until it is out of commission for a few days. Yes...even on the left hand. :hehe:

The Detroit actually fired up on the first hit on the key and I drove it in the shop. I was amazed. Has coolant in the pan and a ticking noise. I'm assuming it is a head gasket but it could go slightly deeper. Don't know. Here is a video of it running before I took everything off. If anyone wants it for something, holler. I'll make a great deal on it. It will come with everything from flywheel to fan, including the compressor if anyone wants it.
[ame="http://www.youtube.com/watch?v=fFpWfFW_2OU"]http://www.youtube.com/watch?v=fFpWfFW_2OU[/ame]
Commencing the fun:
I feel for the puke that ever pulls out in front of me. That bumper is one heavy SOB.
About as far as I got before injury. LOL A person simply doesn't realize how important a thumb is until it is out of commission for a few days. Yes...even on the left hand. :hehe:
The Detroit actually fired up on the first hit on the key and I drove it in the shop. I was amazed. Has coolant in the pan and a ticking noise. I'm assuming it is a head gasket but it could go slightly deeper. Don't know. Here is a video of it running before I took everything off. If anyone wants it for something, holler. I'll make a great deal on it. It will come with everything from flywheel to fan, including the compressor if anyone wants it.
[ame="http://www.youtube.com/watch?v=fFpWfFW_2OU"]http://www.youtube.com/watch?v=fFpWfFW_2OU[/ame]
Attachments

Last edited:
jimbo486
New member
- Joined
- Jan 24, 2010
- Messages
- 1,617
A person simply doesn't realize how important a thumb is until it is out of commission for a few days. Yes...even on the left hand. :hehe:
"I don't have any thumbs!"
- Ron White.
:hehe:
- Joined
- Jan 22, 2007
- Messages
- 32,086
"I don't have any thumbs!"
- Ron White.
:hehe:
^^^ Classic. :hehe: Thanks for reminding me of that. I'm having trouble remembering to only hit the space bar with my right thumb. Every time I hit it with my left you hear *^&%&* from my office. LOL
Destroked 450
Member
- Joined
- Mar 12, 2015
- Messages
- 341
I'm left handed, that thump is very important to me. I busted it up bad some years ago and couldn't use it a three months. Try wiping your back side with the wrong hand, make sure and wash up when your done.
- Joined
- Jan 22, 2007
- Messages
- 32,086
After several days of recovery I can finally move my thumb almost full range again...at least enough to work. Got the engine almost ready to pull. I think almost everything is loose from it. I'll try to get the transmission pulled tonight or tomorrow so I can get the motor out sometime this weekend. I pulled the PTO hydraulic pump off last night. I just need to pull the tower and four bolts and it should drop. I had to stop early since I accidentlly dipped my hair in a huge puddle of hyd fluid. LOL What a freakin' mess. LOL

Pretty sure potatoes would grow under the floor mats. Man, this thing is a mess. Gonna have to buy some new flooring and pad from JC Whitney or somewhere cheap.

Pretty sure potatoes would grow under the floor mats. Man, this thing is a mess. Gonna have to buy some new flooring and pad from JC Whitney or somewhere cheap.
![IMG_6856[1].jpg](/data/attachments/53/53964-6399152ca17ce244c230850782b94462.jpg?hash=Y5kVLKF84k)
![IMG_6855[1].jpg](/data/attachments/53/53965-44fe41768f338d6d55a040bf75069dab.jpg?hash=RP5Bdo8zjW)