
You are using an out of date browser. It may not display this or other websites correctly.
You should upgrade or use an alternative browser.
You should upgrade or use an alternative browser.
95' Junker Drag Truck
- Thread starter Big Blue24
- Start date
Big Blue24
Comp Diesel Sponsor
- Joined
- Jan 5, 2008
- Messages
- 6,320
Any strength concern with your front mounts when it comes time to get some real tires?
We'll see if they bend. I've already thought up a couple of ways to make fabrication easier for a beginner fabricator like me, so if they break, I'll build them back stronger.
I actually started out with an 8" right triangle made out of 3 layers of 16 gauge sheet metal that I laminated together. The mount holes didn't look like they were far enough apart so I added the 3/16" thick x 2" wide flat bars.
If I were to do it again, I'd laminate (2) 1/8" flat bars and eliminate the triangle. Probably add (1) 1/8" flat bar as a triangular brace (the hypotenuse leg in trigonometry terms).
SSpeeDEMONSS
Still Learning
- Joined
- May 11, 2006
- Messages
- 3,370
why not just use 1/4"?
Garrett
Garrett
Big Blue24
Comp Diesel Sponsor
- Joined
- Jan 5, 2008
- Messages
- 6,320
Big Blue24, did you advance the fuel timing on your p7100 yourself? If so, how did you know when you were at 24 degrees BTDC?
I set the timing myself.
First step, locate true top dead center. I over tightened the valve lash on a valve in cylinder # 1 and barred the motor. When the piston hit the valve, I made a mark on the dampener right where a belt crosses. Next I loosened the valve and barred the motor past TDC. Then I tightened the valve to the exact same tightness, and turned the motor over backwards using the alternator 7/8" nut. When the piston made contact with the valve, I marked the dampener. Halfway between the two marks is true top dead center.
Second step, I removed the lower plug on the injection pump. using a mirror, you can see a metal finger that rotates and comes centered in the hole when the motor is at or near TDC, depends on if timing has slipped.
Third step, look at the engine data plate on the side of the timing case. It lists the stock timing, I think mine was somewhere around 12.3*. The pump is setup to have the metal finger centered in the hole at at stock timing. Basically, if the motor is at TDC, and the metal finger is centered in the hole, your pump/motor is set at stock timing.
Fourth step, measure the diameter of the dampener. These are made up numbers and not accurateFor ease of math, lets say it's 10 inches across i think it is closer to 8" in actuality. There are 360 degrees in a circle and the distance around a circle is pi x diameter. 3.1415 x 10 inches = 31.4". 31.4" divided by 360 =0.087" per degree. Next decide how many degrees before top dead center you want for timing. Lets say you wanted 17.3*, that's exactly 5* before stock timing so you take 0.087" per degree and multiply by 5 and you'd end up with 0.436".
Fifth step, measure back or counter clockwise 0.436" on the dampener from your TDC mark and make a mark.
Sixth step, remove the oil fill tube and break the pump shaft nut loose. Then carefully bar the motor back to TDC. This will put that metal finger centered in the hole. Once at TDC, put a puller on the pump gear and pull it loose from the pump shaft.
Seventh step, turn the motor backwards using the alternator nut till your exactly at your new timing mark 0.436" before TDC. Now check to make sure the pump didn't move backwards with the motor. If you pulled the gear loose, the pump should not move. Use a mirror and check that the metal finger is still centered in the hole.
Eighth step, clean the pump shaft really well with brake parts cleaner or electrical parts cleaner. Then reinstall the pump gear on the shaft and tighten it to about 45 ft lbs. Double check that the when the motor is on your new timing mark, that the pump's metal finger is centered in the hole. If it is, finish tightening the pump shaft nut to 150-175 ft lbs.
Ninth step, put everything back together, congratulations, you have advanced your timing for next to nothing.
On my truck 12 degrees more than stock or 24.3 degrees total worked out to roughly 0.84". Those who "fly by the seat of their pants" should be fine setting the timing somewhere between 1/4" and 1/2" back from TDC.
If you're cheap like me and you don't have $150+ to fork out for a timing kit, all that you need is a $15 gear/pulley puller from Harbor Freight, an old compact make-up case with a mirror from the wife or girlfriend, and a good tape measure or $10 set of calipers from Harbor Freight.
Big Blue24
Comp Diesel Sponsor
- Joined
- Jan 5, 2008
- Messages
- 6,320
why not just use 1/4"?
Garrett
1/4" plate is expensive and it's a lot of work to cut (4) big triangles out of solid plate. Much easier in my opinion to buy 2" flat stock and butt and overlap opposite layers and add a few quick welds with the flux core welder.
That said, if I had some extra 1/4" plate laying around, I'd use that before spending $ at the metal store or Home Depot to buy 2" x 1/8" flat stock.
White Knight
New member
- Joined
- Aug 18, 2007
- Messages
- 1,380
I set the timing myself.
First step, locate true top dead center. I over tightened the valve lash on a valve in cylinder # 1 and barred the motor. When the piston hit the valve, I made a mark on the dampener right where a belt crosses. Next I loosened the valve and barred the motor past TDC. Then I tightened the valve to the exact same tightness, and turned the motor over backwards using the alternator 7/8" nut. When the piston made contact with the valve, I marked the dampener. Halfway between the two marks is true top dead center.
Second step, I removed the lower plug on the injection pump. using a mirror, you can see a metal finger that rotates and comes centered in the hole when the motor is at or near TDC, depends on if timing has slipped.
Third step, look at the engine data plate on the side of the timing case. It lists the stock timing, I think mine was somewhere around 12.3*. The pump is setup to have the metal finger centered in the hole at at stock timing. Basically, if the motor is at TDC, and the metal finger is centered in the hole, your pump/motor is set at stock timing.
Fourth step, measure the diameter of the dampener. These are made up numbers and not accurateFor ease of math, lets say it's 10 inches across i think it is closer to 8" in actuality. There are 360 degrees in a circle and the distance around a circle is pi x diameter. 3.1415 x 10 inches = 31.4". 31.4" divided by 360 =0.087" per degree. Next decide how many degrees before top dead center you want for timing. Lets say you wanted 17.3*, that's exactly 5* before stock timing so you take 0.087" per degree and multiply by 5 and you'd end up with 0.436".
Fifth step, measure back or counter clockwise 0.436" on the dampener from your TDC mark and make a mark.
Sixth step, remove the oil fill tube and break the pump shaft nut loose. Then carefully bar the motor back to TDC. This will put that metal finger centered in the hole. Once at TDC, put a puller on the pump gear and pull it loose from the pump shaft.
Seventh step, turn the motor backwards using the alternator nut till your exactly at your new timing mark 0.436" before TDC. Now check to make sure the pump didn't move backwards with the motor. If you pulled the gear loose, the pump should not move. Use a mirror and check that the metal finger is still centered in the hole.
Eighth step, clean the pump shaft really well with brake parts cleaner or electrical parts cleaner. Then reinstall the pump gear on the shaft and tighten it to about 45 ft lbs. Double check that the when the motor is on your new timing mark, that the pump's metal finger is centered in the hole. If it is, finish tightening the pump shaft nut to 150-175 ft lbs.
Ninth step, put everything back together, congratulations, you have advanced your timing for next to nothing.
On my truck 12 degrees more than stock or 24.3 degrees total worked out to roughly 0.84". Those who "fly by the seat of their pants" should be fine setting the timing somewhere between 1/4" and 1/2" back from TDC.
If you're cheap like me and you don't have $150+ to fork out for a timing kit, all that you need is a $15 gear/pulley puller from Harbor Freight, an old compact make-up case with a mirror from the wife or girlfriend, and a good tape measure or $10 set of calipers from Harbor Freight.
How did you account for backlash? Good method, but you should always come up to your marks going the direction of engine rotation. Idk how any degrees of backlash are in everything but I wouldn't be surprised if you were 3-4* short of your mark.
:Cheer:
Big Blue24
Comp Diesel Sponsor
- Joined
- Jan 5, 2008
- Messages
- 6,320
How did you account for backlash? Good method, but you should always come up to your marks going the direction of engine rotation. Idk how any degrees of backlash are in everything but I wouldn't be surprised if you were 3-4* short of your mark.
:Cheer:
In my humble opinion, worrying about back lash's effect on timing is useless. For all i know, I rolled the motor too far rearward and when barring it back forward i removed all of the lash. The pump gear could have settled in a bit and slipped 1-2* as well. I appreciate the insight and you are right, gear lash does have an effect on timing.
When you consider that I changed DV's, Injectors, and altered lift pump pressure, who really knows where timing is exactly? All of these things have an effect timing.
Timing is relative, the type of fuel or additives, air temp, boost, compression ratio, water injection, etc all have an effect on timing. I don't believe static timing on these diesel motors is an exact science and that's why i said 1/4" to 1/2" is good enough for most daily drivers.
npe3484
I hate ATF
- Joined
- May 10, 2009
- Messages
- 792
Big Blue24, did you have to pull the entire timing cover off or just the oil filler neck?
I appreciate you taking the time to type those instructions, they are incredibly helpful!
You won't need to pull the timing cover unless you mistakenly drop something (pump nut, lock washer, etc.) into the timing case. However, if you haven't done the KDP fix yet, you might as well do that and change your timing at the same time. That will require removing the cover.
Big Blue24
Comp Diesel Sponsor
- Joined
- Jan 5, 2008
- Messages
- 6,320
Correct, no need to pull the cover, just remove the oil filler neck.
I pulled the cover when I first got this truck to put a tab over the (KDP) killer dowel pin. At that time, I wasn't ready to bump the timing because I wanted to get a few stock baseline runs and torque down the head bolts first.
Also, to remove the front cover, you have to remove the harmonic dampener so if you set timing with the front cover removed, you'd have to buy a mechanic's dial and measure plunger lift on the front barrel of the injection pump.
I pulled the fuel plate out of my truck this weekend, I'm very surprised about how much my power increased!
I found true TDC using the "touch" valve method, and found that my p7100 was firing at 5.5 degrees BTDC. I guess it slipped at some point, since my motor has over 200,000 miles on it. I set it at about 19.5 degrees BTDC. Thanks again for your super clear instructions. I noticed an immediate performance difference: I lost a lot of torque at idle, but my power above 1800 rpm definitely increased. The engine noise is quite a bit louder now, and the exhaust noise is quieter.
After I drive it a little while, I'll let you know about any changes in fuel economy.
Big Blue24
Comp Diesel Sponsor
- Joined
- Jan 5, 2008
- Messages
- 6,320
If idle noise increased, topend increased, and you lost some lower rpm torque, it sounds like you did indeed advance your timing.
It wasn't so hard was it!
Now you need to modify your AFC, you can easily pick up another 30-50 HP with a few simple AFC modifications.
AFC mods will not help your fuel economy, they'll just make you a hot-rod!
It wasn't so hard was it!
Now you need to modify your AFC, you can easily pick up another 30-50 HP with a few simple AFC modifications.
AFC mods will not help your fuel economy, they'll just make you a hot-rod!
Big Blue24
Comp Diesel Sponsor
- Joined
- Jan 5, 2008
- Messages
- 6,320
Well, I've had the Junker for just over 1 year now. 1/4 times have improved significantly since baseline stock run of 20.227 @ 65.35 MPH to current best of 13.68 @ 100.8 MPH.
In the past few months the Junker has eaten:
(1) HE351ve vgt turbo
(1) WH1C stock turbo bushings
(1) exhaust manifold to turbo gasket
(1) Dana 70 rearend.
(40) gallons of #2 diesel fuel
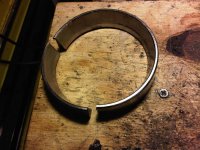
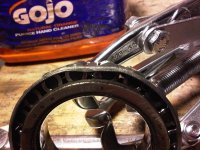
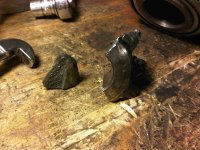
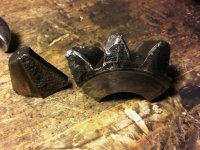
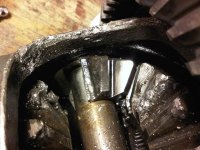
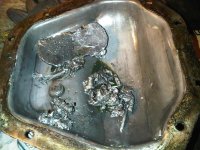
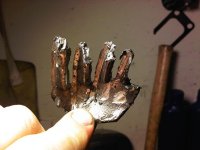
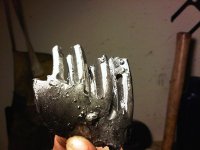
Unfortunately, it looks like either one of my terrible welds failed or possibly one of my wedged bolts put a point load on one of the spider gears and caused it to fail which in turn caused more of my poor quality welds to fail and eventually spit a bunch of metal outside the carrier and into the axle housing. Then it looks like some debris got wedged between the spinning carrier and the axle housing itself and caused the driver's side carrier bearing to break the outer race.
The ring gear and pinion look fine so I'm going to throw in a new set of carrier bearings and hope for the best.
I'm also going do a better job of welding the rear, might take it to a professional welder, we'll see.
In the past few months the Junker has eaten:
(1) HE351ve vgt turbo
(1) WH1C stock turbo bushings
(1) exhaust manifold to turbo gasket
(1) Dana 70 rearend.
(40) gallons of #2 diesel fuel
Unfortunately, it looks like either one of my terrible welds failed or possibly one of my wedged bolts put a point load on one of the spider gears and caused it to fail which in turn caused more of my poor quality welds to fail and eventually spit a bunch of metal outside the carrier and into the axle housing. Then it looks like some debris got wedged between the spinning carrier and the axle housing itself and caused the driver's side carrier bearing to break the outer race.
The ring gear and pinion look fine so I'm going to throw in a new set of carrier bearings and hope for the best.
I'm also going do a better job of welding the rear, might take it to a professional welder, we'll see.
Attachments
DIESELGUY84
Bracket Racer
- Joined
- Nov 25, 2008
- Messages
- 164
Do mini spools exist for Dana 70's? IIRC I've seen them as cheap as $75 for other axles, might be a bit more reliable than the welded gears.$.02
If idle noise increased, topend increased, and you lost some lower rpm torque, it sounds like you did indeed advance your timing.
It wasn't so hard was it!
Now you need to modify your AFC, you can easily pick up another 30-50 HP with a few simple AFC modifications.
AFC mods will not help your fuel economy, they'll just make you a hot-rod!
It wasn't a bad job at all. I replaced the factory AFC spring with one that has a smaller rate, the star wheel is not compressing it. What other AFC mods were you recommending?
Are you still wanting a replacement HE351VE? You can get 'em for less than $105 shipped off of ebay.
Joker12valve
New member
- Joined
- Nov 26, 2006
- Messages
- 259
i got a price for one and they wanted 500 for a mini spool. i will just have some one else that knows how to weld do it for that price
DIESELGUY84
Bracket Racer
- Joined
- Nov 25, 2008
- Messages
- 164
i got a price for one and they wanted 500 for a mini spool. i will just have some one else that knows how to weld do it for that price
Who did you get that price from? I'm looking in the summit racing cataolg and they list mini spools for a GM 12 bolt for $92. I wouldn't think one for a Dana 70 or 80 would be much more, but I've been wrong before!!